

One of the best secrets the web keeps hidden is YQL, for those of you who’ve never heard of this little hidden gem, YQL stands for “Yahoo Query Language” and it’s an SQL-like syntax that allows you access to the masses of information available in Yahoo’s many different data stores.
In this post, we’re going to explore using the “geo.placefinder” lookup to find UK post codes and then show their location using a map in a desktop WPF application using the “Great Maps” toolkit.
So, What Exactly Is YQL?
There’s not really an easy way to define YQL in one sentence, but it’s a language that it interpreted by the YQL service, and under the hood turned into whatever is needed to query the requested resources. However, it’s not just a universal database layer for all of Yahoo’s data; it can, for example, be used to query your Yahoo Email account (if you have one), and it can be instructed to parse web pages, RSS feeds, and all manner of other resources, and then return the data in either XML- or JSON-based formats.
One of the things that YQL is most used for, in fact, is to query XML-based RSS streams, and return the results as a JSON result set, thus allowing a quick and easy way to convert RSS to JSON. If you want to have a play with the YQL service, Yahoo provide a developers console at
https://developer.yahoo.com/yql/console
and the best thing is, you don’t need to have an account or be logged in to use a large chunk of the service.
When you view the console, you’ll see a number of data tables down the left hand side, a box to enter your YQL query, and a number of samples to get you started.
We’ll be using the ‘geo.placefinder’ method, so if you enter
select * from geo.placefinder where text="DH1 1HR"
into the YQL statement box on the console page, click the JSON button, and then click test, YQL should then go off and look for the UK postal code ‘DH1 1HR’ and come back with various bits of information about it.
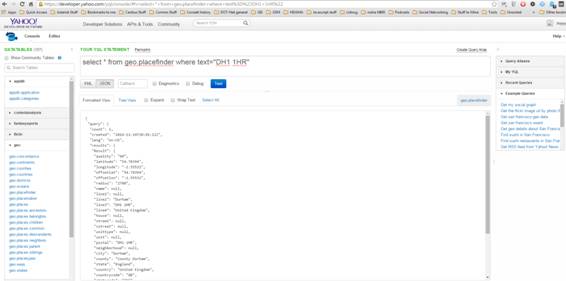
Figure 1: Retrieving the postal code information
Among the data that you get back you should be able to see that you get a latitude and a longitude value. With these two values, we could then plug them into Google maps, for example, and it would show us where that postal code was located. I would also guess that you could potentially put in postal codes from other countries in here too, but I can’t say 100% what would and would not work as I’ve not tested it.
If you look at the bottom of the console screen, you should see something like this:
![]()
Figure 2: Observing the postal code information
This is the URL you need to call from your favourite programming language to get that data back into your application. In particular, if you look closely, you’ll see that your postal code text has been plugged in there, so all you need to do to create an application that can search on any given code, is to remove that section of the string and replace it with a new bit of text.
With that in mind, fire up Visual Studio, and create a new WPF application project. Use the following base XAML code for your main window
<Window x_Class="yqlpostcodelookup.MainWindow"

      xmlns_x="http://schemas.microsoft.com/winfx/2006/xaml"
      Title="YQL Postcode Lookup" Height="600" Width="800">
   <Grid>
      <Grid.ColumnDefinitions>
         <ColumnDefinition Width=".25*"/>
         <ColumnDefinition Width=".75*"/>
      </Grid.ColumnDefinitions>
   </Grid>
</Window>
This will create a base window off 800×600 with a left hand bar that is a quarter of the width of the window, and a main right hand pane that’s three quarters of the width.
To continue, we’re now going to add a search box, a button to trigger the search, and some controls to display our status to the left hand bar. Add the following XAML just after the end of the grid column definitions in the previous XAML code, to define our left hand bar.
<StackPanel Grid.Column="0" Background="Beige">
   <TextBlock Text="Postcode to search for:" Margin="10"/>
   <TextBox x_Name="txtCodeToSearch" Margin="10,0,10,10"
      BorderBrush="Black" BorderThickness="1" Background="White"/>
   <Button x_Name="btnDoSearch" Content="Search"
      Margin="10,0,10,10"></Button>

   <TextBlock Text="Results:" Margin="10,50,10,10" FontWeight="Bold"/>

   <TextBlock Text="Latitude" Margin="10,10,10,0"/>
   <TextBlock x_Name="txtLatVal" Text="0" Margin="10,0,10,0"/>

   <TextBlock Text="Longitude" Margin="10,10,10,0"/>
   <TextBlock x_Name="txtLongVal" Text="0" Margin="10,0,10,0"/>

   <TextBlock Text="City" Margin="10,10,10,0"/>
   <TextBlock x_Name="txtCityVal" Text="x" Margin="10,0,10,0"/>

   <TextBlock Text="County" Margin="10,10,10,0"/>
   <TextBlock x_Name="txtCountyVal" Text="x" Margin="10,0,10,0"/>

   <TextBlock Text="Country" Margin="10,10,10,0"/>
   <TextBlock x_Name="txtCountryVal" Text="x" Margin="10,0,10,0"/>

</StackPanel>
By now, your form should look something like the following.
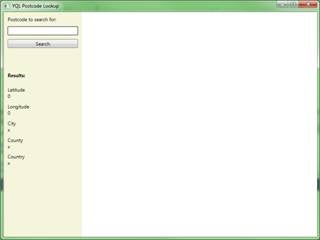
Figure 3: The form is progressing
At this point, we’ll now switch to code view and start adding some code to query the YQL service.
Make sure your code behind looks similar to the following:
using System.IO;
using System.Net;
using System.Windows;

namespace yqlpostcodelookup
{
   public partial class MainWindow : Window
   {
      public MainWindow()
      {
         InitializeComponent();

       InitializeResultDefaults();
      }

      private void InitializeResultDefaults()
      {
         txtCityVal.Text = "Unknown";
         txtCountryVal.Text = "Unknown";
         txtCountyVal.Text = "Unknown";
         txtLatVal.Text = "0";
         txtLongVal.Text = "0";

      }

      private void BtnDoSearchClick(object sender,
         RoutedEventArgs e)
      {
         if(string.IsNullOrWhiteSpace(txtCodeToSearch.Text))
         {
            MessageBox.Show("Please enter a postal code to
               search for");
            return;
      }

      string jsonString = PerformYqlSeqrch(txtCodeToSearch.Text);
   }

      private string PerformYqlSeqrch(string postalCode)
      {
         string urlString =
            @"https://query.yahooapis.com/v1/public/yql?q=select
            * from geo.placefinder
               where text=""{0}""&format=json&callback=";
         string resultJson = string.Empty;

         try
         {
            WebClient webClient = new WebClient();
            Stream dataStream =
               webClient.OpenRead(string.Format(urlString,
                  postalCode));
            StreamReader reader = new StreamReader(dataStream);
            resultJson = reader.ReadToEnd();
            if (dataStream != null) dataStream.Close();
            reader.Close();
         }
         catch(WebException)
         {
            // Result is an empty JSON object
            resultJson = "{}";
         }

         return resultJson;
      }

   }
}
And, change your main window XAML for the search button to the following so that it fires the search correctly.
<Button
   x_Name="btnDoSearch"
   Content="Search"
   Margin="10,0,10,10"
   Click="BtnDoSearchClick">
</Button>
You’ll see from the preceding code that we’ve copied the string from the bottom of the YQL console and changed it back to a more readable string, followed by making the post code section a parameter that can be added by using string.format. If we now run the application by using F5, enter a postal code (for example DH1 1HR) into the search box, and then click search. Our app will fire off a request to the YQL service and come back with some JSON. At this point, however, we’ve not yet wired anything up in the UI.
Because there are no readymade libraries for YQL, we’ll need to process the JSON returned ourselves, and to make that easy, we’ll use the excellent Newtonsoft JSON library available on NuGet. Use NuGet to install the “Json.Net” NuGet Package into our WPF project.
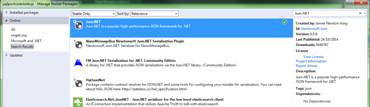
Figure 4: Installing the “Json.Net” NuGet Package
Newtonsoft JSON makes parsing complex JSON objects child’s play. By using the .NET dynamic object services, you can easily take an unknown JSON string and parse it to gain useful information.
Add the following method to your WPF form class to take the JSON data we retrieve from YQL and turn it into an object we can work with.
private LocationInfo ParseYqlJsonData(string jsonData)
{
   dynamic task = JObject.Parse(jsonData);

   var count = task.query.count.Value;
   int objectCount = 0;

   if(count != null) objectCount = Convert.ToInt32(count);

   if (objectCount == 0) return new LocationInfo();

   JObject resultObject = objectCount > 1 ?
      task.query.results.Result[0] : task.query.results.Result;

   if(resultObject == null)
   {
      return new LocationInfo();
   }

   LocationInfo result = new LocationInfo();

   var latitude = resultObject["latitude"].ToString();
   if(latitude != null)
   {
      result.Latitude = Convert.ToDouble(latitude);
   }

   var longitude = resultObject["longitude"].ToString();
   if (longitude != null)
   {
      result.Longitude = Convert.ToDouble(longitude);
   }

   var city = resultObject["city"].ToString();
   if (city != null)
   {
      result.City = city;
   }

   var county = resultObject["county"].ToString();
   if (county != null)
   {
      result.County = county;
   }

   var country = resultObject["country"].ToString();
   if (country != null)
   {
      result.Country = country;
   }

   return result;
}
You’ll also need to add a new class called ‘LocationInfo’ that has the following definition:
namespace yqlpostcodelookup
{
   class LocationInfo
   {
      public double Latitude { get; set; }
      public double Longitude { get; set; }
      public string City { get; set; }
      public string County { get; set; }
      public string Country { get; set; }

      public LocationInfo()
      {
         Latitude = 0;
         Longitude = 0;
         City = "Unknown";
         Country = "Unknown";
         County = "Unknown";
      }

   }
}
With these two changes in place, and the following code added to the search button click handler
string jsonString = PerformYqlSeqrch(txtCodeToSearch.Text);
LocationInfo result = ParseYqlJsonData(jsonString);

txtLatVal.Text =
   result.Latitude.ToString(CultureInfo.InvariantCulture);
txtLongVal.Text =
   result.Longitude.ToString(CultureInfo.InvariantCulture);
txtCityVal.Text = result.City;
txtCountyVal.Text = result.County;
txtCountryVal.Text = result.Country;
you should now find that you can enter a postal code into the search box, click search, and have the values filled in for you.
Just before anyone starts to write a comment about doing any of this using MVVM, however, please remember that this is just an example of using YQL. Please don’t write your own UI update code the same way as I have done here. My code is deliberately simple so you can focus on the important bits; there are much better ways of doing this, especially where getting the data from the YQL URL is concerned.
The last bit we need to look at is adding a map to show the searched location. We’ll do this by using a NuGet package called “Great Maps” that will add support for the most common arial and standard street maps available for public consumption on the web. Fire up NuGet and search for and install the package named “GMap.NET.Presentation”.

Figure 5: Installing “GMap.NET.Presentation”
Then, we’ll be ready to add a map to the right hand side of our UI. To get the map into our XAML, we need to add a new namespace to our window. You can do this by adding:
xmlns:gMap="clr-namespace:GMap.NET.WindowsPresentation;
   assembly=GMap.NET.WindowsPresentation"
to the XAML window declaration, making the full declaration look something like the following:
<Window x_Class="yqlpostcodelookup.MainWindow"

   xmlns_x="http://schemas.microsoft.com/winfx/
      2006/xaml"
   xmlns_gMap="clr-namespace:GMap.NET.WindowsPresentation;
      assembly=GMap.NET.WindowsPresentation"
   Title="YQL Postcode Lookup" Height="600"
      Width="800">
Once we’ve declared the namespace, we then can add some code to the actual XAML markup where we want our map to appear. Add the following XAML just after the closing ‘StackPanel’ used to create the left hand information section.
   <Grid Grid.Column="1">
      <gMap:GMapControl Margin="10"
         x_Name="mainMap"
         MinZoom="1"
         MaxZoom="20"
         Zoom="17"/>
   </Grid>
This will set up our default map holder and add the appropriate objects to our markup.
Once we have the XAML side of things working, we then need to add a small bootstrap function to our code behind. We do this by using the following method:
private void SetupGmaps()
{
   mainMap.MapProvider = GMapProviders.BingSatelliteMap;
   mainMap.Position = new PointLatLng(0, 0);
   mainMap.MinZoom = 1;
   mainMap.MaxZoom = 25;
   mainMap.Zoom = 16.0;
}
If you press F5 at this point and run your app, you should see your app start up with a blank grey map. (This is normal as your centred at 0,0, which is the Equator.)
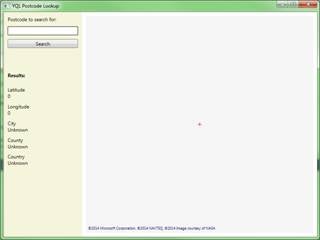
Figure 6: The map shows when you run your app
You might (depending on your project configuration) see the following, however:
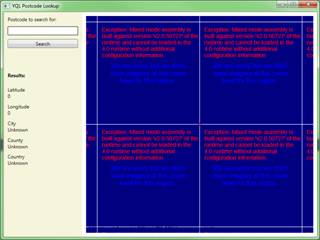
Figure 7: Your project could, instead, look like this
If you do, you need to set your application to use the legacy version 2 .NET runtime policy. Find the ‘Startup’ section in your app.config file (it’ll look like the following):
   <startup>
      <supportedRuntime version="v4.0"
      sku=".NETFramework,Version=v4.5" />
   </startup>
and change it so that it has the following attribute:
   <startup useLegacyV2RuntimeActivationPolicy="true">
      <supportedRuntime version="v4.0"
         sku=".NETFramework,Version=v4.5" />
   </startup>
When you now run your application, everything should work as expected.
The final thing we now need to do is to add a line into the search button handler that changes our map’s centre point to the co-ordinates received from the YQL JSON data. We can do this by adding the following line:
mainMap.Position = new
   PointLatLng(result.Longitude, result.Latitude);
just after the code that sets the various strings in our information display. If you now enter a post code into the search box—for example, DH1 1HR—and then click search, your map should update to show the location of that post code.
And that’s it. You now have an app that can pretty much search for anything that the YQL system can find and perform a reverse geocode on, and then display a map of that location. There’s much more you can do with the app as it stands. For example, you could implement manual scrolling of the map, or a drop-down enabling you to change the map type. You could even try using some of the many geospatial utility libraries that exist on NuGet to provide co-ordinate conversion and lots of other tricks.
If you have any ideas for topics you’d like to see covered in this column, please add a comment below or come and find me lurking around in the Lidnug (Linked .NET users group) in Linked-In and ask me directly. If I can help, I’m more than happy to oblige.