

By Wayne Plourde
If you have been in the software development business for any length of time, I am sure that you have read books and articles extolling the virtues of designing your Web-based or client-server based applications in multiple tiers or layers – distinctly separating code intended for Presentation (User Interface), Business Rules, and Data Access (see Robert Chartier’s article on n-tier application architecture – https://www.codeguru.com/csharp/.net/net_data/article.php/c19439/
).
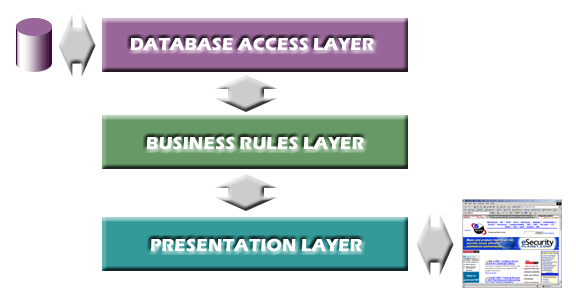
Fig #1 – Basic N-tier Model
In this two-part series, I will demonstrate one approach for building a Data Access Layer (DAL) in ADO.NET using the latest whiz-bang tools in Visual Studio .NET (VS .NET). In the end, I hope to establish a simple process that will create a DAL suitable for Web applications and Web services. (I am specifically leaving out client-server apps since there are some special considerations for this application model in .NET).
Here is a summary of the topics we will discuss:
- Establishing goals for designing a DAL
- Understanding the importance of establishing development, staging and production platforms.
- Setting up a database using SQL Enterprise Manager or Visual Tools now built into VS .NET
- Securing a database by restricting permissions on login accounts and using stored procedures
- Building components in .NET to handle data access
- Building Typed DataSets to provide object to relational mapping
- Handling errors and transactional integrity
In this first part, we will cover the process for setting up the database and preparing the projects in VS .NET. In the second part, we will begin assembling our data components and writing some code.
Goals for Building a Robust Data Access Layer
If you are a Web developer, I am sure that you have designed many pages that perform database CRUD (Create, Read, Update and Delete) operations directly from the code associated with the page. This is a quick and dirty approach that often results in applications that are difficult to maintain, and worse, tend to be inconsistent in their execution of error handling and transactional integrity.
By separating and centralizing code for the activities associated with the specific tasks like data access, you gain the ability to reuse the code, not only within a single project, but across multiple projects, as well. This can greatly simplify maintaining application logic since code for specific tasks is easy to find and changes only need to be made in one place.
In an ideal world, Web pages, or any app for that matter, should be oblivious to how the data from a DAL is retrieved. They should only make polite requests to the DAL. It should not matter whether the data comes from Oracle, SQL Server, or a hundred monkeys pounding keyboards in the back room. In addition, all good DALs should adhere to the following:
Let’s take a look at some of these issues in more depth
Security
The first line of defense in creating a secure data access layer is to create database accounts for your applications with no direct permissions on tables within the database. This can be done by providing separate stored procedures for each Select, Update, Insert and Delete action that can be performed on an entity.
By avoiding the use of direct embedded SQL in the code, we can prevent SQL injection attacks.
Another security consideration is protecting the credentials of the database login accounts you use from your application. For most Web applications, it is a necessity to provide a mechanism outside of the code to specify the connection string to be used to access the database. Therefore, the connection string (which contains the login credentials) is often placed within registry settings or in .NET web.config files to make it easy to change (and unfortunately easy to discover). You can encrypt the connection string used with production servers, which complicates things a bit but gives you an extra level of security.
Another reason for limiting permissions on the login account is to prevent a rogue developer that has knowledge of the connection string from using something like Query Analyzer to perform dastardly deeds like undermining the structure of the database. Although they could add, edit, or delete data with the stored procedures, they cannot completely destroy database entities.
We will discuss login accounts in more details as we move forward.
Data Integrity
Of course, your database should be designed with all the necessary constraints to ensure the integrity of the data. However, we certainly don’t want to wait until we submit the data to the database to find out that it doesn’t meet the constraints, like referential integrity. Therefore, our DAL logic should be configured to reflect these same constraints and raise errors before we get to the database.
Transaction Integrity
If you are inserting multiple pieces of data in one or more tables, you may need to ensure that all the data is successfully saved. A DAL should support the ability to rollback a series of database transactions if any one of them fails.
Concurrency Integrity
A common problem of multi-user systems is that you may have more than one user of the system updating or deleting a record at a time. These are known as concurrency conflicts.
There are essentially three options for handling these scenarios (with some variations). In the first option, we do nothing, allowing the changes of the last user to overwrite the changes of the first without warning. This is typically known as the “last in wins” scenario.
The second option is to take the optimistic approach. In this scenario, you predict that it is unlikely or rare that two users will try to edit the same record at the same time; therefore, you place a check in your Update or Delete statement to make sure the underlying record has remained unchanged while the edit has been in progress. If it has changed, the edit fails and the second user will need to start the process over.
In the third option, you take a pessimistic stand. In this scenario, you predict that it is likely that two users will be vying for the same record so you place a lock on the record when the first person accesses it to prevent any others from accessing it until the first edit is complete. In a connected world, this could be handled by record locking in the database itself. Otherwise, you would need to provide your own system to track locking.
Handling concurrency is an especially important issue in .NET because our primary means of access is in a disconnected mode. Fortunately, ADO.NET and VS .NET help to facilitate optimistic concurrency issues
Error Handling
Since we want our DAL consumers to be oblivious to the inner workings of our data retrieval, we certainly don’t want unhandled SQL Server exceptions bubbling up to the presentation layer. Instead, the DAL should be providing more useful custom exceptions about the nature of the error. The DAL needs to present these exceptions to the consumer so that the consumer can decide whether it is OK to proceed, try again, or simply give up.
Maintainability
How many times have you needed to change or remove a field in a table, then have to search through all your code to find every place that it is being referenced? By centralizing your code, you limit the number of places this can happen. Also, by using data objects that provide hard-coded properties that match fields for our entities, the application will not compile if one is removed. We will discuss this a bit more in our Object to Relational Mapping section.
Working in a DSP Environment
Before we start coding, I want to take a moment to discuss a process issue that can seriously affect the way you develop your DAL. If you are a developer of Web-based applications or enterprise client-server apps that are in production with live users, then you should be working in a DSP (Development, Staging and Production) environment. This means that you will have distinct servers for each of these platforms and you will only be developing on the development platform. When you have a live application in production, it is critical that when you deploy changes, they have been fully tested on your staging platform first. In order to satisfy this requirement, we must keep database connections outside the code so that you can point to specific database servers associated with each level, which raises security concerns I mentioned earlier.
In addition, once you have deployed a system into production, we must keep SQL scripts for all modifications to the database so that they can be deployed on both staging and production. VS .NET gives us some new capabilities in this area as well.
Object to Relational Mapping
Another goal of a good DAL design is to provide objects that represent the data in useful ways to the business and presentation layers.
Some of you may have designed Data Access Layers with Windows DNA/COM components using VB6 and ADO. In this model, there were two ways to approach the design. One was to create objects with methods that simply returned ADO recordsets. This approach has both advantages and disadvantages. Because recordsets are generic, most developers can readily use them without ramp-up time. However, their generic nature causes them to have a lack of specificity about what is contained within. Since fields are accessed by a numeric or string index reference, the component consumer has to have knowledge about how the recordsets are filled. In addition, the component provider is under no “contractual” obligation to maintain the “interface” to the recordset fields. Fields can be changed anytime the component or a stored procedure changes, and the component consumer will not know until the component is run. Also, at design time, it is not possible to guarantee the datatype of a field or other constraints.
In order to avoid these problems, many developers turned to creating classes with typed properties that mapped to specific fields in database entities. This is called Object to Relational mapping. In this model, there are typically
While this solved the problems mentioned above (especially guaranteeing an interface to the objects that can be inspected at design-time) there was a trade-off. Developers had the considerable tasks of coding all these extra classes including the classes and methods that would have to take the data retrieved from recordsets and migrate it into the entity objects.
What’s New in .NET
Fortunately, the .NET Framework, along with some cool tools in VS .NET, provides us with the ability to rapidly build type safe data objects with relative ease. And we can do everything, from start to finish, in VS .NET.
ADO.NET provides us a whole new paradigm for accessing databases. No longer do we have recordsets that give us dynamic access to the database. Instead, ADO.NET provides data in disconnected packages called DataSets. These have some similarity to disconnected recordsets; however, DataSets are not limited to single tables. They can contain many tables and define the relationships between the tables, in effect making them mini in-memory relational databases that can be filtered and sorted. Each DataTable object contained within the DataSet is made up of a collection of DataRow objects.
DataSets come in two forms – Untyped and Typed. Untyped DataSets handle data in a generic fashion, similar to ADO recordsets. These DataSets are great in situations were you want to be flexible, without the need for publishing heavy objects, such as providing data in a Web services.
And there are Typed DataSets, which are created to reflect database entities and their attributes. These DataSets contain specific properties named after the tables they contain. And these tables contain a collection of specialized DataRows, each with typed properties mapping to fields in the entities they represent (sound familiar).
Now, I said for the most part that our data access will be disconnected because .NET does give us the DataReader. DataReaders provide highly optimized, forward-only, read-only access to data. Like ADO recordsets, a DataReader’s fields are accessed via string or numeric index.
Support Objects
There are a number of other ADO.NET objects that give us the tools necessary to work with DataSets.
Each of these classes comes in two flavors in the .NET Framework – one set optimized for SQL Server (prefixed with ‘Sql’ and found in the System.Data.SqlClient names) and one set designed for OLEDB (prefixed with ‘Oledb’ and found in the System.Data.Oledb namespace). You would use the OLEDB classes when using OLEDB drivers for datasources like Access or Oracle.
In order to simplify things for programmers and allow you to handler both sets of objects with the same code, the System.Data namespace provides common interfaces for you to use:
| SqlClient namespace | OLEDB namespace | Interfaces |
|---|---|---|
| SqlConnection | OledbConnection | IDbConnection |
| SqlCommand | OledbCommand | IDbCommand |
| SqlDataAdapter | OledbDataAdapter | IDbDataAdapter |
| SqlDataReader | OledbDataReader | IdataReader |
The necessity for common interfaces may be moot for all but the DataReader, since the other objects should probably not be exposed outside of the DAL.
The Scenario
A DAL isn’t much good without something to use it.
To demonstrate the DAL building process, we will build a rudimentary framework for an online widget store. The requirements will be to track specific information about widgets we keep in stock, our customers, and orders that are placed. We will start our Visual Studio solution with a Web application and include additional projects in the solution for the Data Access Layer and the database script.
We won’t be building a Business Rules Layer in this article. However, in reality, an application like a widget store would be a good candidate for one since we would need to handle things like calculating sales tax or managing quantity on hand for specific widgets.
Create the Database
If you have SQL Enterprise Manager and the SQL Query Analyzer installed on your development machine, your efforts will be a bit easier. If you don’t have them, you can make do with the tools provided by VS .NET. Most of the visual schema building tools you have in Enterprise Manager are available in VS .NET. What you don’t have are the administrative functions such as creating accounts, performing backups, or renaming entities. However, nearly everything that can be done in Enterprise Manager can be done with standard SQL commands. I will show you shortly how to do this and keep your scripts well organized.
Adding tables, relationships
Here is a diagram (Fig #2) of our widget store database schema. It’s fairly simple but has a variety of different elements to keep things interesting in our DAL.
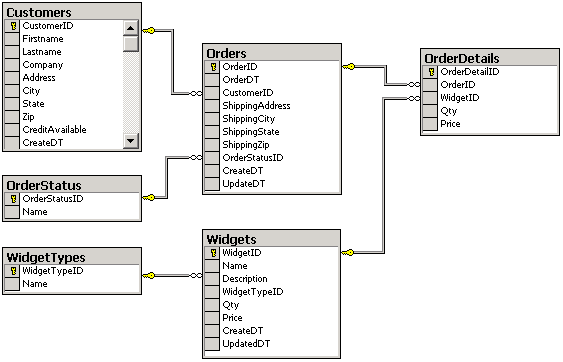
Fig #2 – Widget Store Database Schema.
Adding the Login Account
Fig #4 – Setting Database Access for the SQL Server Login Account
There are two options for setting up the login account for our application – create a new account within SQL Server or give a Windows account permission to access the database. Both have their pros and cons.
The primary reason for using the SQL Server authentication is the simplicity of the setup. There are two concerns about using SQL Server Authentication. One, you will probably have to store the account credentials somewhere external to the code, such as in a web.config. Two, the username and password will be passed across the wire in clear-text. Not such a great idea if your application needs to be super secure. So if you are not overly concerned about security, this might be a good approach. Also, depending upon your network configuration, this may be your only choice.
Using SQL Server Authentication
If you have Enterprise Manager, you can add a SQL Server login account by going to the Security folder and selecting Logins. Next, right-click the Logins folder and select New Login… from the popup menu. The SQL Server Login Properties dialog (Fig #3) will appear:

Fig #3 – Adding a SQL Server Login Account
For the name, type WidgetStoreDAL. Next, select SQL Server the Authentication type and supply a password. You can also select the default database for the account, which of course should be “WidgetStore”.
Next, select the Database Access tab and select the checkbox in front of the WidgetStore listing to allow the account access (Fig #4).

On the Database Roles for ‘WidgetStore’ checklist at the bottom of the dialog, only the public role will be selected. Although the new account will not have access to the new tables we have created, the public role will give it access to some of the system tables, like sysobjects. This is a gold mine for a clever hacker. Avoid exposing system tables by globally denying data read and write permissions on any tables. To do this, scroll down on the Database Roles panel and select db_denydatareader and db_denydatawriter.
If you don’t have Enterprise Manager, you will need to do this via SQL Scripts:
if not exists (select * from master.dbo.syslogins where loginname = N’WidgetStoreDAL’)

	exec sp_addlogin N’WidgetStoreDAL’, N’password’, N’WidgetStore’, N’us_english’

GO
if not exists (select * from dbo.sysusers where name = N’WidgetStoreDAL’)
EXEC sp_grantdbaccess N’WidgetStoreDAL’, N’WidgetStoreDAL’
GO
exec sp_addrolemember N’db_denydatareader’, N’WidgetStoreDAL’
GO
exec sp_addrolemember N’db_denydatawriter’, N’WidgetStoreDAL’
GO
Using Windows Authentication
One way to use Windows authentication in ASP.NET is to use the local machine account that is used by the ASP.NET worker process called ASPNET. If you have an anonymous Web site with the database in a network configuration that allows it to accept a local account, you can set up the ASPNET account to have similar access to the previous SQL Server account. The advantage here is you are using Windows Authentication and your account credentials are not exposed in the connection string. You simply use “Integrated Security=SSPI” in the connection string. Don’t use this technique if you are using Windows Authentication on your Web site to impersonate users. This prevents you from efficiently using connection pooling.
Another advantage to using integrated security is that if you forget to change the web.config file when you move from staging to production, the connection will not work, and you won’t have a situation where your production system is access the staging database.
Setting up the account is pretty much the same as it was for the SQL Server. This time however, you just need to type in the name, MY_MACHINE\ASPNET.
Here is the SQL Script for setting up the ASPNET account.
if not exists (select * from master.dbo.syslogins where loginname = N’MY_SERVER\ASPNET’)
exec sp_grantlogin N’MY_SERVER\ASPNET’
exec sp_defaultdb N’MY_SERVER\ASPNET’, N’master’
exec sp_defaultlanguage N’MY_SERVER\ASPNET’, N’us_english’
GOif not exists (select * from dbo.sysusers where name = N’MY_SERVER\ASPNET’)
EXEC sp_grantdbaccess N’MY_SERVER\ASPNET’, N’MY_SERVER\ASPNET’
GOexec sp_addrolemember N’db_denydatareader’, N’MY_SERVER\ASPNET’
GOexec sp_addrolemember N’db_denydatawriter’, N’MY_SERVER\ASPNET’
GO
A word of caution: The ASPNET account will not authenticate over the Named Pipes protocol – you must use TCP. If you are having problems, add “Network Library =dbmssocn” to the connection string. For more info, see the following Knowledge Base Article – http://support.microsoft.com/default.aspx?scid=kb;en-us;Q315159
ASPNET account could also be problematic if you host more than one application on a single Web server where each accesses a database. Cross database accesses would then be possible by hackers.
If you want to read more about issues related to security, database authentication and what steps VS .NET is taking in the future to make things more secure, take a look at this article:
http://www.eggheadcafe.com/articles/20021211.asp
Adding a Connection to Our Database
Before we start building any projects in VS .NET, we need to set up our database. In Server Explorer, right-click the Database Connections node. Then select Add Connection… this will bring up the Data Link Properties dialog (Fig #5):
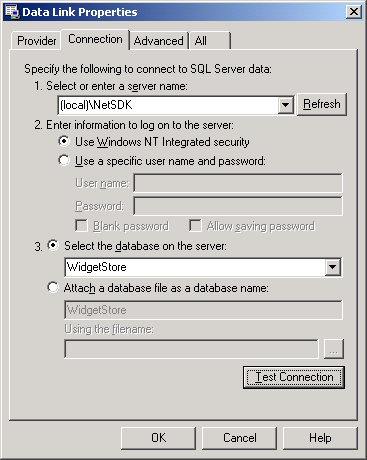
Fig #5 – Data Link Properties dialog
To set up the connection, specify the database server name, how you want to logon to the server, and database on the server you want to access (WidgetStore). The account you use for this connection should have sufficient permissions to view the schema of the database and create stored procedures. This should not be the same account we created for use with the application.
When you are done, rename the new connection node to a friendly name like WidgetStore_Local (Fig #6).

Fig #6 – The newly created Data Link in the Server Explorer
Starting the Web Application
We will start our VS .NET solution by creating our first project. In VS .NET, from the File menu, select New then Project. In the New Project dialog (Fig #7), specify the Project Type on the left – in our case Visual Basic Projects and in the Templates panel on the right select ASP.Net Web Application. Enter the name / location of the project as WidgetStore.
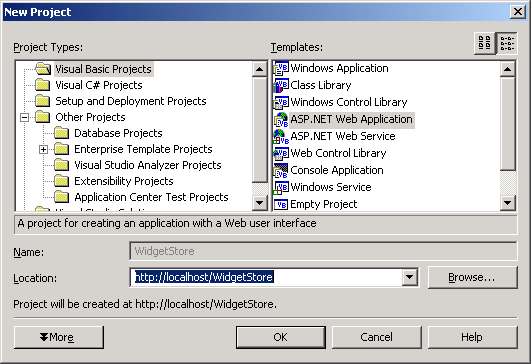
Fig #7 – Creating a New ASP.Net Web Application
Click OK to finish.
Adding a Database Project
VS .NET allows you to add more than just code to your solution. We can add a special project which allows us to store all of our SQL scripts for both creating and altering database entities.
Right-click the solution name in the Solution Explorer. On the popup menu, select Add then New Project… In the New Project dialog (Fig #8) that appears, under Project Types on the left, expand the Other Projects node. Then select Database Projects and the Database Project template on the right. Name the project, WidgetStore.DB.

Fig #8 – Adding a Database Project to the Widget Store Solution
After you click OK, you will be prompted for a default connection. Select the WidgetStore_Local connection we built earlier.
Generate SQL Create Scripts
Now that our Database Project is available, we should place a few things in it. A good place to start is a create script for all the entities in the WidgetStore database. Before you start, make sure that the database project, WidgetStore.DB, is currently selected in the Solution Explorer. Next, right-click our WidgetStore_Local connection node in Server Explorer then select Generate Create Scripts on the popup menu. (You may need to open the connection first) The Generate Create Scripts dialog (Fig #9) will then appear:
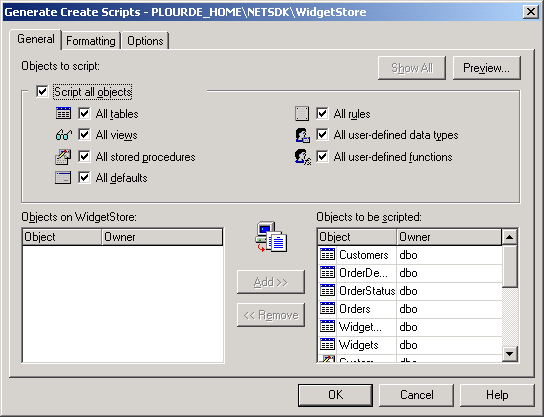
Fig #9 – Generate Create SQL Scripts for the Database
Select the Script all objects checkbox, and then select the Formatting tab (Fig #10).
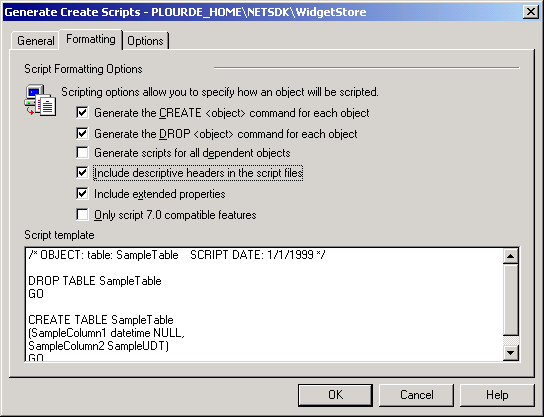
Fig #10 – Selecting formatting options for the Create SQL Scripts
Be sure that the Generate CREATE and DROP commands checkboxes are selected.
Next, Select the Options tab (Fig #11).
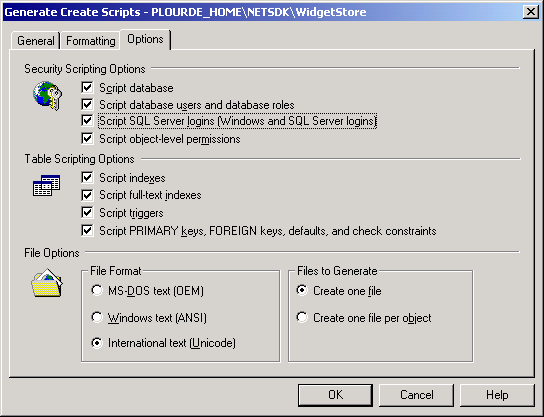
Fig #11 – Selecting Options for the Create SQL Scripts
Finally, be sure that all four checkboxes under Security Scripting Settings are selected along with the Create one file radio button under Files to Generate. When you click OK you will be prompted to save the file in the Create Scripts folder of the database project. Give the file a meaningful name and you are done. I recommend naming the files with a numeric prefix to indicate the order in which they should be run. This makes it easy to know what order they should be deployed on staging and production servers.
Adding a DAL Project
Fig #13 – Adding a reference for the DAL project to the Web Project
Finally, we get to the point of our endeavor – building the DAL. To start, we will add a third project to our solution to contain the code for our DAL.
Here we add a standard Class Library project (Fig #12), in a similar fashion to creating the other projects. Give this project the name WidgetStore.DAL:
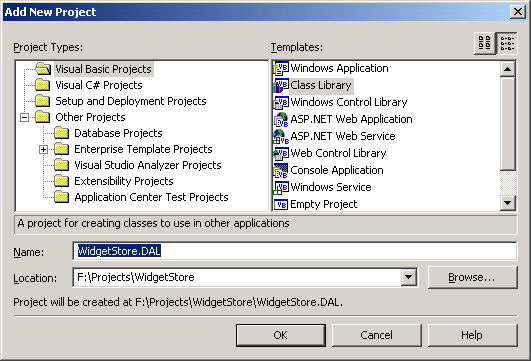
Fig #12 – Adding a Class Library to the Solution for the DAL code
Once the project is created, we need to add a reference to it in our Web application. Right-click the References folder for the WidgetStore project under the Solution Explorer. From the popup menu select Add Reference…. The Add Reference dialog (Fig #13) will appear. Next, click on the Projects tab.
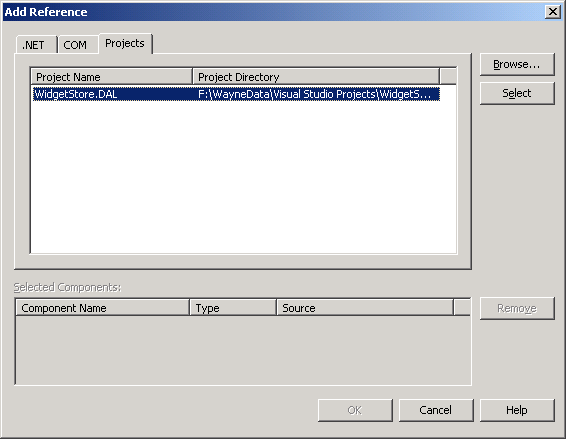
You should see our WidgetStore.DAL project in the list. Click the Select button to add it to the Selected Components list at the bottom of the dialog (Fig #14).

Fig #14 – Adding a reference for the DAL project to the Web Project
Click OK and the DAL project should now appear in the Reference list.

Fig #15 – The WidgetStore.DAL reference in the Web Application
Part 1, Conclusion
Well, that concludes our setup. When we return for Part 2, we will begin coding our Handler classes with .NET Component classes, a new type of class file available in .NET that permits you to drag and drop other components (like those from ADO.NET) onto a designer tray for easy implementation. We will also look at building DataAdapters that use stored procedures for data manipulation and we will use those DataAdapters to build Typed DataSets. Finally, we will create public methods in our Handler class to provide those DataSets to consumers of our DAL.
Stay tuned…
About the Author
Wayne Plourde is a consulting Software Architect who began his career as a building architect twenty years ago. In 1995, he succumbed to the call of the World Wide Web, and since then has been designing sophisticated Web-based and client-server applications for corporations around the country. Wayne holds both MCSD and SCJP certifications and has just completed his .NET MCAD certification. You can contact Wayne at [email protected] or visit his Web site at http://www.plourdenet.com.