

Introduction
The article targets the creating of a standalone autocomplete library (pure XAML) that can be clubbed into any Windows Presentation Foundation (WPF) application and used with minimal efforts.
At the point of writing this article, there are no equivalents in the market that deliver the real-time or cached Autocomplete functionality to data controls. XAML, through its rich user interface and substantially flexible UI model can implement intuitive things like Autocomplete with ease.
NOTE: This article uses the Northwind access database to show an example of Employee search. It is not restricted to access and can be used with any relational database.
The Autocomplete control is a reusable user control. The source code is also attached at the end of the article. So let’s see read on to see how it works.
The Autocomplete control consists of a Canvas. Two controls – A Combo box and a Textbox make up the control collection in it. The markup of the Autocomplete looks like the sample below: A simple CANVAS.
<CODE>

<Canvas x_Class=”DynamicAutoComplete.AutoComplete”


    xmlns:x=”http://schemas.microsoft.com/winfx/2006/xaml” Loaded=”Canvas_Loaded”>

</Canvas>

</CODE>
It has the loaded event, which only sets the focus on the Textbox. The Textbox is added to the Visual Collection from the Control’s constructor.
<CODE>

txtSearch 		 	= new TextBox();

txtSearch.TextChanged                    += new TextChangedEventHandler(Search_TextChanged);

txtSearch.PreviewKeyDown           += new KeyEventHandler(txtSearch_PreviewKeyDown);

txtSearch.VerticalContentAlignment  = VerticalAlignment.Center;

</CODE>
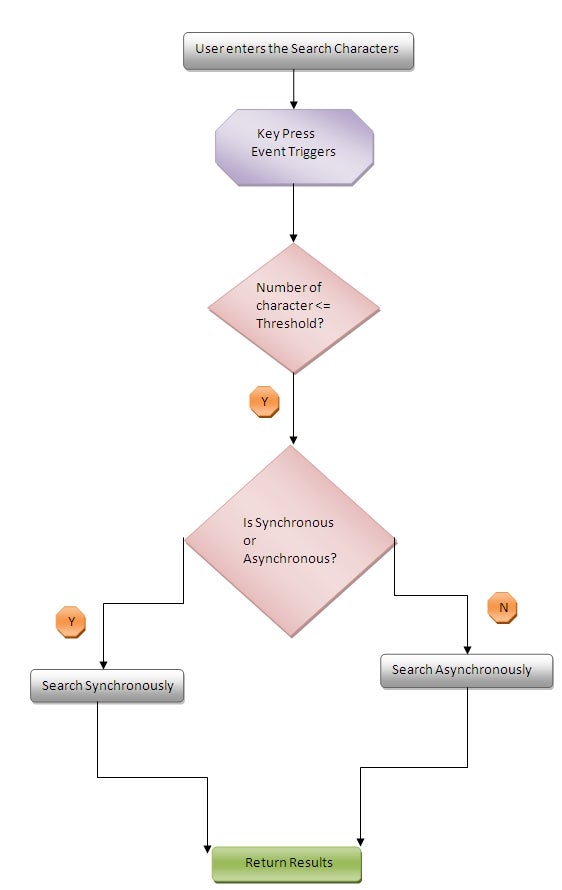
We will use the TextChanged event to trigger the Search on our data. Note the use of the Search Threshold value to invoke the search. We have a control over the search through this property. We would invoke the search only after certain numbers of characters are keyed into the Textbox.
The PreviewKeyDown event also works for the Down Arrow key down, as in the sample provided with the article. It also does the search based on the Search text entered.
Back to the Canvas, the Loaded event does very little, sets the focus of the cursor.
<CODE>

private void Canvas_Loaded(object sender, RoutedEventArgs e)

{

    txtSearch.Focus();

}

</CODE>
The Autocomplete user control provides the Search feature through the Synchronous and the Asynchronous modes. This is particularly helpful with the difference in requirements and depending on the initial data being loaded into the control. Later we’ll look at the LoadSeggregatedKey method
Let us first understand the user control and its behavior.
The “HasData” property of the Auto complete control lets us determine at any point in time whether the control is populated with data or if it is empty. This is a boolean property that lets us invoke the search based on its value.
<CODE>

txtAutoComplete.HasData = true;

</CODE>
The “Threshold” property of the AutoComplete control lets us determine how many key presses would invoke the search. At times, we would not like to invoke the search until a certain number of characters are pressed. This property allows us to do that. This has to be set before the data is populated into the control.
<CODE>

txtAutoComplete.Threshold = 1;

 </CODE>
The “IsSync” property of the AutoComplete Control lets us control the search behavior. It lets us search the data in both Synchronous and Asynchronous mode.
<CODE>

txtAutoComplete.IsSync = false;

 </CODE>
The “PrimaryColumn” property of the Autocomplete control lets us determine which column of the datatable should be searched.
<CODE>

txtAutoComplete.PrimaryColumn = “LastName”;

</CODE>
The “AutoCompleteData” property of the Autocomplete control lets us associate the user control with the data.
<CODE>

txtAutoComplete.AutoCompleteData = searchData;

</CODE>
These five properties and the call to pubic LoadAutoCompleteData method is what is required.
A textBox and combobox is added to the Visual Collection to the parent of the usercontrol with the following lines:
<CODE>

_visualControls = new VisualCollection(this);

_visualControls.Add(comboBoxSearch);

_visualControls.Add(txtSearch);

</CODE>
The combobox is also hooked to two events : SelectionChanged and the PreviewKeyDown as shown below:
<CODE>

comboBoxSearch.SelectionChanged += new SelectionChangedEventHandler(Search_SelectionChanged);

comboBoxSearch.PreviewKeyDown += new KeyEventHandler(comboBoxSearch_PreviewKeyDown);

</CODE>
The textbox is hooked to two events as shown below:
<CODE>

txtSearch.TextChanged += new TextChangedEventHandler(Search_TextChanged);

txtSearch.PreviewKeyDown += new KeyEventHandler(txtSearch_PreviewKeyDown);

</CODE>
“To use this user control”: Follow these steps to add the AutoComplete control in your project:
- Add the reference to the DyanmicAutoComplete library to your solution:

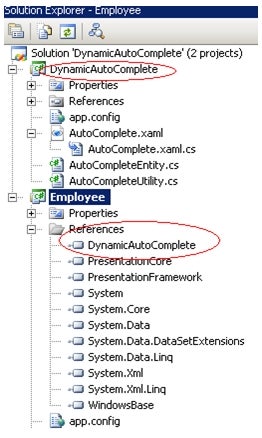
- Add the namespace to your existing XAML:
<CODE>

xmlns_auto=”clr-namespace:DynamicAutoComplete;assembly=DynamicAutoComplete”

</CODE>
- Add the control to your XAML:
<CODE>

<auto:AutoComplete  x:Name=”txtAutoComplete”></auto:AutoComplete>

</CODE>
- To populate the Auto Complete Control with data: The Autocomple control takes a DataTable as the source input. The code sample below explains it all.
<CODE>

DataTable searchData = GetEmployeeData();

           	if (searchData != null)

            	{

                		txtAutoComplete.HasData = true;

                	txtAutoComplete.AutoCompleteData = searchData;

                		txtAutoComplete.Threshold = 1;

                txtAutoComplete.IsSync = false;

                		txtAutoComplete.PrimaryColumn = “LastName”;

                txtAutoComplete.LoadAutoCompleteData();

            }

</CODE>
In the sample code attached, the required data is fetched from the Northwind access database using a simple OleDB data snippet. This is as shown below:
<CODE>

private DataTable GetEmployeeData()

{

OleDbConnection objConn = new OleDbConnection(Properties.Settings.Default.NorthwindConnectionString);

objConn.Open();

OleDbCommand objCmdSelect = new OleDbCommand(“SELECT FIRSTNAME ,LASTNAME, TITLE FROM EMPLOYEES”, objConn);

OleDbDataAdapter objAdapter = new OleDbDataAdapter();

objAdapter.SelectCommand = objCmdSelect;

            	NorthwindDataSet employeeDataset = new NorthwindDataSet();

objAdapter.Fill(employeeDataset.Employees);

objConn.Close();

return employeeDataset.Employees;

}

</CODE>
The isSyncProperty
The isSync property ensures how the data is retreived based on the search and then populated into the combobox.
<CODE>

if (_isSync)

         		AddComboBoxItemSync(txtSearch.Text);

        else

AddComboBoxItemAsyc(txtSearch.Text);

</CODE>
For asynchronous operations, threads are used. There is a MaxThreads count determining the maximum number of threads that are used at any point of time by this Autocomplete control to perform the search.
Note : The entire search is case insensitive.
The Cavas class’s ArrangeOverride method is overriden to position the Combo box list items
<CODE>

 protected override Size ArrangeOverride(Size arrangeSize)

        	{

            		txtSearch.Arrange(new Rect(arrangeSize));

                comboBoxSearch.Arrange(new Rect(arrangeSize));

                return base.ArrangeOverride(arrangeSize);

        	}

</CODE>
The GetVisualChild method also helps in positioning the combo box items.
The AutocompleteUtilty is a helper class that loads the data into the combo box and also has the LoadSeggregatekey method that helps us in Segregation of data based on the first character (0 -9 and a-z) since we do case insensitive search.
In case we want to search huge amounts of data this feature will be helpful since it will group the data based on the first character. During the initial load of data into the usercontrol, a collection will be created with key as 0-9 and a-z and additionally , a list of AutoCompleteEntities corresponding to the keys will be grouped and added to the collection.
So the collection will look like,
<0, items startwith 0>

<1, items startswith 1>

.

.

.

<z, items startswith z>
When ever a keypress event is fired, a particular collection will be taken from the list and a search will be made on that particular collection of items and not on the entire list of items. This will help to speed up the search when we are supposed to do the search on huge data.
The LoadData method Creates each data point as an AutoCompleteEntity and adds it to a collection.
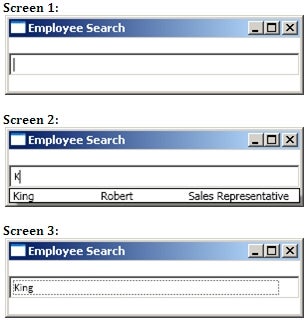
When you run the sample application, you will get the following screen. Type the first character of the Employee’s name, like “K” for example, and you will get the results populated into the combo Box below. Once you select an item, the result is populated into the text box.
The screenshots below of the sample application shows the various steps involved in search.
The solution is also downloadble from the attachment link below
Scope for improvement
Threadpool can be used to handle the Threads.
BackgroundWorker component can be used to intiate Asynchronous calls to keep the UI responsive.
References
http://msdn.microsoft.com/en-us/library/system.windows.media.visualcollection.aspx
http://msdn.microsoft.com/en-us/library/system.windows.controls.canvas.arrangeoverride.aspx