

Introduction
In this article, you’ll learn about sorting and paging as well as the Check All and Uncheck All functionality using OnRowDataBound for an ASP.NET grid view in SharePoint. You will also learn how to call a user control from a SharePoint web part.
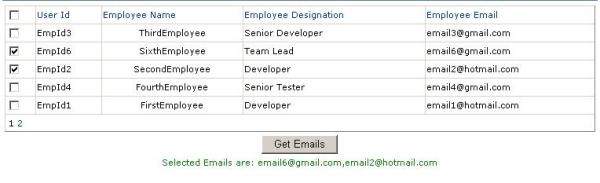
The final output of the example you’ll work with is shown in the following image:
How to Use the Code
In the sample code file attached to this article (GridViewControl.zip), you’ll find the provided sample GridView Control. The solution contains two projects. First project is a normal ASP.NET Web Application that contains an ASP.NET GridView user control along with a web page called sampletest. The second project is a class library that contains a SharePoint Web part and in turn uses the above GridView user control.
In the sample code a custom list named “EmployeeList” having columns called Title, EmployeeName, EmployeeDesignation, and EmployeeEmail was created in the SharePoint site for populating the GridView.
Create User Control
To begin, you need to create a user control. You can do this with the following steps:
Step 1: Open the Visual Studio IDE and select File >> New>> Project. Select “Visual C#” as the programming language and under “Web” select “Web Application” template.
Step 2: The Solution file should be shown in the “Solution Explorer”. Click on References and select the “Add References” option.
Step 3: Select “Windows SharePoint Services” from the .NET tab. This will add the Microsoft.Sharepoint.dll to the References.
Step 4: Right click on project >> Add >> New Item and then select WebUserControl.
The following functionalities are provided in the GridView user control:
- Getting data from SharePoint List
- Creating the Grid view header rows at run time
- Pagination
- Sorting
- CheckAll and UncheckAll checkboxes for getting the IDs of the selected rows.
In the following sample Email IDs are taken.
Place a GridView control from the toolbox into the ascx page. You then write JavaScript for getting the CheckAll and UncheckAll functionality in the grid view control. The following listing contains sample code for the user control.
Listing: Sample user control ascx code:
Check the GridViewUsercontrol.ascx code for JavaScript.
<asp:GridView ID="gvMail" runat="server" AutoGenerateColumns="False" Width="100%"
    AllowPaging="True" AllowSorting="True" OnPageIndexChanging="gvMail_PageIndexChanging"
    OnSorting="gvMail_Sorting" HorizontalAlign="Left" UseAccessibleHeader="false"
    OnRowDataBound="gvMail_RowDataBound" PageSize="5">
    <HeaderStyle BorderStyle="Solid" BorderWidth="1"></HeaderStyle>
    <Columns>
        <asp:TemplateField HeaderText="All" ItemStyle-HorizontalAlign="Left">
            <HeaderTemplate>
                <asp:CheckBox ID="chkAll" runat="server" />
            </HeaderTemplate>
            <ItemTemplate>
                <asp:CheckBox ID="chkRow" runat="server" />
            </ItemTemplate>
        </asp:TemplateField>
        <asp:BoundField DataField="Title" HeaderText="User ID" ControlStyle-Font-Bold="true"
            SortExpression="Title" ItemStyle-HorizontalAlign="Left">
            <ItemStyle HorizontalAlign="Left"></ItemStyle>
        </asp:BoundField>
        <asp:BoundField DataField="EmployeeName" HeaderText="Employee Name"
                  SortExpression="EmployeeName"
            ItemStyle-HorizontalAlign="Left">
            <ItemStyle HorizontalAlign="Left"></ItemStyle>
        </asp:BoundField>
        <asp:BoundField DataField="EmployeeDesignation" HeaderText="Employee Designation"
            SortExpression="EmployeeDesignation" ItemStyle-HorizontalAlign="Left">
            <ItemStyle HorizontalAlign="Left"></ItemStyle>
        </asp:BoundField>
        <asp:BoundField DataField="EmployeeEmail" HeaderText="Email" SortExpression="EmployeeEmail"
            ItemStyle-HorizontalAlign="Left">
            <ItemStyle HorizontalAlign="Left"></ItemStyle>
        </asp:BoundField>
        <asp:TemplateField SortExpression="EmployeeEmail" Visible="false">
            <HeaderTemplate>
                 Email
            </HeaderTemplate>
            <ItemTemplate>
                <asp:Label ID="lblEmail" Text='<%# Bind("EmployeeEmail") %>' runat="server" />
            </ItemTemplate>
        </asp:TemplateField>
    </Columns>
</asp:GridView>
<input type="hidden" id="hdnCheckboxID" runat="server" />
JavaScript code for handling Check Uncheck checkbox functionality
function SelectAll(idHeaderCheckbox, AllCbxHdnFieldId)
{
   var checkboxHeader = document.getElementById(idHeaderCheckbox);
   var hdnCheckboxIDs = document.getElementById(AllCbxHdnFieldId);
   var arrCheckboxIDs = hdnCheckboxIDs.value.split(",");

   if (checkboxHeader.checked == true)
   {
      for (var i = 0; i < arrCheckboxIDs.length; i++)
      {
         if (arrCheckboxIDs[i] != "")
          {
             var ckbItem = document.getElementById(arrCheckboxIDs[i]);
             if (ckbItem != null)
             {
                ckbItem.checked = true;
             }
          }
      }
   }
   else if (checkboxHeader.checked == false)
   {
      for (var i = 0; i < arrCheckboxIDs.length; i++)
      {
          if (arrCheckboxIDs[i] != "")
          {
              var ckbItem = document.getElementById(arrCheckboxIDs[i]);
              if (ckbItem !=null)
              {
                  ckbItem.checked = false;
              }
          }
      }
   }
}

function UnSelectHeader(idHeaderCheckbox, AllCbxHdnFieldId, PageSize) {

   var hdnCheckboxIDs = document.getElementById(AllCbxHdnFieldId);
   var arrCheckboxIDs = hdnCheckboxIDs.value.split(",");

   var count = 0;
   for (var i = 0; i < arrCheckboxIDs.length; i++)
   {
       if (arrCheckboxIDs[i] != "")
       {
          if (document.getElementById(arrCheckboxIDs[i]).checked == false)
          {
              document.getElementById(idHeaderCheckbox).checked = false;
              count = count - 1;
          }
          if (count == i)
          {
              document.getElementById(idHeaderCheckbox).checked = true;
          }
       }
   }
}

OnRowDataBound code for calling above  javascript functions SelectAll and UnSelectHeader:

protected void gvMail_RowDataBound(object sender, GridViewRowEventArgs e)
{
   if (e.Row.RowType == DataControlRowType.Header)
   {
      CheckBox ckbHeader = e.Row.Cells[0].FindControl("chkAll") as CheckBox;

      ckbHeader.Attributes.Add("onclick", "SelectAll('" + ckbHeader.ClientID + "','"
                 + hdnCheckboxID.ClientID + "')");

      HeaderVariable = ckbHeader.ClientID.ToString();
   }
   else if (e.Row.RowType == DataControlRowType.DataRow)
   {
      CheckBox ckbItem = new CheckBox();
      ckbItem = e.Row.Cells[0].FindControl("chkRow") as CheckBox;

      hdnCheckboxID.Value += ckbItem.ClientID + ",";
      ckbItem.Attributes.Add("onclick", "UnSelectHeader('" + HeaderVariable + "','"
            + hdnCheckboxID.ClientID + "'," + this.gvMail.PageSize + ")");
   }
}
Adding the User Control to a Web Part
Once you’ve built your control, you can add it to a SharePoint Web Part. The following steps walk you through this:
Step 1: Add a new project to the same solution you created earlier. Select Visual C# as language and Windows >>Class Library
Step 2: Add “System.Web” as reference in the References of the project.
Step 3: Add a class file.
Step 4: Call the user control from the class file, making it as a Web Part.
Listing: Sample Code for calling User control in the class library
GridViewwControl.ascx is the name of the user control that was created in earlier steps.
WebUserControl = (UserControl)Page.LoadControl
         (@"/_controltemplates/GridViewwControl.ascx");

      if (WebUserControl == null)
      {
          this.Page.Response.Write("usercontrol null");
      }
      else
      {
          this.Controls.Add(WebUserControl);
      }
Step 5: Build the solution.
Deploying the Web Part
Once you’ve built the user control, added it to your project, and built the solution, the next step is to deploy your project. The following steps can help accomplish this:
Step 1: Copy the user control file(.ascx) in the path- “SharePoint Installation Drive\Program Files\Common Files\Microsoft Shared\Web Server Extensions\12\TEMPLATE\CONTROLTEMPLATE/usercontrolfilename.ascx”
Step 2: Copy the DLL of the user control in the path-“Sharepoint Installation Drive\Inetpub\wwwroot\wss\VirtualDirectories\[Site Port No.]\bin\”
Step 3: Create Strong name key.
Step 4: Drag and drop the Web Part DLL in the GAC (Type “assembly” in Start -> Run to open the Assembly folder directly).
Step 5: Add Safe Control tag in the web.config file of this path-
SharePoint Installation Drive\Inetpub\wwwroot\wss\VirtualDirectories\[Site Port No.]\web.config

<SafeControl Assembly="[Web part Assembly Name], Version=1.0.0.0,
   Culture=neutral, PublicKeyToken=[PublicKeyTokenValue]"
   Namespace="[Web Part Namespace Name]" TypeName="*"
   Safe="True" AllowRemoteDesigner="True"/>
Note:
Get the Public Key Token value using Lutz Reflector. Download from here. http://www.red-gate.com/products/reflector/
Step 6: Do iisreset.
Step 7: Then add the Web Part.