

Introduction
In my last article on this topic, you learned how to interact with Outlook via your WinForms applications. In this article, you will explore how to extend the functionality of Outlook with your custom code. The business value here is clear: Give your users an environment in which they are comfortable to do tasks specific to their business needs. In addition to reduced training costs for new users, you also gain the benefits of a whole suite of functionality at your fingertips as opposed to the blank canvas. This article will walk through the creation of a simple add-in and will discuss a few tips and tricks to consider when writing your add-ins.
Getting Started
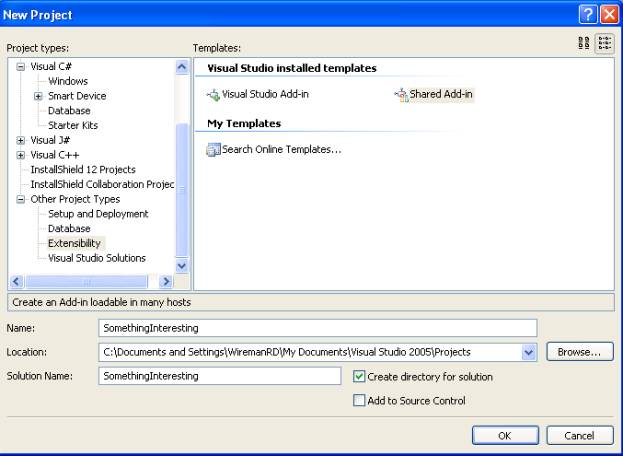
There are some useful Outlook Add-In templates in VSTO (Visual Studio Tools for Office); however, for this demonstration, you will stick with the plain Visual Studio Shared Add-In template. To begin, create a new project of “Shared Add-in” type:
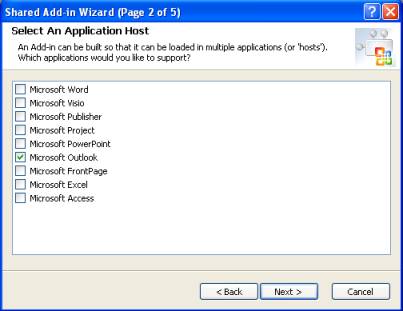
Follow the wizard. For the “Application Host” section, choose Outlook. Notice here that you can write more generic add-ins to be used in multiple Office applications. For your purposes, you will just stick with Outlook.
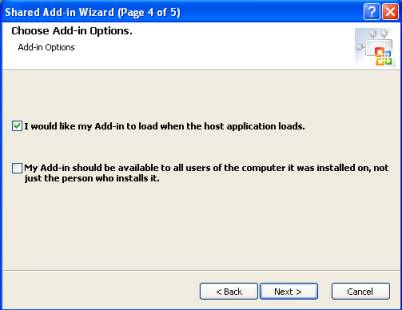
Choose your own name and description, and make sure you check the “I would like my Add-in to load when the host application loads” option. You can choose whether or not your add-in should be installed for the current user or all users.
Visual Studio will create a solution with two projects. The first project will hold your add-in functionality. The second is a setup project that builds an MSI file you can use to install your add-in.
Now, you will notice that the first project contains a reference to the Microsoft.Office.Core library, which exposes functionality dealing with command bars, assistants, search, and so forth—basically the elements that are common among the Office applications. At this point, you also want to add a reference to the Outlook Object Library. You can follow the same instructions in the “Getting Started” section of my article “Interacting with Outlook from a WinForms Application.” For this example, you will need to add one more reference to the System.Windows.Forms .NET library. The following uses directives in the Connect.cs file, which VS provides, and will make your code less verbose:
using Outlook = Microsoft.Office.Interop.Outlook;
using Microsoft.Office.Core;
using System.Reflection;
using System.Windows.Forms;
Notice you will be using System.Reflection. Optional arguments permeate COM. The way around optional arguments in C# is to use the System.Reflection.Missing type, as you will see later in the code.
Creating Your First Outlook Add-In
The Connect class is the “in” for our add-in. It implements the Extensibility.IDTExtensibility2 interface. The required methods are stubbed out for you. The methods of interest for the purpose of this article are OnConnection and OnStartupComplete. You will use the OnConnection method to set up your class-level variables. The template provides two of these variables:
private object applicationObject;
private object addInInstance;
Because you know you will be dealing with only Outlook, the first thing to do is change the type of the applicationObject from object to Outlook.Application. You also will change the assignment provided in the OnConnection method to appropriately cast the object:
applicationObject = (Outlook.Application)application;
You also want to keep class-level references to the active explorer and its command bars, as well as the button you will create and its caption (see the later Tips section for more details):
private Outlook.Explorer activeExplorer;
private CommandBars commandBars;
private CommandBarButton buttonCheckContacts;
private string buttonCheckContactsCaption = "Check Contacts";
You will assign the first two references in the OnConnection method as well:
activeExplorer = applicationObject.ActiveExplorer();
commandBars = activeExplorer.CommandBars;
The OnConnection method will be called every time Outlook opens. Once Outlook is finished loading, the OnStartupComplete method is called. You will use this opportunity to first check if your button has been created, and if it has not, you will do so:
//create a button on the main toolbar if it doesn't already exist
try
{
   buttonCheckContacts = (CommandBarButton)commandBars
      ["Standard"].Controls[buttonCheckContactsCaption];
}
catch
{
   buttonCheckContacts = (CommandBarButton)commandBars
      ["Standard"].Controls.Add(MsoControlType.msoControlButton,
      Missing.Value, Missing.Value, Missing.Value, Missing.Value);
   buttonCheckContacts.Caption = buttonCheckContactsCaption;
   buttonCheckContacts.OnAction = "!<TestAddin.Connect>";
}
You use the commandBars reference to pull out the “Standard” command bar, which is the toolbar located just under the main menu bar in Outlook. This is where you want to add your button. Command bar buttons are indexed by their captions. If you cannot find the button on the standard toolbar, you will create it and set its caption property to the name you want the button to display (declared earlier). You will also set the OnAction property to point to the ProgId of this class (formatted like “!<ProgID>”). You can find the ProgId in a class attribute. Note that yours might differ depending on the name you chose for your solution:
[GuidAttribute("A60C7E1D-5E05-44AB-AEAA-12C323E357C8"),
   ProgId("TestAddin.Connect")]
public class Connect : Object, Extensibility.IDTExtensibility2