

Introduction
Windows® Azure™ Table storage service can store large amounts of structured and un-schematized data at a lower cost for your applications. This service is a NoSQL key-value data store. On the other hand, Azure Mobile Services is an Azure offering designed to provide cloud based backend data source capabilities for applications. By default Mobile Services use Azure SQL Database to store data, but you can override this behavior through “Server Scripts” in mobile services to store phone application data into Azure Table Storage. I will demonstrate this technique in this article.
Scenario
You are going to create a windows phone application that can save user profile information in Azure Table Storage.
Prerequisites
1.Windows Account to access Windows Azure (Free)
2.Windows Azure account (At least Free Trial version)
3.Visual Studio 2013
4.Windows 8 system or VM
5.Windows Phone 8 SDK
Sample Application for This Illustration
This application will consume Mobile Service as the backend. For this demo, I have created a sample app called “ProfileManager”. You can download it from here: https://github.com/manoj-kumar1/Azure-MobSvc-As-Backend-For-SQL-DB.
Profile Manger app has following screens to create and view user profiles.
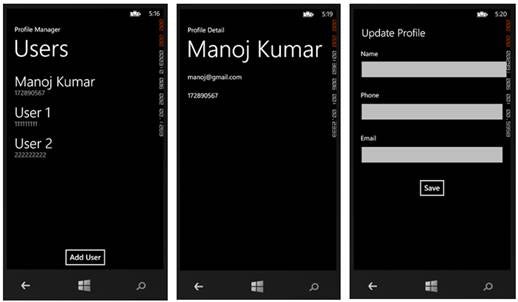
Create and view user profiles
Create an Azure Storage Account
You need to have a Windows Azure storage account to consume table storage service. Follow these steps to create one:
1. Login to https://manage.windowsazure.com/
2. Select +NEW
3. Select “Quick Create” in the following menu:
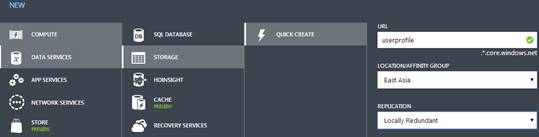
Quick Create
4. Specify a unique name, location and replication for your storage. Replication means – Azure constantly maintains healthy replicas of your data, but it comes at an added cost. So if you do not want your data geo-replicated, you can disable geo-replication. This is called Locally Redundant Storage, and is a 23% to 34% discounted price over geo-replicated storage.
5. Click “CREATE STORAGE ACCOUNT” to finish creating your azure storage account.
Create Mobile Service in Azure
You will need a mobile service to access Table storage. You can create a mobile service in Windows Azure by following these steps:
1. Login to https://manage.windowsazure.com/
2. Select “+New” at bottom
3. From menu select mobile service -> Create
4. Give a proper name to the mobile service and select a new or existing database instance:
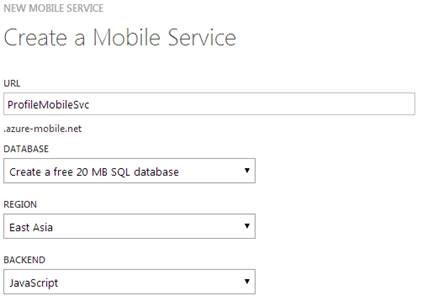
Create a Mobile Service
5. Mobile service uses Azure SQL Database, so when you create a mobile service a new database will be created. You can create a new database or use any existing one. In this demo, I am going to create a new database along with its server.
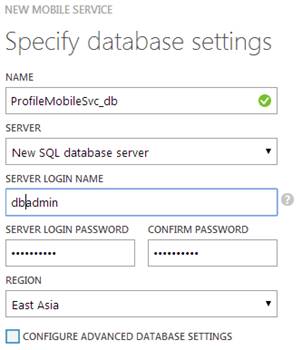
New Mobile Service
6. In this way a new mobile service with name “ProfileMobileSvc” will be created.
7. Create required tables in this new “ProfileMobileSvc_Db” database: Open mobile service “ProfileMobileSvc”, go to Data tab, and select “Add a table” to add “UserProfile” as new table.
Use Server Scripts to Alter the Behavior of “UserProfile” Table Insert and Read
You can register “Server Scripts” in a Mobile Service to perform many operations on data being inserted and updated, including validation and data modification. By default, Mobile services use SQL Database as the data store; you can use scripts to alter this default behavior and store data in table storage. Table storage could be cost-effective in many scenarios.
You can follow these steps to modify insert and read behavior:
1. Go to newly created “ProfileMobileSvc”.
2. Click on “Data” tab and open “UserProfile” table.
3. For this illustration, you need to customize the default insert and read behavior by using the following scripts:
Insert:
function insert(item, user, request) {
    var message;

    // Data validation
    if (!item.name) {
        message = 'User name cannot be null or empty.';
        console.error(message);
        request.respond(statusCodes.BAD_REQUEST, message);
        return;
    }
    if (!item.email) {
        message = 'Email cannot be null or empty.';
        console.error(message);
        request.respond(statusCodes.BAD_REQUEST, message);
        return;
    }

    // Access table service
    var azure = require('azure');
    var tableService = azure.createTableService('STORAGE_ACCOUNT_NAME', ‘STORAGE_ACCOUNT_KEY');

    // Set retry count and retry interval
    var retryCount = 3;
    var retryInterval = 100; // milliseconds

    //insert Entity function
    insertEntity();

    function insertEntity() {
        // Create table if not exists
        tableService.createTableIfNotExists('UserProfile', function(error) {
            if (error) {
                if (retryCount > 0) {
                    console.error('Failed to access or create UserProfile table:\r\nuserId=[' + user.userId +
                                  ']\r\nretryCount=[' + retryCount +
                                  ']\r\nerror=[' + error + ']');
                    retryCount--;
                    setTimeout(insertEntity, retryInterval);
                }
                else {
                    message = 'Failed to access or create UserProfile table:\r\nuserId=[' + user.userId +
                              ']\r\nerror=[' + error + ']';
                    console.error(message);
                    request.respond(statusCodes.BAD_REQUEST, message);
                }
            }
            else {
                // Check for duplicate user profile: By email id
                var tableQuery = azure.TableQuery
                                .select()
                                .from('UserProfile')
                                .where('PartitionKey eq ?', user.userId)
                                .and('email eq ?', item.email);

                tableService.queryEntities(tableQuery, function(error, entities) {
                    if (entities.length > 0) {
                        console.log('Duplicate user profile found:\r\nuserId = [' +  user.userId +
                                     ']\r\nemail = [' + item.email + ']')
                        request.respond(statusCodes.OK, item);
                    }
                    else {
                        //Pass the createdAt property
                        var date = new Date();
                        var createdAt = date.getFullYear() + "/" +
                                        (date.getMonth() + 1) + "/" +
                                        date.getDate() + " " +
                                        date.getHours() + ":" +
                                        date.getMinutes() + ":" +
                                        date.getSeconds();
                        var entity = {
                            PartitionKey :  user.userId || 'default',
                            RowKey : item.email,
                            name : item.name,
                            email : item.email,
                            phone : item.phone,
                            createdAt : createdAt
                        };

                        // Insert the item in the storage table
                        tableService.insertEntity('UserProfile', entity, function(error) {
                            if (error) {
                                if (retryCount > 0) {
                                    console.error('Failed to insert the item in the UserProfile table:\r\nuserId=[' + user.userId +
                                                  ']\r\nretryCount=[' + retryCount +
                                                  ']\r\nerror=[' + error + ']');
                                    retryCount--;
                                    setTimeout(insertEntity, retryInterval);
                                }
                                else {
                                    message = 'Failed to insert the item in the UserProfile table:\r\nuserId=[' + user.userId +
                                              ']\r\nerror=[' + error + ']';
                                    console.error(message);
                                    request.respond(statusCodes.BAD_REQUEST, message);
                                }
                            }
                            else {
                                console.log('Item successfully inserted for user [' + user.userId + ']:\r\n', item);
                                request.respond(statusCodes.OK, entity);
                            }
                        });
                    }
                });
            }
        });
    }
    //request.execute();
}
This insert script performs the following actions:
- Validates the input data
- Checks for the duplication of a user profile based on email address
- The insertEntity function can be called recursively after set internal in case of any error
- Creates instance of table storage service (Pass your storage account name and key), and creates table if it doesn’t exist
- Inserts record with PartitionKey and RowKey
- Comments out request.execute()so that data is not inserted into SQL tables
Read:
function read(query, user, request) {

    // Get access to the storage table
    var azure = require('azure');
    var tableService = azure.createTableService('STORAGE_ACCOUNT_NAME', ‘STORAGE_ACCOUNT_KEY');

    // Define query to retrieve only profiles for the current user or default
    var tableQuery = azure.TableQuery
    .select()
    .from('UserProfile')
    .where('PartitionKey eq ?', user.userId || 'default');

    // Retrieve todo items
    queryEntities();

    function queryEntities() {
        tableService.queryEntities(tableQuery, function (error, entities) {
            if (error) {
                var message = 'Failed to retrieve entities for user [' + user.userId + '].';
                console.error(message);
                request.respond(statusCodes.BAD_REQUEST, message);
            }
            else {
                console.log('Retrieved [' + entities.length + '] profiles for user [' + user.userId + '].');
                for (var i = 0; i < entities.length; i++) {
                    entities[i].id = entities[i].RowKey;
                }
                request.respond(statusCodes.OK, entities);
            }
        });
    }
    //request.execute();
}
The read script does following:
- Creates Table storage service instance
- Creates query to fetch data by PartitionKey
- Fetches data and returns it
- Comments out request.execute()so that data is not fetched from SQL tables
Verify Data in Table Storage Using Phone Application
Now you can verify table storage inserts and read through “ProfileManager” windows phone application. If you have not already downloaded this sample app, you can download it from: https://github.com/manoj-kumar1/Azure-MobSvc-As-Backend-For-SQL-DB
You will need “FinalProfileManagerSoln” from this github location. You can follow these steps to test out the table storage account that you have configured in the above steps:
1. Open “ProfileManagerSoln.sln” from “FinalProfileManagerSoln” folder downloaded from above github location.
2. Setup correct mobile service name and key in the App in App.xaml.cs:
The key is from the newly created Azure Mobile Service “ProfileMobileSvc” (Details for existing app):
public static MobileServiceClient MobileService = new MobileServiceClient(
            "https://profilemobilesvc.azure-mobile.net/",
            "<xxxxxxxxxxxxxxxxxxxxxxxxxx>");    //Put name and key of your mobile service
3. Modify the model class UserProfile under the Model folder in the project: This class represents columns needed for saving the table in Azure table storage.
using Newtonsoft.Json;
using System;

namespace ProfileManager.Model
{
    public class UserProfile
    {
        [JsonProperty(PropertyName = "PartitionKey")]
        public string PartitionKey { get; set; }

              [JsonProperty(PropertyName = "RowKey")]
              public string RowKey { get; set; }

              [JsonProperty(PropertyName = "Timestamp")]
              public DateTime Timestamp { get; set; }

              [JsonProperty(PropertyName = "id")]
              public string Id { get; set; }

              [JsonProperty(PropertyName="name")]
               public string Name { get; set; }

              [JsonProperty(PropertyName = "email")]
              public string Email { get; set; }

              [JsonProperty(PropertyName = "phone")]
              public string Phone { get; set; }
          }
}
4. Build and run the application.
5. Click “Add User” and add a new user profile.
6. Verify that user is listed in the home screen.
7. Verify that the user has been added into the “UserProfile” table in Azure Table storage through “Azure Storage Explorer 5” client. You can download it here: http://azurestorageexplorer.codeplex.com/.
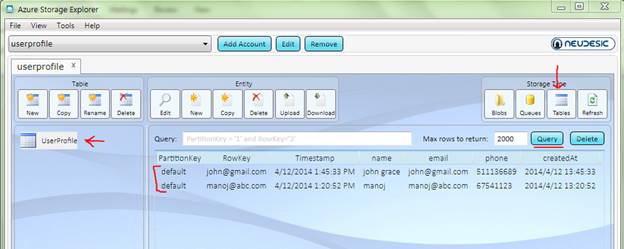
Azure Storage Explorer
Conclusion
In this illustration, I have explained how you can leverage “Azure Mobile Services” to store Windows Phone 8 application data in Azure Table Storage in place of the default Azure SQL Database. This technique can be used to store large amounts of structured data in Table Storage in Azure, which is more economical than relational data store.