

Before we go into how to set up an IoT hub in Azure, and creating a small example client—in this case a console application—and connecting it to the hub. I want to give you a reason why you might consider using the IoT hub outside of IoT scenarios.
I’ve been making use of IoT hubs of late, and the reasons behind that use is not always related to IoT devices. To understand my reasoning, let’s look at some of the reasons Microsoft gives to entice you to use the service.
Some of these reasons are as follows…
- May have limited power and processing resources.
- May have intermittent, slow, or expensive network connectivity.
- Can be in remote locations, where physical access is expensive.
This list is only a small snippet, and you can view the rest of the article; it comes from here.
This article gives a great overview over IoT Hub and I suggest reading through it. But, for me, the items in the list I quoted above are pretty much responsible for my use of it today.
After building applications—for Web, desktop, mobile and embedded devices—I’ve found available system resources can be, even on desktop environments, quite limited at times. And, the transfer of data between application and back-end needs to be as efficient, and as tolerating, as possible. The IoT hub, for me personally, is excellent at servicing this requirement when needed. The IoT hub, out of the box, supports commutation protocols that may be of interest to you. And, Microsoft has gone to great lengths to give you a way of easily implementing your own protocols.
However, if we were to isolate our attention on one protocol, such as MQTT, I can quote this line from their documentation, which says “It was designed as an extremely lightweight publish/subscript messaging transport. It is useful for connections with remote locations where a small code footprint and/or network bandwidth is at a premium.”
You may read the complete documentation here.
That all said, the IoT hub is fast, very fast. It implements a very simple, but extremely efficient, storage solution that those old-school devs may be more familiar with.
To give you an idea of why this simple but effective message storage mechanism is needed, the S2 Standard IoT Hub tier will allow an unlimited number of connected devices, receiving up to six million messages per day, per IoT hub unit. That’s potentially a lot of devices sending a lot of messages. A bog standard ASP.NET WebApi, using Azure SQL to store data, would either need some serious investment in powerful hardware, or require medical attention.
Also, there is one other point that you might consider when deciding to use the IoT hub over something like the Azure Event Hub, and that is the bi-directional communication. For the most part, event Hubs are designed to ingress data, whereas the IoT hub can receive and send to a specific device from day one.
But that’s enough talk, let’s get on with a little example.
Setting Up the IoT Hub
I’ll be using the free tier for this article, and Visual Studio 2015 Update 3 to develop the console application. At the time of this writing, and things are changing a lot at the moment it would appear, Figure 1 is an example of what I’m looking at when setting up an IoT Hub.

Figure 1: The settings for an example IoT Hub
Now, I’m not going to waste your valuable time regaling you with a ‘how to get started with IoT Hub’ in this article because Azure has some excellent articles on that exact subject, using C#; and you can find this here…
https://azure.microsoft.com/en-gb/documentation/articles/iot-hub-csharp-csharp-getstarted/
My interest in the IoT hub is built upon that two-way communication ability. Consider the following scenario…
You have a UWP application, which is sending regular messages to the IoT hub, or a set of applications all working together in a Microservice-like setup. But, based upon the data being received, you wanted a very fast way of sending data back to the application: giving it instructions to do something based upon what data you are receiving, or simply change a setting.
As an example, I’m using the applications created by the Azure Getting Started documentation I mentioned earlier. But, I’m also setting up my application which is simulating a client up to also receive messages from the hub.
Using the registration client detailed in the ‘Azure Getting Started Guide,’ I now have a client registered with the hub, named ‘service1’, and I’ve received the needed key to allow this client to access the hub. My complete client is set up like so…
static DeviceClient deviceClient;
static string _iotHubUri = "Your IoT hub's uri";
static string _deviceKey = "Enter your key here for your IoTHub"

static string _state = "state 0";

static void Main(string[] args)
{
   Console.WriteLine("service1");
   deviceClient = DeviceClient.Create(_iotHubUri,
      new DeviceAuthenticationWithRegistrySymmetricKey
      ("service1", _deviceKey));

   SendDeviceToCloudMessagesAsync();
   ReceiveMessageAsync();
   Console.ReadLine();
}
The Send device to cloud message method is not much different from the example in Azure, except that I’m also appending the _state string onto the output to the console like this…
Console.WriteLine($"{ DateTime.Now } >
   Sending message: { messageString } : { _state }");
My cloud to device receive message method, however, looks a little like this…
private static async void ReceiveMessageAsync()
{
   while (true)
   {
      Message receivedMessage = await
         deviceClient.ReceiveAsync();
      if (receivedMessage == null) continue;

      Console.ForegroundColor = ConsoleColor.Yellow;

      string message =
         Encoding.ASCII.GetString(receivedMessage.GetBytes());
      Console.WriteLine($"Received message: { message }");
      _state = message;

      Console.ResetColor();

      await deviceClient.CompleteAsync(receivedMessage);
   }
}
When a message is received from the cloud, it changes the _state string, which in turn is appended to the output to the console when this client sends a message to the cloud.
And, the code on the client reading the messages from the IoT hub, which sends a message to the simulated client, looks like the following…
static async void SendMessage1()
{
   int count = 0;
   while(true)
   {
      await SendCloudToDeviceMessageAsync(count);
      count++;

      await Task.Delay(10000);
   }
}

private async static Task
   SendCloudToDeviceMessageAsync(int count)
{
   var commandMessage = new
      Message(Encoding.ASCII.GetBytes($"state { count }"));
   Console.ForegroundColor = ConsoleColor.Yellow;
   Console.WriteLine("Sending message to service1...");
   Console.ResetColor();
   await serviceClient.SendAsync("service1", commandMessage);
}
Running the Simulated Device Client and Message Reader
Now that we’ve quickly covered how it’s put together, let’s take a look at the output.
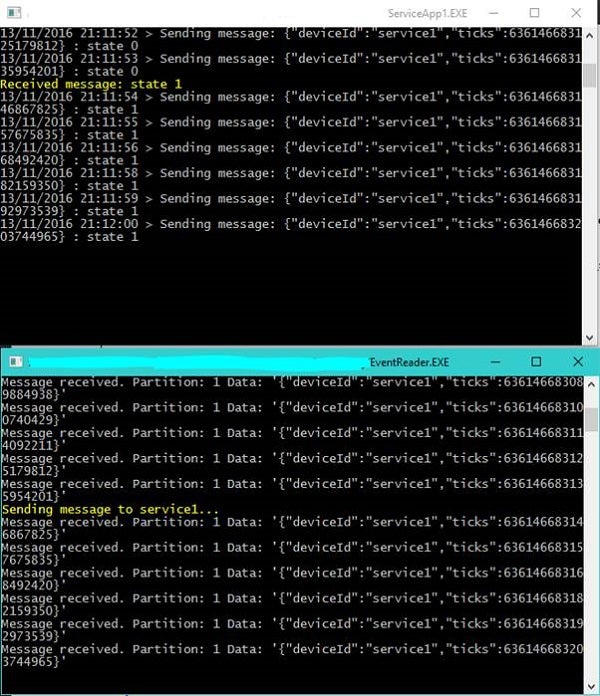
Figure 2: Top: The simulated device client. Bottom: The reader showing messages from the hub.
This not very practical, but very simple, application shows a message being sent from the IoT hub to the simulated device client and changing its state in some small way.
Adding into the mix the security available in the IoT hub, it would be very simple to expand this into a central control for many devices and or microservices. You could configure them quickly, while at the same time be able to receive large volumes of messages at an extremely high frequency.
My own little play project has been using an ASP.NET Core app, hooking it into an IoT hub, and controlling it through a custom middleware component. I have to say I’ve been having a great deal of fun with that!
If you have any comments or questions about this article, please look me up on Twitter: @GLanata.