

By Thiru Thangarathinam
Introduction In this article, we will see how to use Web services in a real-time Web application. Even though Web services are very powerful and based on open Internet protocols such as XML, HTTP and SOAP (that accounts for platform independence), using them in a real-time Web site requires careful consideration of performance implications. For example, if before showing a particular page you try to call out two or three Web services across the Internet to get data, the responsiveness of the site is going to be severely impacted. At the same time, you cannot avoid calling out to Web services to get the data you want. However, if you carefully plan your Web application, you can take advantage of the functionalities of the Web services without impacting the performance of the application.
Windows Service You can create an instance of the Timer component by: The input XML data to the control can be in any one of the following formats: an object of type System.Xml.XmlDocument, an XML string, or an XML file. Similarly the XSL data can be in any one of the following formats: an object of type System.Xml.Xsl.XslTransform or an XSL file.
In this article, we will consider the very common example of a Stock Ticker application and understand how to use features such as asynchronous Web services, Windows service applications, server-based timer components, and .NET XML API classes to create high-performance, scalable, and flexible applications.
Architecture of the System
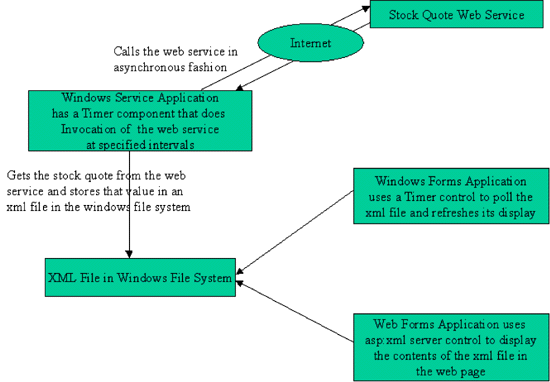
Our requirement is to get the stock quote from the remote Web service and display the stock quote in different kinds of applications such as a Windows form application and a Web form application without affecting the performance. The following pieces are tied together to construct this application.
Before we look at the code, let me briefly introduce some of the new .NET features like Windows Service, Timer Component, ASP:XML server control, and .NET Framework XML API.
There are times where you may want to have your code always running on your server. If you have ever worked with MSMQ, you might have created an application that polls the message queue for every predefined amount of time and checks for new messages. In that case, the application that checks the queue for messages should always be running as a Windows NT Service to poll the message queue frequently. These Windows services do not have any user interface and we can configure Windows services in such a way that they can be automatically started when the computer starts, or they can be paused and restarted at any time.
Prior to Visual Studio .NET, if you wanted to write a Windows service application either you had to use the template provided by ATL, or if you are a VB programmer, you had to embed custom NT service controls in VB to achieve the same functionality. But with Visual Studio .NET, you can easily create an application that has the capability to run as a Service. Visual Studio.NET is supplied with a new project template called Windows Service that provides all the plumbing required for creating the application that can run as a Service. When you create a Visual Studio .NET project as a Service, you can write code to respond to the actions like what should happen when the service is started, paused, resumed and stopped.
Once you create the service, it has to be installed using InstallUtil.exe (Command line utility), which is used to install the service in the local computer. After you install the service, you can start, stop, pause and resume it using Service Control Manager.
Timer Component
One of the new exciting features in the .NET Framework is the ability to create applications that can raise events at scheduled intervals. The Timer component that is contained in the System.Timers namespace is a server-side component that exposes methods and properties through which we can capture events raised by the Timer component and take specific actions according to the requirements.
Timer component exposes a property named Interval, the value of which determines the specified interval at which the Elapsed event is raised. As the name suggests, the Elapsed event is raised whenever the specified time interval expires, and we can write code in this event to implement the custom processing logic that we want to execute.
In this article, we are going to use the Timer component to raise events at the elapsed intervals that will allow us to make a request to a remote Web service in an asynchronous fashion. This frequency of requests is determined by the value of the Interval property. It is also important to note that the server-based timer component is different from the Windows-based timer control that is contained in the System.Windows.Forms namespace. Since the server-based timer components are designed for use with worker threads in a multithreaded environment, they can be more efficient in multithreaded environment unlike their Windows-based counterparts.
.NET Framework XML API
The .NET Framework provides a set of XML classes for developers to create applications based on XML. Microsoft has made every attempt to keep the programming model of these classes in line with the ADO.NET programming model, which also provides a wealth of functionality to work with XML. These XML classes are contained in the System.XML namespace. The methods and properties of the classes present in the System.XML namespace are similar to its predecessor, the MSXML parser component. System.XML namespace is likely to replace the MSXML parser.
All the .NET Framework XML classes are derived from two abstract classes called XmlReader and XmlWriter. XmlReader provides a fast, forward-only, read-only cursor for reading an XML document and XmlWriter provides a mechanism for producing XML document streams. The output produced by these classes conforms to the W3C recommendations. In this article, we will be using XmlTextWriter and XmlTextReader for writing into and reading from an XML file.
ASP:XML Server control
One of the coolest features of .NET is the ability to apply XSLT transforms to XML data and create HTML on the fly. This can be done using the high-performance, built-in server control identified by the tag asp:xml.
We will be using the following two properties of the control in the later parts of this article.
Indicates the name of the XML file to be used as input data
Indicates the name of the XSL file that contains the transformations to be applied to the XML data
Implementation of the System
We will split the whole application into three different parts.
This Windows service application invokes the Web service asynchronously at scheduled intervals, which is determined by the interval property of the Timer component. This application gets the stock quote from the Web service, and it stores that value in the XML file named stocks.xml that is created on the fly.
In this section, we will see how this XML file (that has the updated stock information) can be used by different applications. Towards this end, we will consider the following:
- A WinForms client application
- A Web Forms client application
Implementation of Web Service
A Web service can be defined as a programmable logic that is exposed via the Internet using protocols such as HTTP, XML and SOAP. Since Web services are exposed using standard Internet protocols, any application that can communicate using these standards can interact with a Web service. Web services provide well-defined interfaces of their functionality through an XML based language called Web Services Description Language (WSDL). This language not only describes the functionality of the Web service but also describes each of its methods, the parameters they take, and their return value. It is similar to the way a COM object exposes its functionalities through a type library.
In this section, we will be implementing a Web service called StockQuoteWebService. This Web service basically invokes the stored procedure called StockQuoteGet, which is defined as follows:
create procedure StockQuoteGet

@Name char(4)

as

select * from Stocks

where Name = @Name

GO
As you can see, the stored procedure is very simple, and it returns the stock quote from the stocks table based on the name of the company passed in as the argument.
Here is the code required to implement the Web service.
using System;

using System.Collections;

using System.ComponentModel;

using System.Data;

using System.Diagnostics;

using System.Web;

using System.Web.Services;
using System.Data.SqlClient;[WebMethod(EnableSession=false,Description=”This Method returns the stock quote
based on the name of the company”)]
public string GetQuote(string name)
{
DataSet dstQuote;
SqlConnection sqlConn;
SqlDataAdapter command;
DataTable dtStockTable;
string connString;
string price;
connString = “server=localhost;uid=sa;pwd=thiru;database=15Seconds”;
sqlConn = new SqlConnection(connString);
command = new SqlDataAdapter(“StockQuoteGet”, sqlConn);command.SelectCommand.CommandType = CommandType.StoredProcedure;
command.SelectCommand.Parameters.Add(new SqlParameter(“@Name”,
SqlDbType.Char,4));
command.SelectCommand.Parameters[“@Name”].Value = name;dstQuote = new DataSet();
command.Fill(dstQuote, “Stocks”);
//Assign the table to the DataTable object variable
dtStockTable = dstQuote.Tables[“Stocks”];
//Return the value present in the Price column
price = dtStockTable.Rows[0][“Price”].ToString();
return price;
}
Let us walk through the code line by line to understand the execution of the Web service.
We start our implementation by importing all the required namespaces.
using System;
using System.Collections;
using System.ComponentModel;
using System.Data;
using System.Diagnostics;
using System.Web;
using System.Web.Services;
Since we need to access the Sql Server database to get the stock quote, we import the namespace System.Data.SqlClient using the code shown below. This namespace contains all the classes required for accessing SqlServer database using native calls that result in high performance.
using System.Data.SqlClient;
The attribute WebMethod specifies that this method is Web-callable and the ASP.NET runtime provides all the underlying plumbing required for exposing this method to the Internet clients. We also specify that we do not want to store state across requests from a single consumer by setting the EnableSession property to false. The Description property allows us to provide a brief description of the functionality of our Web service.
[WebMethod(EnableSession=false,Description=”This Method returns the stock quote

based on the name of the company”)]
In this line, we create an instance of the SqlConnection object, passing to it the connection string that is required to establish connection with the database.
sqlConn = new SqlConnection(connString);
Once we create an instance of the SqlConnection object, we can then create the SqlDataAdapter object.
We pass the name of the stored procedure we want to execute and the previously created SqlConnection as arguments to the constructor of the SqlDataAdapter object.
command = new SqlDataAdapter(“StockQuoteGet”, sqlConn);
Here, we indicate that we want to execute the stored procedure by setting the CommandType property to Stored Procedure.
command.SelectCommand.CommandType = CommandType.StoredProcedure;
Since our stored procedure takes the company symbol as an argument, we add the Name parameter in the following line.
command.SelectCommand.Parameters.Add(new SqlParameter(“@Name”,

SqlDbType.Char,4));
After we add the parameter, we assign the passed name to the Value property of the parameter object.
command.SelectCommand.Parameters[“@Name”].Value = sName;dstQuote = new DataSet();
We then populate the DataSet with the results of the stored procedure execution by invoking the Fill method of the SqlDataAdapter object.
command.Fill(dstQuote, “Stocks”);
The Tables collection of the DataSet object contains all the tables that are returned as a result of the stored procedure execution. From this collection, we retrieve the Stocks table and assign it to the DataTable object using the following line of code.
//Assign the table to the DataTable object variable

dtStockTable = dstQuote.Tables[“Stocks”];
Once we get the DataTable object, we can then easily extract the value present in the Price column of and assign it to the local variable price.
//Return the value present in the Price column

price  = dtStockTable.Rows[0][“Price”].ToString();
Finally, we return the value present in the variable price to the caller.
return price;
Implementation of Windows Service Application
To create a Windows service application in Visual C#, select File->New Project and then select Visual C# Projects from the Project Types and select Windows Service from the List of templates. Enter the name of the project as WinPollingService. Once the project is created, rename the default service class from Service1 to QuotePollingService.
The following figure shows the Properties window of our QuotePollingService. Through this window, we can set properties such as CanStop and CanShutdown to either true or false. These settings determine what methods can be called on our service at runtime. For example, when the CanStop property is set to true, the OnStop method will be automatically called when the service is stopped through the Service Control Manager.
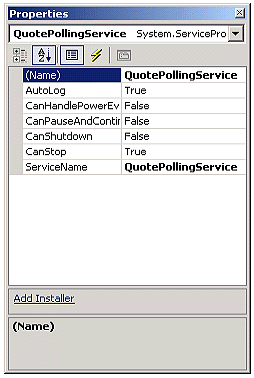
Once we set all the properties to appropriate values, we need to add the installers that are required for installing our Windows service application as a service. To add these installers, we click on Add Installer (shown in the above figure) in the Properties window of the QuotePollingService class.
After we add the installer classes, we need to change the Account property of the ServiceProcessInstaller instance to use the LocalSystem account. This is shown in the following diagram.

Since our Windows service depends on the methods of the StockQuoteService to get the stock quote, we need to reference the Web service that we created in the previous step. In Visual Studio .NET, this is done using the Add Web Reference option.
To add a Web reference, right click on the project in the Solution explorer and select Add Web Reference. In the Add Web Reference dialog box, enter the path of the .asmx file of the Web service.
When you add a Web reference of a Web service to your project, Visual Studio .NET automatically generates a proxy class that not only interfaces with the Web service but also provides a local representation of the Web service.
Let us look at the code required to implement our Windows service.
using System;

using System.Collections;

using System.ComponentModel;

using System.Data;

using System.Diagnostics;

using System.ServiceProcess;

using System.Xml;

using System.Data.SqlClient;public class QuotePollingService : System.ServiceProcess.ServiceBase
{
private System.ComponentModel.IContainer components;
private localhost.QuoteService _service;
private System.IAsyncResult _asyncResult;
private System.Timers.Timer timer1;
private string _name;static void Main()
{
System.ServiceProcess.ServiceBase[] ServicesToRun;
ServicesToRun = new System.ServiceProcess.ServiceBase[] { new
QuotePollingService() };System.ServiceProcess.ServiceBase.Run(ServicesToRun);
}protected override void OnStart(string[] args)
{
// TODO: Add code here to start your service.
_name = “MSFT”;
_service = new localhost.QuoteService();
timer1.Enabled = true;
}private void timer1_Elapsed(object sender, System.Timers.ElapsedEventArgs e)
{
//Invoke the GetQuote method in asynchronous fashion with the //callback method
_asyncResult = _service.BeginGetQuote(_name ,new AsyncCallback(WriteResult),
null);
}private void WriteResult(IAsyncResult oRes )
{
string result;
result = _service.EndGetQuote(oRes);
XmlTextWriter writer = new XmlTextWriter
(“c:\\Inetpub\\wwwroot\\MyProjects\\15Seconds\\StockWebForms
Client\\stocks.xml”,
null);
writer.Formatting = Formatting.Indented;
writer.WriteStartDocument(false);
writer.WriteComment(“This file represents the stock quote returned from the web
service”);
writer.WriteStartElement(“stockquotes”);
writer.WriteStartElement(“stockquote”, null);
writer.WriteStartElement(_name, null);
writer.WriteElementString(“price”, result);
writer.WriteEndElement();
writer.WriteEndElement();
writer.WriteEndElement();
//Write the XML to file and close the writer
writer.Flush();
writer.Close();
}}
We start by importing all the required namespaces. As you can see, we have also imported the System.Xml namespace to get access to the XML related classes.
using System;
using System.Collections;
using System.ComponentModel;
using System.Data;
using System.Diagnostics;
using System.ServiceProcess;
using System.Xml;
using System.Data.SqlClient;
In the following lines of code, we declare objects of type QuoteService and IAsyncResult.
private localhost.QuoteService _service;
private System.IAsyncResult _asyncResult;static void Main()
{
Here, we declare an Array of type ServiceBase.
System.ServiceProcess.ServiceBase[] ServicesToRun;
All the services contained by the application can be added and run together. Since we are creating only one service named QueuePollingService, we add that to the array.
ServicesToRun = new System.ServiceProcess.ServiceBase[] { new QuotePollingService() };
The Run method of the ServiceBase class is the main entry point for the service. In the following line of code, we call the Run method and pass the previously created array as an argument.
	System.ServiceProcess.ServiceBase.Run(ServicesToRun);

}
The OnStart method will be executed when the service is started from the Service Control Manager. In this method, we create an instance of our QuoteService, and we also enable the Timer component to let it raise the Elapsed event at periodic intervals.
protected override void OnStart(string[] args)

{

	// TODO: Add code here to start your service.

	_name = “MSFT”;

	_service = new localhost.QuoteService();

	timer1.Enabled = true;

}
As we already said, the Windows service application has a Timer component that has its interval property set to 5000 milliseconds. Whenever this interval elapses, the Timer component automatically fires the Elapsed event. In this event, we call the BeginGetQuote method of the Web service and pass the company symbol as the first argument. We also pass an instance of the AsyncCallback delegate object. To the constructor of the AsyncCallback class, we pass the name of the callback method that is to be called back when the asynchronous operation is completed, as an argument. The BeginGetQuote method returns an object of type IAsyncResult which can be used to check the status of the asynchronous operation.
private void timer1_Elapsed(object sender, System.Timers.ElapsedEventArgs e)

{

//Invoke the GetQuote method in asynchronous fashion with the //callback method

_asyncResult = _service.BeginGetQuote(_name ,new AsyncCallback(WriteResult), null);

 }
The WriteResult method is called once the Web service finishes its executionm and it is also passes an object of type AsycnResult that encapsulates the results of the asynchronous Web service call that we made.
private void WriteResult(IAsyncResult oRes )

{

string result;
We get the result by calling the EndGetQuote method, passing to it the AsyncResult object that holds the results of the invocation as an argument.
result = _service.EndGetQuote(oRes);
Here we create an instance of the XmlTextWriter object and specify the path of the XML file to be created.
XmlTextWriter writer = new XmlTextWriter

(“c:\\Inetpub\\wwwroot\\MyProjects\\15Seconds\\StockWebForms

Client\\stocks.xml”, null);
To format the XML Document, we assign the value Indented to the Formatting property of the XmlTextWriter. When this option is set, child elements are indented using Indentation and IndentChar properties. IndentChar property decides which character to use for Indenting and Indentation property determines how many IndentChars to write for each level in the hierarchy.
Here we use the default values for Indentation and IndentChar, which are 2 and space respectively.
writer.Formatting = Formatting.Indented;
We use the StartDocument to write out the XML declaration with the version and the standalone attributes. The version attribute will be set to “1.0” and the standalone will have the value “no” as we pass false as an argument to the WriteStartDocument method.
writer.WriteStartDocument(false);
In this line, we write a Comment to indicate that the QuotePollingService application has created this file.
writer.WriteComment(“This file represents the stock quote returned from the web service”);
Here we write out the specified start tag with the name of the element as stockquotes.
writer.WriteStartElement(“stockquotes”);
We then write out another element with the name being stockquote.
writer.WriteStartElement(“stockquote”, null);
We add this line of code to create an element with the name as the value contained in the _name variable.
writer.WriteStartElement(_name, null);
Finally, we write out an element of type string by invoking the WriteElementString method of the XmlTextWriter object.
writer.WriteElementString(“price”, result);
In the following lines, we write out the corresponding end tag elements.
	writer.WriteEndElement();

	writer.WriteEndElement();

	writer.WriteEndElement();
After we are done writing the elements, we flush the contents and then close the XmlTextWriter object.
	//Write the XML to file and close the writer

	writer.Flush();

	writer.Close();

}
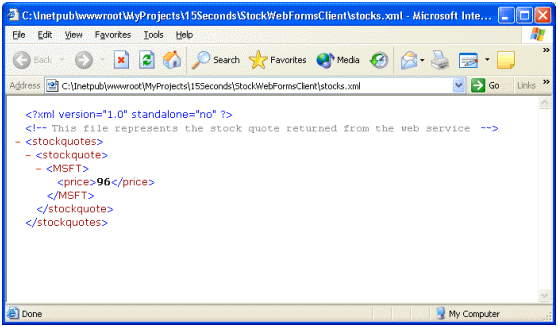
A sample xml file that is generated by the above code looks like this.
Now that we have created the Windows service application, let us create a Windows installer to install the Windows service. For this purpose, add a new Setup project named WinPollingServiceSetup to the WinPollingService solution. Once the setup project is created, add the Project Output of the WinPollingService to the setup project. You can do this by right clicking on the WinPollingServiceSetup project from the Solution Explorer and select Add->Project Output from the context menu. In the Add Project Output Group dialog box, select Primary Output from the list and click OK. Now that we have added the output of the WinPollingService project to the setup project, we then need to add the installer that we created earlier in the WinPollingService project as a custom action. To do this, select the WinPollingServiceSetup project from the Solution Explorer and select View->Editor->Custom Actions from the menu. In the Custom Actions editor, right click on the Custom Actions folder and select Add Custom Action from the context menu and then select the Primary Output of the WinPollingService project from the dialog box.
Implementation of Client Applications
Now that we have created the Windows service application that periodically refreshes the contents of the XML file with the latest stock quote, we will look at how different applications use this XML file. To illustrate, we will consider the following two types applications:
- A Windows Form application
- A Web Form application
We will start our explanation with the Windows form application
Windows Forms Application
We create a new Visual C# Windows application using the New Project dialog box and call it StockWinFormsClient. Once the project is created, add a Timer control to the form and set its Interval property to 5000. We also add three label controls and name them lblStock, lblName and lblMessage respectively. The label control lblStock is the one that displays the stock quote that is obtained from the XML file.
Since we set the interval property of the Timer control to 5000, the Tick event of the timer control will be fired for every 5000 milliseconds.
private void timer1_Tick (object sender, System.Timers.ElapsedEventArgs e)

{

try

	{
Here, we invoke the UpdateDisplay method and pass the name of the XML file to be read as an argument.
UpdateDisplay(“c:\\Inetpub\\wwwroot\\MyProjects\\15Seconds\\StockWebFormsClient\\stocks.xml”);
}
catch(Exception ex)
{
MessageBox.Show(ex.Message);
}}
The UpdateDisplay method loops through the contents of the XML file and identifies the element with the name “price” by verifying the NodeType and Name properties of the XmlTextReader object.
private void UpdateDisplay(string sPath)

{

	try

	{

		XmlTextReader reader = new XmlTextReader (sPath);

		while (reader.Read())

		{

			if (reader.NodeType == XmlNodeType.Element)

		{

				if (reader.Name == “price”)

{
Once the element is identified, we read the contents of the element by invoking the ReadElementString method.
lblStock.Text = reader.ReadElementString();
}
}
}
reader.Close();
}
catch(Exception ex)
{
MessageBox.Show(ex.Message);
}}
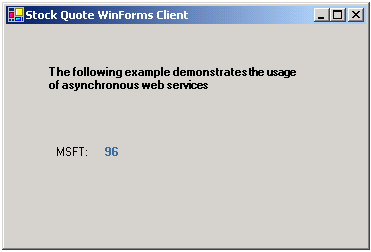
When we execute this application, we get an output that is similar to the following.
Web Forms Application
Now, let us have a look at how we can use the XML file that is created by the Windows service application, to display the stock quote information in a Web forms application. Let us start by creating a new Visual C# ASP.NET Web application project called StockWebFormsClient. Once we create the project, we add the asp:xml server control to the Web form and set its DocumentSource and TransformSource properties to stocks.xml and stock.xsl respectively.
The entire code of the Web form page named WebForm1.aspx is as follows:
<%@ Page language=”c#” Codebehind=”WebForm1.aspx.cs”
AutoEventWireup=”false” Inherits=”StockWebFormsClient.WebForm1″ %>
<!DOCTYPE HTML PUBLIC “-//W3C//DTD HTML 4.0 Transitional//EN” >
<HTML>
<HEAD>
<meta content=”Microsoft Visual Studio 7.0″
name=”GENERATOR”><meta content=”C#” name=”CODE_LANGUAGE”>
<meta content=”JavaScript (ECMAScript)” name=”vs_defaultClientScript”>
<meta content=http://schemas.microsoft.com/intellisense/ie5
name=”vs_targetSchema”>
</HEAD>
<body MS_POSITIONING=”GridLayout”><form id=”TesWebForm” method=”post” runat=”server”>
<asp:label id=”Label1″ style=”Z-INDEX: 101; LEFT: 149px; POSITION:
absolute; TOP: 255px” runat=”server” Height=”38px” Width=”471px”
ForeColor=”Maroon”>The above content is generated through the use of
asp:xml server control
</asp:label><asp:xml id=”Xml1″ runat=”server” TransformSource=”stocks.xsl”
DocumentSource=”stocks.xml”>
</asp:xml></form>
</body>
</HTML>
The stocks.xsl file that is used for transforming the contents of the stocks.xml file to html looks like the following.
<?xml version=”1.0″ ?>
<xsl:stylesheet version=”1.0″
xmlns_xsl=”http://www.w3.org/1999/XSL/Transform”>
<xsl:template match=”stockquotes”>
<table cellspacing=”0″ width=”100%” border=”1″
borderColor=”DarkGoldenrod”>
<tr align=”center”><td>
<b>
MSFT : <xsl:value-of select=”stockquote/MSFT/price” />
</b>
</td>
</tr><br></br>
<br></br>
<tr align=”center”>
<td>
<b>The stock price is obtained from the xml file generated through the asynchronous web service
</b>
</td>
</tr>
</table>
</xsl:template>
</xsl:stylesheet>
If we run the application, we get the following output.
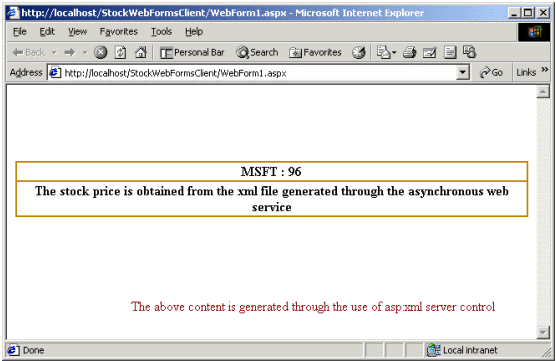
As we can see from the above figure, the first half of the page is generated by the asp:xml server control, and the second half of the page, which has the static display, originates from the parent Web form.
Putting it all together
Now that we have constructed the different parts of the application, let us test the application by going through the following steps.
- First, we start the QuotePollingService by opening up the Service Control Manager, right clicking on QuotePollingService and selecting Start from the context menu. Once the service is started, it will keep polling the Web service and refresh the contents of the XML file with the latest stock quote value.
- Now if we run our Windows application by executing the StockWinFormsClient, it will display the latest stock quote from the XML file. If we change the value of the stock quote in the stocks table, the Windows form will automatically update its display by showing the new value. This is made possible due to the combination of the following operations. Firstly, the Windows service application (that is always running) continuously invokes the Web service to get the latest stock quote, and it refreshes the XML file with the new value. Secondly, the Timer control set in the Windows forms application fires the Tick event at pre-determined intervals that allows us to read the contents of the XML file at specific intervals and update the display.
- Similarly, we can test our web forms application by navigating to the url http://localhost/MyProjects/15Seconds/StockWebFormsClient/WebForm1.aspx. Since the part of the page that contains the stock quote information is generated from the asp:xml server control (which gets its xml data from the xml file), we always get the updated and accurate stock quote information displayed in our browser.
Conclusion
In this article, we have seen the following.
Although the application we created was simple in functionality, it should provide a solid foundation for understanding how to build high-performance, scalable, flexible and reliable Web applications using some of the new features of the .NET framework such as XML based web services, windows service applications, XML API classes and the server-based Timer component.
About the Author
Thiru has authored numerous books and articles.
Thiru has many years of experience in architecting, designing, developing and implementing applications using Object Oriented Application development methodologies. He also possesses a thorough understanding of software life cycle (design, development and testing).
He is an expert with ASP.NET, .NET Framework, Visual C#.NET, Visual Basic.NET, ADO.NET, XML Web Services and .NET Remoting and holds MCAD for .NET, MCSD and MCP certifications.