

Introduction
The Windows Phone 7 platform was introduced to the world earlier this year in Barcelona. One of the chief highlights of the announcement was the fact that the phone will support two different frameworks – Silverlight for Windows Phone 7 and XNA for Windows Phone 7.
Since Microsoft has kept a firm hand in terms of specifying the minimum hardware specification for Windows Phone 7 devices, it has ensured that the phone will be a great platform for XNA. Hardware performance is great on the devices while the XNA platform ensures that software performance, even in 3D, is magnificent.
XNA support on the Windows Phone platform ensures the easy game authoring experience that XNA provides transcends to creating fun-filled games for WP7.
Another advantage that WP7 provides is the support for Xbox Live. Today, hardcore as well as casual gamers have Xbox Live profiles. Now they can enjoy some of their Xbox live games on a newer platform.
XNA Overview
XNA games do 3 things:
- They load content at startup
- Respond to user input as fast and possible and update the game (Update method)
- Draw the updates as fast as possible (Draw Method)
Hands-on
Let’s start by creating an XNA game for the Windows Phone 7.
When you fire up Microsoft Visual Studio 2010 with the Windows Phone 7 tools installed, and select the XNA Game Studio group of templates, you will notice 2 “Windows Phone” Game templates. Select “Windows Phone Game (4.0)” from the template list and give the name of the project as “DemoXNAGame“.
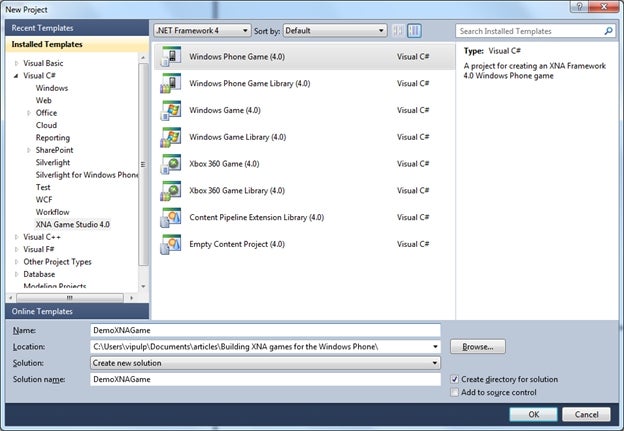
Figure 1
|
When you click OK to create the project, you will notice that Microsoft Visual Studio will create a couple of projects and some boilerplate code. One of the projects created is the project we specified, “ |
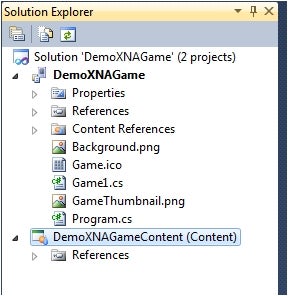 Figure 2 |
In the DemoXNAGame project, two files are auto-creates, Game1.cs and Program.cs.
There are 4 methods in the Game1.cs that come with some boilerplate code and will need to be modified to add functionality of the game.
Initialize
Let us start with the first method, Initialize.
         /// <summary>
           /// Allows the game to perform any initialization it needs to before starting to run.
           /// This is where it can query for any required services and load any non-graphic
           /// related content.  Calling base.Initialize will enumerate through any components
           /// and initialize them as well.
           /// </summary>
           protected override void Initialize()
           {
               // TODO: Add your initialization logic here

               base.Initialize();
           }
The above is the boilerplate code. Let us say, we want to draw a square at startup, you will modify the code as under.
We will need to add a class level object to store the object state of the drawn square. Let us call it mySquare of the type Rectangle.
   protected override void Initialize()
           {
               // TODO: Add your initialization logic here
               int squareDimension = (GraphicsDevice.Viewport.Width < GraphicsDevice.Viewport.Height) ? GraphicsDevice.Viewport.Width : GraphicsDevice.Viewport.Height;
               mySquare = new Rectangle(0, 0, squareDimension, squareDimension);
               base.Initialize();
           }
LoadContent
The second method is LoadContent. The default content is:
   /// <summary>
           /// LoadContent will be called once per game and is the place to load
           /// all of your content.
           /// </summary>
           protected override void LoadContent()
           {
               // Create a new SpriteBatch, which can be used to draw textures.
               spriteBatch = new SpriteBatch(GraphicsDevice);

               // TODO: use this.Content to load your game content here
           }
For our changes, add the code highlighted.
   protected override void LoadContent()
           {
               // Create a new SpriteBatch, which can be used to draw textures.
               spriteBatch = new SpriteBatch(GraphicsDevice);
               myTexture = Content.Load<Texture2D>("background");
               // TODO: use this.Content to load your game content here
           }
Draw
The last method we need to modify is Draw. The default implementation is as under:
         protected override void Draw(GameTime gameTime)
           {
               GraphicsDevice.Clear(Color.CornflowerBlue);

               // TODO: Add your drawing code here

               base.Draw(gameTime);
           }
We will change the highlighted portion.
   protected override void Draw(GameTime gameTime)
           {
               GraphicsDevice.Clear(Color.CornflowerBlue);

               // TODO: Add your drawing code here
               spriteBatch.Begin();
               spriteBatch.Draw(myTexture, mySquare, Color.Aqua);
               spriteBatch.End()

               base.Draw(gameTime);
           }
Now that you have changed the code, build it and run it in the emulator.
Note that if you do not have a system capable of rendering properly, you will get a warning when you start to debug the application.

Figure 3
Summary
In this article, we learned how to create a simple XNA application. Hopefully, you will be able to use this information to create fantastic games for the Windows Phone 7 platform.