

The first installment of this series showed how to set up a project for a custom Web control. Then, it demonstrated creating a template for the control’s .h and .cpp files, placing the new controls on the toolbar, and finally, changing the default control icon and TagPrefix.
Now, it’s time to have fun with Managed C++ and all that prep work from the previous article by actually building some custom Web controls. This installment examines the first of the three types of custom Web controls: superclassed. (The third and fourth installments will provide more detailed coverage of composite and rendered Web controls. The previous article promised only two more parts, but superclassed Web controls call for more discussion than originally planned.)
Superclassed Custom Web Controls
Superclassed custom Web controls are by far the easiest of the three custom Web control types. You create them by simply taking existing Web controls and adding properties, methods, and/or events to change their normal behavior. In fact, to implement them you just use standard inheritance. The only real difference between superclassed custom Web controls and standard class inheritance is that, to expose a property to the properties toolbox, you need to add attributes to that property.
The four property attributes that you will work most with when it comes to any of the custom Web control types are:
- Bindable—specifies whether the property can be bound to data
- Description—specifies the text to display in the description section of the properties toolbox
- Category—specifies whether the property will be exposed on the properties toolbox
- DefaultValue—specifies the default value for the property
To add the attributes to a property, you prefix the setter portion of the property as follows:
[Bindable(true), Description("The confirmation message displayed
                              within the popup box"),
Category("Appearance"), DefaultValue("")]
__property void set_ConfirmMessage(String *value);
Because all of the attributes seem to be associated only with the setter, you don’t need to prefix the getter portion of the property.
A Superclassed Custom Web Control in Action
The preceding explanation seems clear enough, but an actual example will help clear up any gray areas.
One superclassed custom Web control I keep in my toolbox is a confirmed button. This button pops up a message box verifying whether the user really wants to go ahead and process the button. I usually use the confirmed button when the button is about to delete something. This gives the user one last chance to cancel the delete action. Figure 1 shows the ConfirmedButton in action. (It also displays the result of the custom Web control created in part one of this series, as this example continues where the last article left off.)
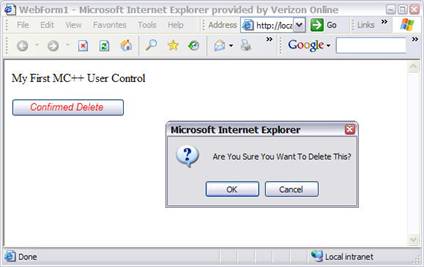
Figure 1: The ConfirmedButton in Action
The preliminary steps in creating a superclassed custom Web control are the same as any other custom Web control. Add a new class to the class library (that you created in the prep work). In this case, I called the class ConfirmedButton, but of course you can call it anything you like. Then, paste the .h and .cpp code, which you save in the toolbox to the appropriate class files. Next, search and replace all instances of the default class name to the name of the new class in both the .h and .cpp files. Finally, in the .cpp file, rename the include file to point to the new .h file you created.
Okay, now you are ready to create your new superclassed custom Web control.