

JavaScript DOM Ranges
By Nicholas C. Zakas
The DOM is a very exciting set of functionality for web pages, but most of the attention has been drawn by the standard DOM functionality. Many developers are unaware that the DOM has much more to offer than just createElement() and appendChild(); DOM ranges are a very powerful tool for dynamic web page manipulation.
A range can be used to select a section of a document regardless of node boundaries (note that the selection occurs behind the scenes and cannot be seen by the user). Ranges are helpful when regular DOM manipulation isn’t specific enough to change a document.
DOM Level 2 defines a method called createRange() to, well, create ranges. In DOM-compliant browsers (not Internet Explorer, by the way), this method belongs to the document object, so a new range can be created like this:
var oRange = document.createRange();
Just like nodes, a range is tied directly to a document. To determine if the document supports DOM-style ranges, you can use the hasFeature() method:
var supportsDOMRanges = document.implementation.hasFeature("Range", "2.0");
If you plan to use DOM ranges, it is always best to make this check first and wrap your code in an if statement:
if (supportsDOMRange) {
   var oRange = document.createRange();
   //range code here
}
Simple selection in DOM ranges
The simplest way to select a part of the document using a range is to use either selectNode() or selectNodeContents(). These methods each accept one argument, a DOM node, and fill a range with information from that node.
The selectNode() method selects the entire node, including its children, whereas selectNodeContents() selects all of the node’s children. For example, consider the following:
<p id="p1"><b>Hello</b> World</p>
This code can be accessed using the following JavaScript:
var oRange1 = document.createRange();
var oRange2 = document.createRange();
var oP1 = document.getElementById("p1");
oRange1.selectNode(oP1);
oRange2.selectNodeContents(oP1);
The two ranges in this example contain different sections of the document: oRange1 contains the <p> element and all its children, whereas oRange2 contains the <b/> element and the text node World (see Figure 1).
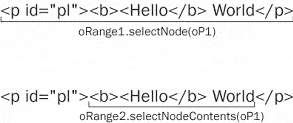
Figure 1
Whenever you create a range, a number of properties are assigned to it:
- startContainer — The node within which the range starts (the parent of the first node in the selection)
- startOffset — The offset within the startContainer where the range starts. If startContainer is a text node, comment node, or CData node, the startOffset is the number of characters skipped before the range starts; otherwise, the offset is the index of the first child node in the range.
- endContainer — The node within which the range ends (the parent of the last node in the selection)
- endOffset — The offset within the endContainer where the range ends (follows the same rules as startOffset)
- commonAncestorContainer — The first node within which both startContainer and endContainer exist
These properties are all read-only and are designed to give you additional information about the range.
When you use selectNode(), the startContainer, endContainer, and commonAncestorContainer are all equal to the parent node of the node that was passed in; startOffset is equal to the index of the given node within the parent’s childNodes collection, whereas endOffset is equal to the startOffset plus one (because only one node is selected).
When you use selectNodeContents(), startContainer, endContainer, and commonAncestorContainer are equal to the node that was passed in; startOffset is equal to 0; endOffset is equal to the number of child nodes (node.childNodes.length).
The following example illustrates these properties:
<html>
  <head>
    <title>DOM Range Example</title>
    <script type="text/javascript">
      function useRanges() {
          var oRange1 = document.createRange();
          var oRange2 = document.createRange();
          var oP1 = document.getElementById("p1");
          oRange1.selectNode(oP1);
          oRange2.selectNodeContents(oP1);

          document.getElementById("txtStartContainer1").value
              = oRange1.startContainer.tagName;
          document.getElementById("txtStartOffset1").value =
              oRange1.startOffset;
          document.getElementById("txtEndContainer1").value =
              oRange1.endContainer.tagName;
          document.getElementById("txtEndOffset1").value =
              oRange1.endOffset;
          document.getElementById("txtCommonAncestor1").value =
              oRange1.commonAncestorContainer.tagName;
          document.getElementById("txtStartContainer2").value =
              oRange2.startContainer.tagName;
          document.getElementById("txtStartOffset2").value =
              oRange2.startOffset;
          document.getElementById("txtEndContainer2").value =
              oRange2.endContainer.tagName;
          document.getElementById("txtEndOffset2").value =
              oRange2.endOffset;
          document.getElementById("txtCommonAncestor2").value =
              oRange2.commonAncestorContainer.tagName;
        }
    </script>
  </head>
  <body><p id="p1"><b>Hello</b> World</p>
    <input type="button" value="Use Ranges" onclick="useRanges()" />
    <table border="0">
    <tr>
        <td>
          <fieldset>
              <legend>oRange1</legend>
              Start Container:
                  <input type="text" id="txtStartContainer1" /><br />
              Start Offset:
                  <input type="text" id="txtStartOffset1" /><br />
              End Container:
                  <input type="text" id="txtEndContainer1" /><br />
              End Offset:
                  <input type="text" id="txtEndOffset1" /><br />
              Common Ancestor:
                  <input type="text" id="txtCommonAncestor1" /><br />
          </fieldset>
        </td>
        <td>
          <fieldset>
              <legend>oRange2</legend>
              Start Container:
                  <input type="text" id="txtStartContainer2" /><br />
              Start Offset:
                  <input type="text" id="txtStartOffset2" /><br />
              End Container:
                  <input type="text" id="txtEndContainer2" /><br />
              End Offset:
                  <input type="text" id="txtEndOffset2" /><br />
              Common Ancestor:
                  <input type="text" id="txtCommonAncestor2" /><br />
          </fieldset>
        </td>
    </tr>
    </table>
  </body>
</html>
Figure 2 displays the result when this example is run in a DOM-compliant browser, such as Firefox.
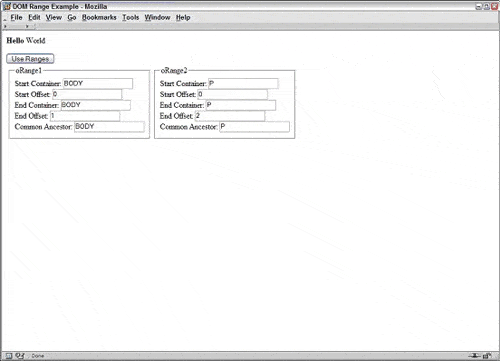
Figure 2
As you can see, oRange1‘s startContainer, endContainer, and commonAncestorContainer are equal to the <body/> element because the <p/> element is wholly contained within it. Also, startOffset is equal to 0, because the <p/> element is the first child of <p/>, and endOffset is equal to 1, meaning that the range is over before the second child node (which is index 1).
Looking over at oRange2‘s information gathered by selectNodeContents(), startContainer, endContainer, and commonAncestorContainer are equal to the <p/> element itself because you are selecting its children. The startOffset is equal to 0, because the selection begins with the first child node of <p/>. The endOffset is equal to 2 because there are two child nodes of <p/>: <b/> and the text node World.
Several methods help you get more specific with selections while still setting these properties for you. These are the following:
- setStartBefore(refNode) — Sets the starting point of the range to begin before refNode (so refNode is the first node in the selection). The startContainer property is set to refNode‘s parent and the startOffset property is set to the index of refNode within its parent’s childNodes collection.
- setStartAfter(refNode) — Sets the starting point of the range to begin after refNode (so refNode is not part of the selection; rather, its next sibling is the first node in the selection). The startContainer property is set to refNode‘s parent and the startOffset property is set to the index of refNode within its parent’s childNodes collection plus one.
- setEndBefore(refNode) — Sets the ending point of the range to begin before refNode (so refNode is not part of the selection; its previous sibling is the last node in the selection). The endContainer property is set to refNode‘s parent and the endOffset property is set to the index of refNode within its parent’s childNodes collection.
- setEndAfter(refNode) — Sets the ending point of the range to begin before refNode (so refNode is the last node in the selection). The endContainer property is set to refNode‘s parent and the endOffset property is set to the index of refNode within its parent’s childNodes collection plus one.
Using any of these methods, all properties are assigned for you. However, it is possible to assign these values directly in order to make complex range selections.