

Although some other alternatives are available, such as the rkt container engine, Docker Engine has become the de facto containerization platform in the past 2-3 years. In “Using Java with Docker Engine,” we discussed creating a Java application with Docker Engine. Docker Engine makes better use of the operating system kernel in comparison to a virtualization platform such as VirtualBox or VMWare because a single Docker container does not make use of a whole OS kernel, whereas a single virtual machine does. Each Docker container includes its own filesystem and networking, which makes it an isolated process on the Docker Engine. A single Docker Engine with multiple Docker containers running in isolation makes it feasible to run different applications and even have some containers make use of other containers. One of the main benefits of Docker Engine is the ease of installation and configuration for software. In this tutorial, we shall discuss using C++ on Docker Engine. This tutorial has the following sections:
- Setting the Environment
- Creating a C++ Application
- Creating and Running a Docker Image with the g++ Compiler
- Creating and Running a Docker Image with the gcc Compiler
- Compiling and Running C++ Applications Separately
- Removing Docker Containers and Images
Setting the Environment
Docker is pre-installed on some OSes, such as CoreOS, and needs to be installed if some other OS—such as Ubuntu, Amazon Linux, or Redhat Linux—is used. We shall be using CoreOS. We shall use the CoreOS Linux (Stable) on EC2, which may be accessed at https://aws.amazon.com/marketplace/pp/B01H62FDJM?qid=1478625912213&sr=0-1&ref_=srh_res_product_title. Click Continue. Select 1-Click Launch and the default Version, which is the latest available. Select a Region and a EC2 Instance Type.
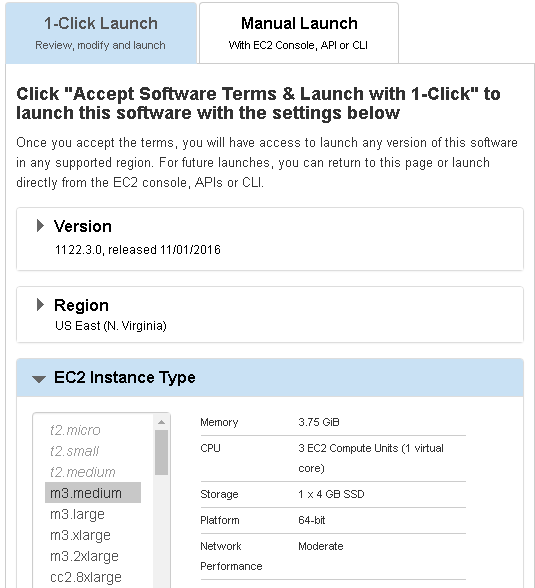
Figure 1: Launching
Select the “default” security group, which provides access from all Source IPs. Select a Key Pair, which may have been created previously.

Figure 2: Selecting a security group
Click Launch with 1-click.
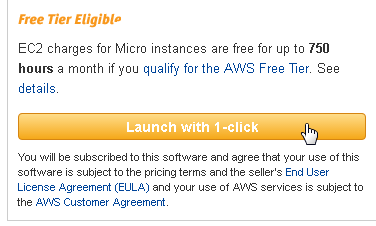
Figure 3: Launching with 1-click
A single instance of CoreOS Linux gets started on EC2. Obtain the Public DNS or the Public IP address for the CoreOS instance from the Console.
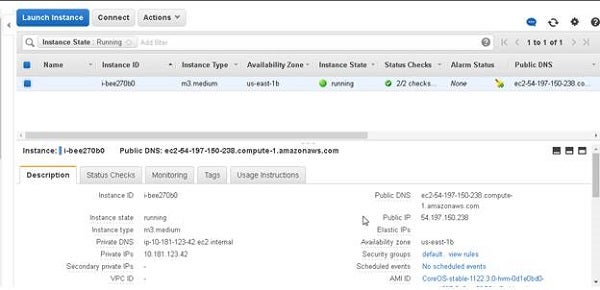
Figure 4: Obtaining the public information
Using the Key Pair and the Public IP (or Public DNS) SSH, log in into the CoreOS instance.
ssh -i "coreos.pem" [email protected]
The CoreOS instance gets logged into and the command prompt gets displayed.
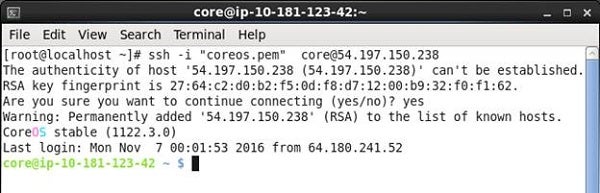
Figure 5: Displaying the command prompts
Creating a C++ Application
We shall use a Hello World C++ application to demonstrate the use of C++ on Docker, and the application HelloWorld.cpp is listed:
#include <iostream>
using namespace std;

int main()
{
   cout << "Hello world" << endl;
   cout << "From a C++ Program" << endl;
   return 0;
}
Create a file called HelloWorld.cpp in a vi editor and copy the listing to the file.
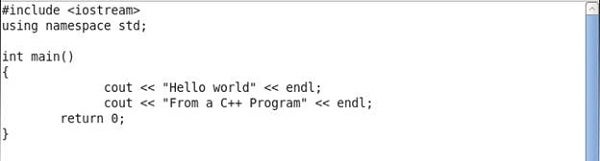
Figure 6: Creating the HelloWorld file
Two options are available to run the C++ application:
- Create a Docker image and subsequently run a Docker container.
- First, compile the Docker application and subsequently run the application.
Creating and Running a Docker Image with the g++ Compiler
We shall be using the Docker image “gcc” available on the Docker Hub. The “gcc” Docker image is the GNU Compiler Collection with support for several languages, including C and C++. Two of the main commands that could be used for C/C++ application are gcc and g++. The differences between the two are discussed in the following table.
| gcc | g++ |
| GNU C Compiler | GNU C++ Compiler |
| Compiles *.c and *.cpp files as C and C++, repectively | Compiles *.c and *.cpp, but they are treated as C++ files |
| Does not link in the C++ libraries | Automatically links in the C++ libraries |
| Should be used with C applications | Should be used with C++ applications |
Next, we shall use the g++ command to run a C++ application. Create a Dockerfile (in a vi editor) in the same directory as the HelloWorld.cpp file. A Dockerfile contains instructions to build a Docker image that could be used to run a Docker container. Copy the following listing to the Dockerfile.
FROM gcc:4.9
COPY . /HelloWorld
WORKDIR /HelloWorld
RUN g++ --o HelloWorld HelloWorld.cpp
CMD ["./HelloWorld"]
The Dockerfile instructions are as follows.
| Dockerfile Instruction | Description |
| FROM gcc:4.9 | The Docker image to use as the base image is gcc with tag 4.9. |
| COPY . /HelloWorld | Copy the files in the current directory to the /HelloWorld directory. |
| WORKDIR /HelloWorld | Set the /HelloWorld directory as the working directory. |
| RUN g++ –o HelloWorld HelloWorld.cpp | Run the gcc command g++ with output as “HelloWorld” and input as “HelloWorld.cpp”. The command generates a runnable application called “HelloWorld” |
| CMD [“./HelloWorld”] | Run the compiled, runnable application ./HelloWorld |
The Dockerfile is shown in the vi editor.

Figure 7: The Dockerfile
The root directory should list two files: Dockerfile and HelloWorld.cpp.

Figure 8: The two files in the root directory
Before creating a Docker image, create the directory /HelloWorld and set its permissions to global (777).
sudo mkdir /HelloWorld
chmod 777 /HelloWorld
Run the docker build command to create a Docker image called helloworld:v1 from the Dockerfile.
docker build -t helloworld:v1 .
The Docker image gets created.
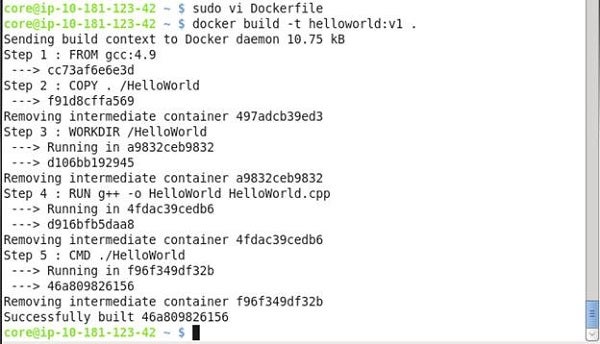
Figure 9: The newly created Docker image
Subsequently, list the Docker images.
docker images
The helloworld image tag v1 gets listed.

Figure 10: The new helloworld image tag
Having created the Docker image, run the a Docker container with the docker run command. The Docker container may optionally be named, “HelloWorld” for example, with the --name option. If the --name option is not used, a random name is used for the Docker container. The --rm option is called the “Clean up” option and removes the Docker container and the filesystem & volumes associated with the container after it has run. Run the following docker run command for the Docker image helloworld:v1.
docker run -it --rm --name HelloWorld helloworld:v1
The C++ application in the Docker image runs to produce an output.

Figure 11: The Docker image producing output
Creating and Running a Docker Image with the gcc Compiler
It was mentioned previously that the g++ command is used for C++ applications and the gcc command is used for C applications. The main difference between the two is that gcc does not link the standard C++ libraries. But, the standard C++ libraries could be linked explicitly when using the gcc commnd; this is what we shall discuss in this section. Before creating a Docker image using the gcc command, remove the Docker image helloworld:v1 because we will create the same name Docker image with gcc.
docker rmi helloworld:v1
The standard C++ libraries could be linked when using the gcc command with the --lstdc++ option. Modify the Dockerfile to replace the g++ command with the gcc command as in following listing.
FROM gcc:4.9
COPY . /HelloWorld
WORKDIR /HelloWorld
RUN gcc --o HelloWorld HelloWorld.cpp --lstdc++
CMD ["./HelloWorld"]
The modified Dockerfile is shown in the vi editor.

Figure 12: The modified Dockerfile
The same two files, Dockerfile and HelloWorld.cpp, should get listed.

Figure 13: Listing the same two files
Run the same docker build command to create the Docker image helloworld:v1.
docker build -t helloworld:v1
A Docker image gets generated, but contains a different command, the gcc command instead of the g++ command to run the C++ application. List the Docker images, and the helloworld:v1 Docker image should get listed in addition to the gcc Docker image.
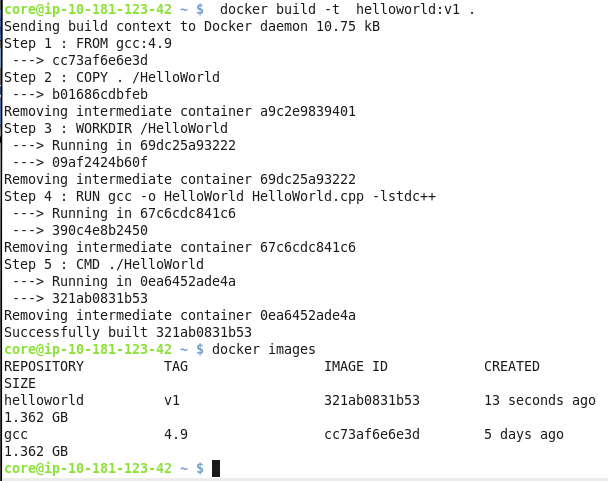
Figure 14: Listing the Docker images
Next, run the same docker run command to run a Docker container for the Docker image helloworld:v1.
docker run --it --rm --name HelloWorld helloworld:v1
The same output get generated.

Figure 15: Generating the same output
The Docker containers get removed when using the --rm option. List the running and exited Docker containers with the following commands, respectively:
docker ps
docker ps -a
Because the Docker containers have been removed no Docker container should get listed running or exited.

Figure 16: No Docker container is listed
In the previous two sections, we compiled the Docker application into a Docker image with docker build and subsequently ran a Docker container with docker run. In the next section, we shall not create a Docker image but instead only compile the HelloWorld.cpp file into a runnable application with docker run with the g++ command being invoked as a command arg to the docker run command. Subsequently, we shall run the application binaries HelloWorld, separately.
Compiling and Running C++ Applications Separately
To compile only the HelloWorld.cpp application into HelloWorld runnable application, run the following command that invokes the g++ GNU C++ compiler.
docker run --rm --v "$PWD":/HelloWorld
                --w /HelloWorld gcc:4.9 g++
                --o HelloWorld HelloWorld.cpp
The --rm option removes the container after it has run, but does not remove the application binaries generated. The --v option adds the current directory as a volume and the --w option sets the working directory to the volume.

Figure 17: Removing the container
Subsequently, listing the files lists the HelloWorld application generated.
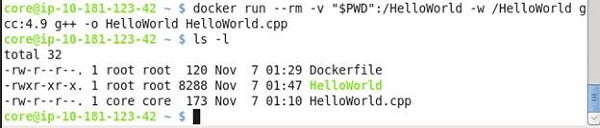
Figure 18: Listing the files to see HelloWorld
Next, run the HelloWorld application.
./HelloWorld
The C++ application output gets generated.

Figure 19: Generating the C++ output
We used the g++ compiler with the docker run command to generate the application binaries, but the gcc command with the --lstdc++ option may be used just as well.
docker run --rm --v  /HelloWorld
           --w /HelloWorld gcc:4.9 gcc
           --o HelloWorld HelloWorld.cpp
           --lstdc++
Removing Docker Containers and Images
The Docker images and containers, if any, may be removed after the C++ application has been run. Remove all Docker containers that have exited.
sudo docker rm $(sudo docker ps --a --q)
All exited Docker container should get removed.
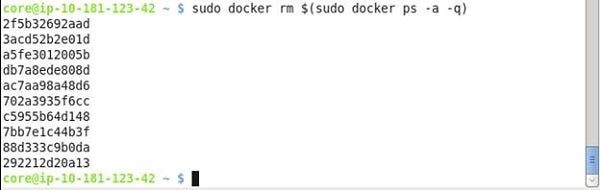
Figure 20: The Docker containers are removed
Remove the Docker image helloworld:v1 with the docker rmi command.
docker rmi helloworld:v1
The Docker image gets removed.
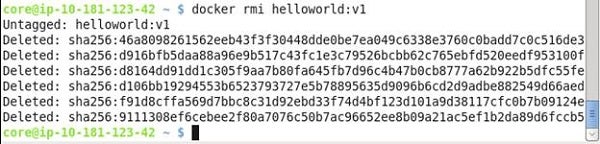
Figure 21: The Docker images are removed
Listing the Docker images may still list some images and some images could be called <none>.
docker images
The <none> images are called dangling images. These are just some images that did not get downloaded properly or built properly.
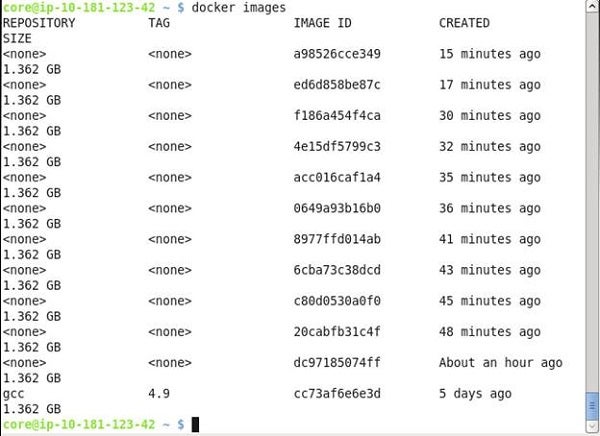
Figure 22: Showing the dangling images
Remove all the dangling images.
sudo docker rmi $(sudo docker images --f
   "dangling=true" --q)
All the dangling images should get removed.

Figure 23: The dangling images are now gone
Listing the images lists only the gcc:4.9 Docker image, which could be kept for subsequent use.

Figure 24: The remaining gcc:4.9 Docker image
Conclusion
In this tutorial, we introduced using C++ with Docker Engine.