

Introduction
In this article let us learn about web.config transformation and how it comes in so handy while performing the deployment of an ASP.NET web application.
As a note Web configuration file transformation is a nice feature introduced in the ASP.NET framework 4.0.
What is Web.Config Transformation?
If you ask the .NET developers about the most menacing part in the development process, the answer would the deployment. This is so tedious because it may have to be deployed in various environments like Dev, QA and Production. The problem with this is the config file entries, for example, a connection string would be different for each environment, though the config file structure would be the same for all.
The developer has to publish the web application first, and then he needs to change the config values based on the environment before deploying the application.
What Makes the Above Job Intimidating?
- It is boring, to do the same set of changes for different environments.
- If the config file has lot of entries, it gets difficult to traverse manually to a particular section and modify it.
- Possibilities of typo errors (This would screw up the config file as well as the workability of the deployed application). In ASP.NET 4.0 you don’t have to worry about it because of the availability of the web config transformation feature. All you need to do is create transformation XML files for each environment in which the application is going to be deployed. Make sure that you select the proper transformation config file for the environment while publishing (use configuration manager option). The publish process will transform your web.config file with values and instructions provided in the selected transformation xml file.
Below is the default structure of the XML config transformation file:
<?xml version=”1.0″?><!– For more information on using web.config transformation visit http://go.microsoft.com/fwlink/?LinkId=125889 –>
<configuration xmlns_xdt=”http://schemas.microsoft.com/XML-Document-Transform”>
<!–
In the example below, the “SetAttributes” transform will change the value of
“connectionString” to use “ReleaseSQLServer” only when the “Match” locator
finds an atrribute “name” that has a value of “MyDB”.
<connectionStrings>
<add name=”MyDB”
connectionString=”Data Source=ReleaseSQLServer;Initial Catalog=MyReleaseDB;Integrated Security=True”
xdt:Transform=”SetAttributes” xdt_Locator=”Match(name)”/>
</connectionStrings>
–>
<system.web>
<compilation xdt_Transform=”RemoveAttributes(debug)” />
<!–
In the example below, the “Replace” transform will replace the entire
<customErrors> section of your web.config file.
Note that because there is only one customErrors section under the
<system.web> node, there is no need to use the “xdt:Locator” attribute.
<customErrors defaultRedirect=”GenericError.htm”
mode=”RemoteOnly” xdt_Transform=”Replace”>
<error statusCode=”500″ redirect=”InternalError.htm”/>
</customErrors>
–>
</system.web>
</configuration>
You should also notice the fact that the XDT namespace is defined in “http://schemas.microsoft.com/XML-Document-Transform“
Step By Step Explanation Using a Simple Example
- Create a simple ASP.NET web application using Microsoft Visual Studio 2010 IDE. Name it as
WebConfigTransformationDemo. - Delete the default
Web.Debug.configandWeb.Release.configfiles. - Go to to configuration manager as shown in Fig 1.0 and click on it.
- In the configuration manager using the “New” option shown in Fig 1.1 declare 3 transformation files and name it as Dev, QA and Prod shown in Fig 1.2.

Fig 1.1
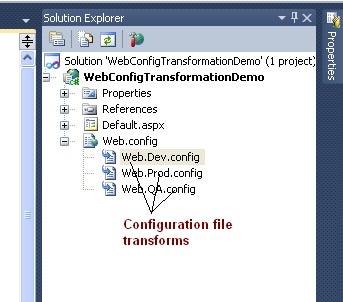
Fig 1.2 - Now when you create the transform in the web application project. All the declared config transform files will be created under the actual Web.Config file node in the solution explorer. They will be named as
Web.<name provided by you>.config.
In order to create them right click on the Web.Config file and select “Add Config Transforms” option as shown in Fig 1.3
Fig 1.3See Fig 1.4 for the created transformation files Web.Dev.config, Web.QA.config and Web.Prod.config.

Fig 1.4 - Have two connection strings in the Web.Config file which will be used by the application which we created for data access.
<?xml version=”1.0″?>

<configuration>

  <connectionStrings>

    <add name=”SqlConnectionString1″ connectionString=”Data Source=DebugSqlServer;Initial Catalog=MyDB1;Integrated Security=True”/>

    <add name=”SqlConnectionString2″ connectionString=”Data Source=DebugSqlServer;Initial Catalog=MyDB2;Integrated Security=True”/>

  </connectionStrings>

    <system.web>

        <compilation debug=”true” targetFramework=”4.0″ />

    </system.web>

    <system.webServer>

      <modules runAllManagedModulesForAllRequests=”true”/>

    </system.webServer>

</configuration>
- In the 3 three transform XML files provide the transforms for the connection strings
SqlConnectionString1andSqlConnectionString2as shown below. I am adding only the Web.Prod.config transform for example:
<?xml version=”1.0″?>

<configuration xmlns_xdt=”http://schemas.microsoft.com/XML-Document-Transform”>

  <connectionStrings>

    <add name=”SqlConnectionString1″

      connectionString=”Data Source=ProdSqlServer1;Initial Catalog=MyDB1;Integrated Security=True”

      xdt:Transform=”SetAttributes” xdt_Locator=”Match(name)”/>

    <add name=”SqlConnectionString2″

      connectionString=”Data Source=ProdSqlServer2;Initial Catalog=MyDB2;Integrated Security=True”

      xdt:Transform=”SetAttributes” xdt_Locator=”Match(name)”/>

  </connectionStrings>

  <system.web>

    <compilation xdt_Transform=”RemoveAttributes(debug)” />

  </system.web>

</configuration>
Microsoft always recommends not to set the <COMPILATION DEBUG=”true”/> when the application is deployed. By default it is false, so I have added a transform to remove the debug attribute in the compilation tag.
- Once the transforms are ready (here I am not implementing the usage of the connection strings in the application since it is not related to this demo) select the configuration as “Prod” as shown in Fig 1.5 and publish the web application (make sure you select the publish method as “File System”).
[config7.jpg]
Fig 1.5Go to the published location, open Web.Config. Witness the transformation as shown in Fig 1.6.

Fig 1.6
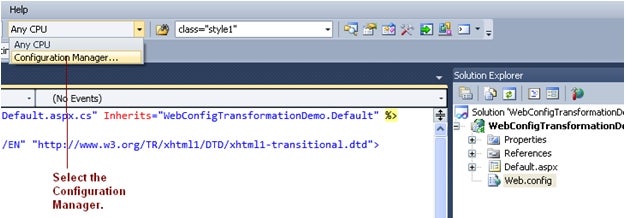
Fig 1.0


Keywords Walkthrough
In the transform files there are two attributes which does the tricks:
1. Locator
The locator attribute specifies the config element or elements which need to be transformed. Some of the Locator attribute values are:
- a. Condition
- b. Match
2. Transform
The transform attribute specifies what kind of transformation that has to be performed on the located element. Some of the Transform attribute values are:
- a. Replace
- b. Insert
- c. InsertBefore
- d. InsertAfter
- e. Remove
- f. RemoveAll
- g. RemoveAttributes
- h. SetAttributes
Conclusion
Thus I believe this article provides good information about web config file transformation. I have also added the source code of the demo project that we created to this article.
Happy reading! See you in my next article.