

In the previous FAQ, you learned how use Notepad to build a simple C# application. This FAQ shows you how to develop a console-based application using Visual C# .NET.
Even though you need to work with Visual C# .NET, you have to launch Visual Studio .NET 2003 from Start | All Programs | Microsoft Visual Studio .NET 2003 | Microsoft Visual Studio .NET 2003. This is because Visual Studio .NET ships with a single IDE for developing applications with all .NET languages.
Initially, you will be presented with a welcome screen containing a list of recently opened projects. Select New | Project from the File menu. Choose “Visual C# Projects” from the Project Types section on the left-hand side and “Console Application” icon from the templates section, as shown in Figure 2.4.1.
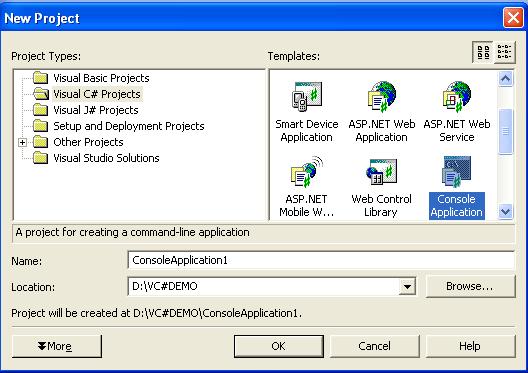
Figure 2.4.1
You would notice from Figure 2.4.1 that I didn’t change the project’s name. It is set to its default name. But, while developing a real project, you should always give a meaningful name to reflect the project being done so that you can locate the project easily at a later stage of its development.
Upon clicking the OK button, a separate tab titled Class1.cs will be created on the top of the IDE. If you have more than one class file, they will be listed one by one. You also will notice that the code editor automatically creates the required template for writing a C# program, as shown in Listing 2.4.1:
Listing 2.4.1
using System;
namespace ConsoleApplication1
{
   /// <summary>
   /// Summary description for Class1.
   /// </summary>

class Class1
{
   /// <summary>
   /// The main entry point for the application.
   /// </summary>
      [STAThread]
      static void Main(string[] args)
      {
         //
         // TODO: Add code to start application here
         //
      }
}
}
You need not to enter complete code as you have done in FAQ 2.3. The above code calls the program’s default namespace named ConsoleApplication1, Main() method and the required documentation comments as discussed in FAQ 2.3. The IDE also creates a class named Class1. This name can be modified from the Solution Explorer window. The STAThread attribute in the code denotes your application’s threading model; you will use this attribute when you work with COM Interoperability.
Your next task is to write the required statements for running the application by deleting the TODO comment portion and entering the following code:
Console.WriteLine("Welcome to C-Sharp");
You will also notice that Visual C# .NET automatically colors the syntaxes and also shows Intellisense when entering the code, as shown in Figure 2.4.2.
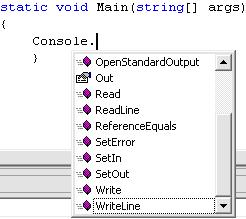
Figure 2.4.2
The preceding program is now ready to be compiled. Press F5 to build the application. When you build an application using Visual C# .NET, it compiles the program and also automatically executes the program. Alternatively, you can build your project by selecting the Debug | Start menu from the IDE.
For the preceding program, Visual C# .NET displays the command window and closes it instantly. It can be rectified by adding the following code just below the statement you have entered above:
Console.Read();
If you build the project now, Visual C# .NET displays the command window, as shown in Figure 2.4.3.

Figure 2.4.3
Visual C# .NET automatically creates the required assembly and manifest files in the background. If there are any errors, it will be displayed on the Task List window on the bottom of the IDE. Double-clicking an entry on the task list takes you to the specified location of an error. For instance, if you remove a semicolon, a red mark will appear in the specified location. The task list reads as “; expected”. The entries on the task list will immediately disappear as soon as you rectify the relevant error.