

Creating a DockablePanel-Controlmanager Using C#, Part 5
Actions in a Docked condition
In Parts 1-4, you have learned how to create all the parts that are needed to create a DockingManager; you now are able to manage DockableForms on the screen. You have laid out the design and learned how the different parts will work together. You decided to use DockingButtons to offer the user the ability to dock the DockableForms. Apart from that, you have learned that, by using the given design, you are faking a bit, because you really do not dock the forms but instead dock a Panel named DockablePanel. You have come to the point where you are able to show these certain buttons on the screen when you start to drag your DockablePanel. You can already dock them with your Basic Docking methods.
If you haven’t yet read the previous parts of this article series, you will need to do so before you can start with this one, or you will not fully understand the structure and logic of this design pattern. Here are the preceding articles:
- Dockable Panel Controlmanager Using C#, Part 1
- Dockable Panel Controlmanager Using C#, Part 2
- Dockable Panel Controlmanager Using C#, Part 3
- Dockable Panel Controlmanager Using C#, Part 4
Note: Because you have to add some parts here and there, the code becomes more and more complex now and, to be sure where you are, I have added the regions where the code is to be found or where it should be created, so that it is easier for you to follow. If you still haven’t created all the regions by now, you really should do this organizational work beforehand; it will save you hours of work.
Being able to do some basic docking actions after some hours of work is good progress, but there are still some actions needed; a well-designed DockingManager should be able to handle those actions. So, one of the points you still aren’t able to do is to size the DockableForms during the docking process. If you take your VS 2005 IDE as an example of being able to size docked panes, you will notice that if you need the panel a bit wider or narrower, you can drag on its pane and it will become wider or narrower. When you undock the pane, it snaps back to its original size. Now, when you want to achieve this, you will need to be able to size the DockingControler. This will be the way you will arrange it.
Sizing the DockingControler
If you can recall, you have already added a padding zone to your DockingControler for this reason. In designing the sizing mechanism, you have to be aware that sizing the DockingControler also means that you need to size the DockablePanel; this is followed by resizing the DockableForm which, in its inheritance, in your DockingControlTestApplication is named TechForm. You will get a cascade of resizing Events and this, as I have seen when testing on a 2 GHz Dual Core machine+, has led to lots of flicker. So, I decided to reduce the number of resizing Events by the use of a Timer that I called SizerTick. This is added to the DockingControler now simply by opening the Designer View of the DockingControler and double-clicking on the Timer-control in the Toolbox.
| Property | Value |
|---|---|
| (Name) | sizerTick |
| Enabled | False |
| Interval | 5 |
Create the Tick-Event Delegate of this Timer Control Named SizerTick_Tick
First, see the code and then have a closer look at how this works. It’s standard that, when your mouse moves over the borders of any undocked Form, the cursor changes its appearance to some arrows that show you sizing will be possible. When you have the Form docked, you are not able to size the Form wherever you want. So, the cursor’s appearance should be changed only when you are hovering on a border, where sizing is possible. So, for the cursor’s Shape, you have the following SetBorderCursor() method.
#region private methods ( DockingControler )
private BorderRange SetBorderCursor() {
   Point pos = Cursor.Position;
   BorderRange inRange = GetBorderRange(pos);
   switch (inRange) {
      case BorderRange.Right:
      case BorderRange.Left:
         this.Cursor = Cursors.VSplit;
         break;
      case BorderRange.Top:
      case BorderRange.Bottom:
         this.Cursor = Cursors.HSplit;
         break;
      default:
         this.Cursor = Cursors.Default;
         break;
   }
   return inRange;
}

private BorderRange GetBorderRange(Point posOnScreen) {
   Point pt = PointToClient(posOnScreen);
   if (this.Dock == DockStyle.Left && pt.X > (this.Width - 3)
      && pt.X < this.Width && pt.Y > 0 && pt.Y <= this.Height) {
      return BorderRange.Right;
   }
   if (this.Dock == DockStyle.Right && pt.X >= 0 && pt.X < 3
      && pt.Y > 0 && pt.Y < this.Height) {
      return BorderRange.Left;
   }
   if (this.Dock == DockStyle.Bottom && pt.Y >= 0 && pt.Y < 3
      && pt.X > 0 && pt.X < this.Width) {
      return BorderRange.Top;
   }
   if (this.Dock == DockStyle.Top && pt.Y > (this.Height - 3)
      && pt.Y <= this.Height && pt.X > 0 && pt.X <= this.Width) {
      return BorderRange.Bottom;
   }
   return BorderRange.None;
}
//. . .
#endregion
Depending on where your DockingControler has been docked, you must allow only the opposite side of the DockingControler to be sized. All other attempts should return BorderRange.None; this means that you are not hovering on any Border of the DockingControler that is sizeable.
The full sizing action will need the following fields to be added in your code.
#region Fields (DockingControler)
// needed private Fields for Sizing the Controler
private bool _controlerSizing;
private BorderRange _inRange;
private bool _sizeNow;
private Point _lastMousePos;
private Point _actMousePos;
//. . .
#endregion
The mouse events of the DockingControler need to be overridden in the following way.
#region overrides (DockingControler)
protected override void OnMouseDown(MouseEventArgs e) {
   if (_inRange != BorderRange.None) {
      _lastMousePos = this.PointToScreen(e.Location);
      //At this time the actual Mouse position is also the last one
      _actMousePos = _lastMousePos;
      _controlerSizing = true;
   }
   base.OnMouseDown(e);
}
//. . .
#endregion

#region overrides (DockingControler)
protected override void OnMouseMove(MouseEventArgs e) {
   if (_controlerSizing) {
      // We get a new actual mouse position
      _actMousePos = this.PointToScreen(e.Location);
      if (_sizeNow) {
         // The Timer isn't allowed to be restarted during
         // all the sizing evets are done
         SizerTick.Enabled = false;
      }
      else {
         // If we aren't sizing we start the Sizing Timer
         SizerTick.Enabled = true;
      }
   }
   else {
      _inRange = SetBorderCursor();
   }
   base.OnMouseMove(e);
}
This is the sizing method itself; it sizes the Control on exactly that border, where sizing is possible. The change of the size depends on the difference in the cursor’s position between two cycles, where this method is called.
#region private Methods (DockingControler)
private void SizeAccordingRange() {
   switch (_inRange) {
      case BorderRange.Right:
         int deltaX = _lastMousePos.X - _actMousePos.X;
         this.Width -= deltaX;
         break;
      case BorderRange.Left:
         deltaX = _lastMousePos.X - _actMousePos.X;
         this.Width += deltaX;
         this.Left -= deltaX;
         break;
      case BorderRange.Bottom:
         int deltaY = _lastMousePos.Y - _actMousePos.Y;
         this.Height -= deltaY;
         break;
      case BorderRange.Top:
         deltaY = _lastMousePos.Y - _actMousePos.Y;
         this.Height += deltaY;
         this.Top -= deltaY;
         break;
   }
   //Now store the actual Mouseposition as the last one
_lastMousePos = _actMousePos;
}
//. . .
#endregion

#region overrides (DockingControler)
protected override void OnMouseUp(MouseEventArgs e) {
   _controlerSizing = false;
   SizerTick.Enabled = false;
   _sizeNow = false;
   base.OnMouseUp(e);
}
//. . .
#endregion
#region delegates (DockingControler)
private void SizerTick_Tick(object sender, EventArgs e) {
   _sizeNow = true;
   SizerTick.Enabled = false;
   SizeAccordingRange();
   _sizeNow = false;
}
//. . .
#endregion
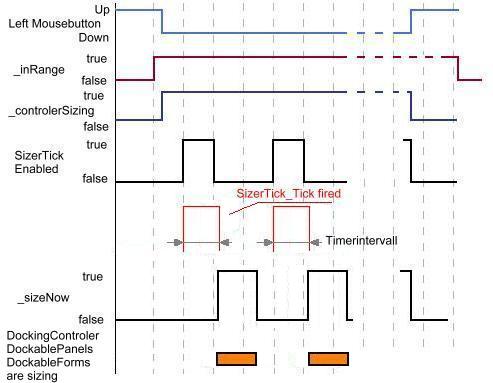
Figure 1: Time diagram Sizing the DockingControler
Figure 1 demonstrates the way it works. When the LeftMouseButton has been pressed and you are in the range of a Border of the DockingControler that could be used for sizing it, _controlelSizing is set to true (See OnMouseDown() method). This causes the Timer to start ticking and fires the Tick event. In the corresponding delegate, _sizeNow is set to true, and then the sizing Method SizeAccordingRange() is called. This is done in the Timer event so it isn’t directly coupled anymore to the mousemove event. But, you have to know there is a Windows.Foms Timer used, so this is no separated thread; it’s all done in the applications main thread. You have to know, basically the event is fired means it’s added to the message queue and will be done in order when the message is to be done there.