

Introduction
Microsoft released Windows Server AppFabric this summer. AppFabric is a new service platform for .NET developers that helps them easily deploy and manage Windows Communication Foundation (WCF) based services and Windows Workflow Foundation (WF) based workflows, as well as handle high performance distributed caching.
Like a web service, WF based workflows must be hosted by a process. This host runs the WF engine, and processes the workflow you have designed. Until now most developers had a limited list of choices of how to host their workflows.
These were limited to hosting in a SharePoint portal, or in your own custom code (perhaps as a part of a desktop application or a server side service.) This made it challenging to provide all of the support services a running workflow needs in a real environment.
When you are running workflows you want to be able to track the instances of that workflow that is running, as well as the messages that are invariably flowing into and out of the workflow itself. You also have to figure out how to save the state of your workflow to recover from a failed server, and how to sleep your workflow when it will have to wait a long time between steps in the workflow so that it doesn’t consume too many resources on your server.
Microsoft released Windows Server AppFabric to resolve a lot of these challenges. It provides a very simple to use and deploy hosting environment for your WCF and WF based services. AppFabric provides a lot of the services we discussed above. It includes diagnostics infrastructure, tracking each message and workflow as they are processed so you can see what is happening on your server. It provides mechanisms to cluster servers, allowing you to load balance the load on your workflow across the servers you have available. It can also recognize when a workflow has crashed (because of either the server, or a code issue) and can restart the workflow on an available server.
If you have ever worked with Microsoft BizTalk Server (which I have for years and love it) you will see that AppFabric is really a light-weight sibling that has many of the same core system features. BizTalk still rules for ecommerce, RFID, true system integrations, and so on. But if all you need is an enterprise grade place to run your workflows, AppFabric is the right tool for you. The great thing is that you can install it with the Web Platform Installer in minutes, and you administer it with the IIS management console you already know and love.
With the release of .NET framework 4 Microsoft has really completed the marriage between WCF and WF. Workflows tend to rely on message passing, and until now it was challenging to send and receive messages over the network with WCF from within WF. Now, sending and receiving messages over WCF are simple shapes provided by WF. The send and receive shapes create your data contacts for the service, and also your service endpoints. Developers consuming your workflow service would have no idea it is running in AppFabric, or as a workflow service. Now workflows are much more like their older cousins from BizTalk, Orchestrations.
Since this article is about how to deploy a WF service to AppFabric we are going to jump into an already developed workflow. It is important to note that there is a new term in the WF world, and that is “Workflow Service.” This is a workflow that has a message receive shape as its first shape. This receive shape is an activation shape, which means when the code hosting the workflow receives a new message bound to that port, it will start up (or activate) a new instance of your workflow and pass in that message to get it started. This is differentiated from other receive shapes you might have later in your workflow that are waiting on a response to a message your workflow has sent.
You can still make normal workflows in .NET framework 4 and host them in your own way, but I think they will quickly become a minority. Workflow Services have a .xamlx extension to differentiate them from the more classic workflows.
Our sample workflow will receive a single integer. A random number will be selected between zero and the number passed into the workflow. The workflow will then delay as many seconds as the random number determines. Then the workflow will check if the random number is even or odd. If it is odd, a response message will be sent back to the client with the value of the random number. If it is even, the workflow will force an exception because in our business even numbers cause exceptions. We are forcing the exception as an example to show how AppFabric will handle the error.
The following figure shows what the workflow looks like in Microsoft Visual Studio 2010 Ultimate.
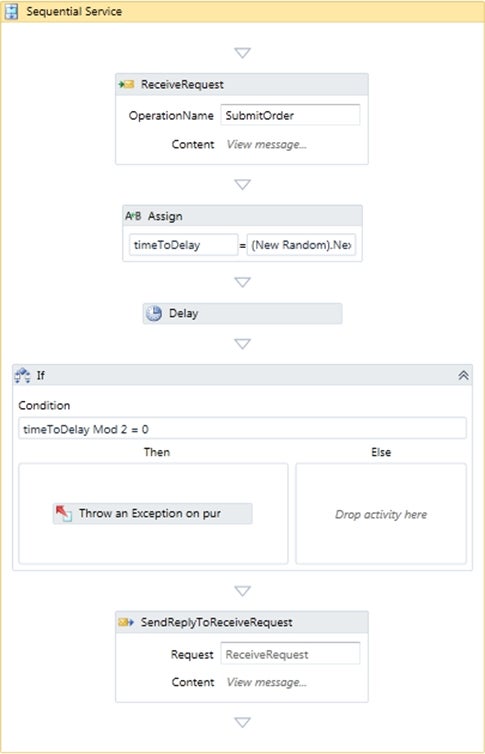
Figure 1
Once you have your workflow running the way you want, we need to package it up for deployment to our AppFabric server. You might want to configure the publishing settings to suit your needs. To do this, right click on your Workflow Services project, and choose properties. Move down to the “Package/Publish Web” tab. In my case, I customized where the package (it is built as a zip file) is copied. I also set the default name of the web site the workflow service should be hosted under. You can see my selections in the following figure. You will need to save these settings. Once you have completed this, right click on your project and choose “Build Deployment Package” from the menu.
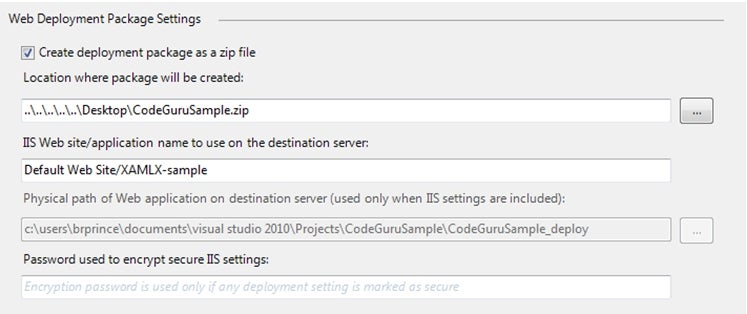
Figure 2
The next step to deploying our workflow service is to open the IIS Management Console on the server you want to deploy to. Navigate through the server tree on the left to the web site you want to host the service. Right click on it, and choose “Deploy/Import Application…”. You can see what this will look like in the following figure.

Figure 3
The Import Application wizard will start. You will have to browse to the deployment package you just built. Click next to move on to configuration.
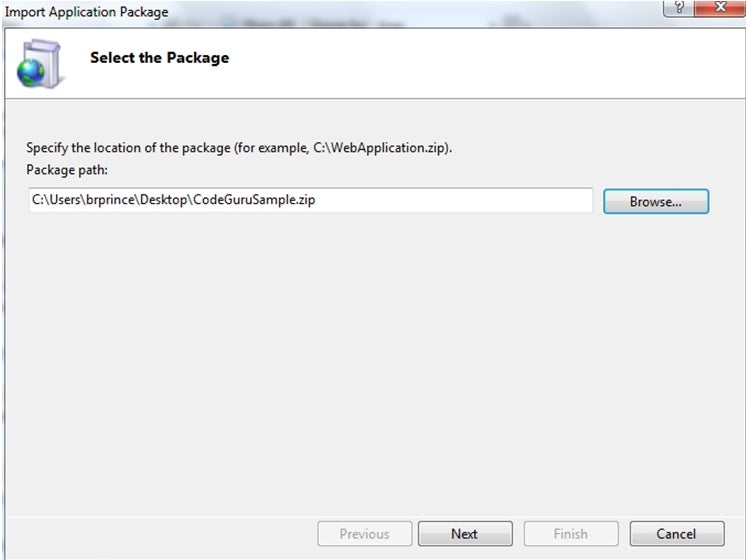
Figure 4
In this next step you will be shown all of the moving parts of the service, including configuration changes, and confirm or modify them. The package will include everything that needs to be setup. AppFabric does provide a way for you to change these defaults.
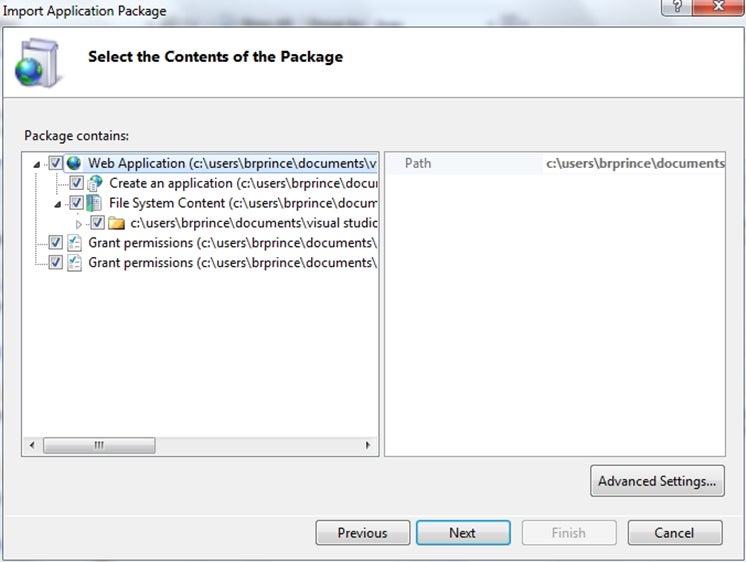
Figure 5
Leave everything checked as is, and click next. Your next step will be to name the path the service will be deployed to. It will default to the value you set in the package options above. Just click next to move on. The wizard will deploy and wire everything up and then give you a final configuration.