

Introduction
Microsoft BizTalk Server has been available since 2000, and during these ten years, the product has evolved to handle even the most complex situations in communications between organizations and integrating their diverse IT systems. This integration process is commonly known as Enterprise Application Integration, or EAI. EAI solutions help organizations to digitize and automate their business processes. For example, two organizations might share warehouse data, send orders, or integrate material sourcing of two manufacturing plants.
As a Microsoft solution, BizTalk Server can be extensively customized and extended using .NET technologies. In fact, BizTalk itself relies heavily on .NET technologies. For .NET developers wishing to learn BizTalk Server development, there’s no better time to start: the new 2010 version is about to become ready, and more and more .NET examples are available on MSDN.
This article explores the overall picture of BizTalk Server 2010 beta, and shows how .NET developers can get started in their development work. Although this article uses BizTalk Server 2010 beta as the base platform, many of the principles apply to older BizTalk versions as well. The current production version is BizTalk Server 2009.
Understanding BizTalk Server
BizTalk Server is about integrating business systems, transferring data from one system to another, and monitoring these processes. Whether the amount of data is large or small, BizTalk is often apt to handle it without any custom development. However, complex scenarios and special steps can require custom code, allowing you to integrate and monitor any process you see fit.
When learning about BizTalk, you will often run across the term process, and the associated term workflow. In the world of BizTalk, a process refers above all to a business process. A process timeframe can be anything from a couple of seconds to weeks or even months. A workflow on the other hand defines the technical steps necessary to complete a process. A workflow can contain multiple execution routes and decisions, and is best described visually as a flow chart (Figure 1). In fact, processes in BizTalk are modeled visually: workflows for instance can be drawn graphically, and do not necessarily require code.
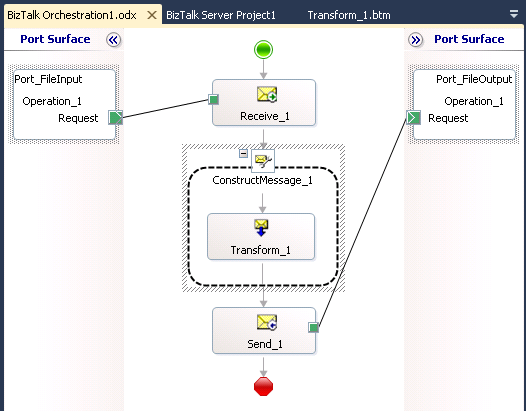
Figure 1. A sample orchestration in Visual Studio 2010
In BizTalk, processes can happen completely inside a single organization, or can span between multiple organizations no matter their physical location. This gives lots of flexibility to using the product: both internal and external scenarios can be modeled. When BizTalk is working on behalf of an organization and executing a workflow, it is said to be orchestrating the process. In BizTalk parlance, a workflow is known as an orchestration.
BizTalk is a server-based product, and thus does not have any user interface for general users; for them, BizTalk has done its job if the needed data can be seen in a particular system. For instance, warehouse levels from a distributor might be directly seen inside a resellers’ ERP system, if such data is shared between the two organizations.
For administrators and developers, BizTalk is managed through an administrative console, seen in Figure 2. Usually, BizTalk is installed on a Windows server operating system, but since developers also need access to the system, BizTalk 2010 can be installed on Windows 7, too. A central storage for all data and settings–called the message box–is implemented using Microsoft SQL Server. BizTalk 2010 requires you to use the latest SQL Server version 2008 R2.
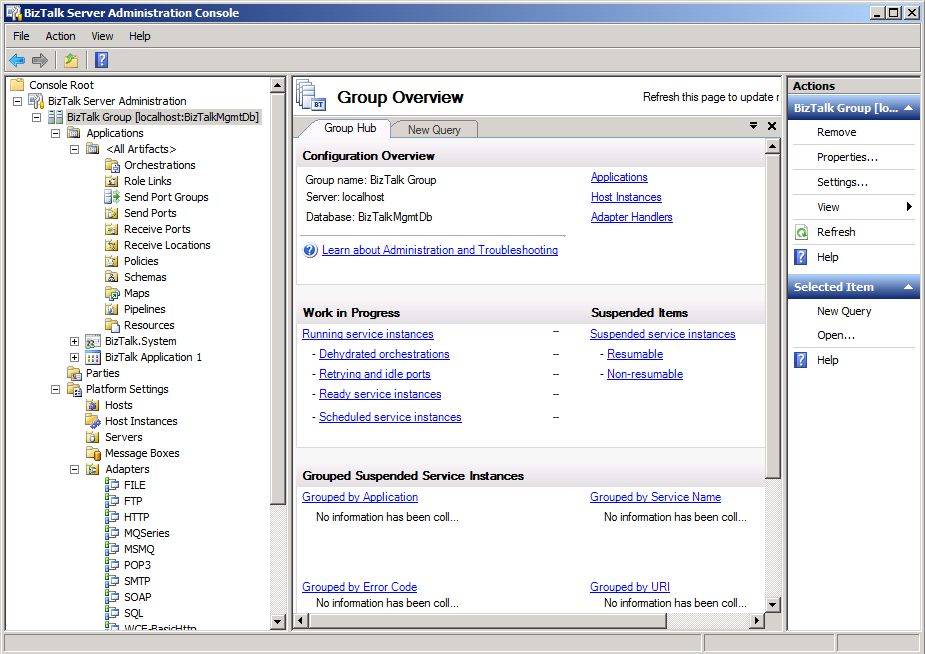
Figure 2. The BizTalk Administration Console
Setting Up a BizTalk Test Environment
If you are keen to try your skills with BizTalk 2010, then Microsoft has provided a free beta version that you can readily test. When you download BizTalk 2010 for example from Microsoft Downloads, you gain access to both a 32-bit and 64-bit versions. Thus, you can install BizTalk 2010 into both 32 and 64-bit systems. However, there are certain special requirements when installing BizTalk into 64-bit operating systems, so even today, the 32-bit version is easier to get working. For instance, Excel integration currently only works with a 32-bit version of Excel.
For detailed instructions on how to install BizTalk 2010 beta, refer to a document titled “Installing BizTalk Server 2010 on Windows Server 2008 R2 and 2008” (see the Links section). A similar document is also available for Windows 7 users. Basically, you will need to install IIS with management compatibility, .NET framework 4.0, Microsoft Visual Studio 2010, Excel 2010, SharePoint 2010 and SQL Server 2008 R2 to get an environment suitable for BizTalk.
Once you have installed BizTalk 2010, BizTalk Server Developer Tools and the SDK kit onto your computer, you are ready to start exploring BizTalk development possibilities. First, you should become familiar with the main BizTalk administrative console. Note that you should run the configuration tool in elevated mode as an administrator: the first time you do so, you will need to go through an initial setup process (Figure 3). To run the console as an administrator, right-click the BizTalk Server Administration Console icon, and then choose the Run as Administrator command from the popup menu.
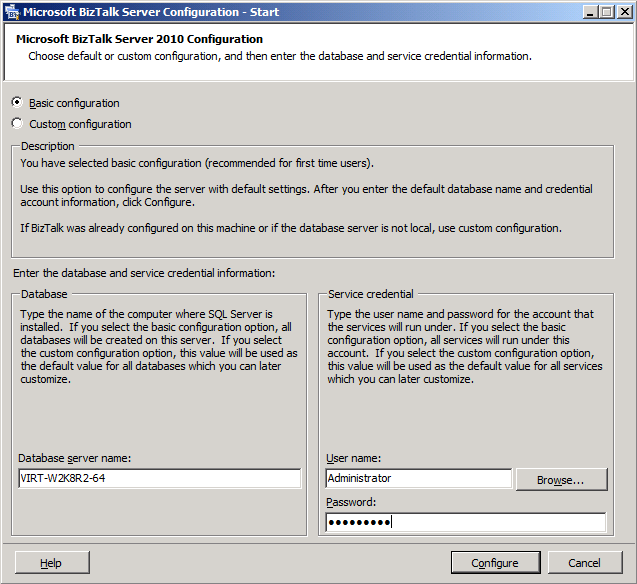
Figure 3. When launching the administration console for the first time, you need to step through a configuration process
Developing Solutions with Microsoft Visual Studio 2010
Once you have explored the BizTalk 2010 administration console a bit, it’s time to develop a simple application with Microsoft Visual Studio. BizTalk 2010 changes .NET development in that only applications targeting the .NET Framework version 4.0 are supported. This means that older applications using for instance .NET framework 3.0 or 3.5 will have to be migrated to the 4.0 version.
When BizTalk is installed on a computer with Microsoft Visual Studio 2010, the setup process will extend Visual Studio’s functionality to support BizTalk development. For example, to start writing BizTalk applications, you would begin with a BizTalk project template. This template creates an empty solution in Visual Studio, which you can use as your starting point.
BizTalk provides you many possibilities for writing custom code: you could be developing your own send and receive ports, maps to convert data from one format to another, schemas to define custom data formats, and so on. However, a BizTalk orchestration is a central piece of many BizTalk applications, and thus the rest of this article will provide a fast-paced tour to writing a simple orchestration using Visual Studio 2010.
With an empty BizTalk project open in Microsoft Visual Studio, choose the Add New Item command to add a new orchestration to the project (Figure 4). Microsoft Visual Studio divides orchestrations into three parts: the actual logic of the orchestration in the middle, at the left the receiving port(s), and at the right, the send port(s). Thus, you can think of an orchestration as the logic to receive data, process it, and then store the results.
![]()
Figure 4. BizTalk gives Visual Studio new icons to work with
Developing an orchestration starts by dragging and dropping components from the Toolbox onto the designer surface. For the sample application, drag a port component onto the gray area on the left. This will become a receive port, a component through which BizTalk can read information. In the sample application’s case, the information will be read from a traditional flat text file containing customer information, and later converted (or transformed) into a simple XML presentation.
After dragging the port component, you will need to configure it using the wizard that is displayed on the screen. Once you have configured the port to access files from a particular path (for instance, “C:\Input”), you are ready to add more components. A port can be thought of as a technical “protocol” to receive input, and a receive component is the operation to read that input. Next, you will need to add a Receive component into the orchestration.
Since BizTalk orchestrations can become complex at times, Microsoft Visual Studio offers its help by showing you hints and tips about components. For example, if configurations are missing from a particular component, Visual Studio will display a red exclamation mark on the right of the component. Click this mark, and you will get a helpful hint of what is missing. In the receive component’s case, the hint indicates that a message is missing (“No message”).
The sample application is about reading a text file and converting it to an XML file. For this to be possible, BizTalk requires a schema for each file that is to be read or written. A schema is used so that BizTalk can understand the file’s structure, field names and data types. Thus, you will need to define two schemas, one for the input file, and another for the output file.
To define the schemas, simply add new schema files to your Visual Studio project through the Add New Item dialog box. Visual Studio offers you several different options, and for flat text files, the Flat File Schema Wizard (Figure 5). The wizard is usually the easiest way to get started, and works for both delimited and non-delimited (fixed format) files. In the case of latter, you will need to separate areas from the file data and tell BizTalk which areas correspond to which record fields. For XML based files, a simple schema file is enough.
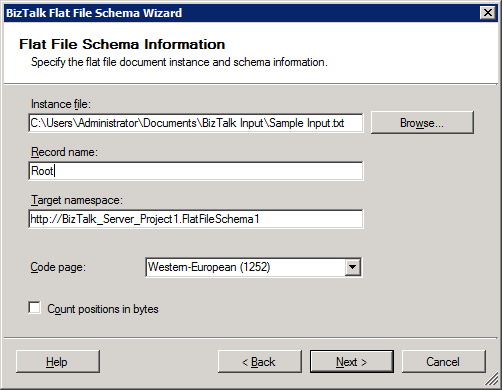
Figure 5. The Flat File Schema Wizard