

Ever needed to do something with the ComboBox, but found that the normal ComboBox is quite limited? The ComboBox, as we know it, shows a list of items. What if you wanted to show colours, fonts, drawn lines, or images with the ComboBox? Wouldn’t that be nice? Yes, it would. Not only that, but why not change the appearance and normal behaviour of the normal ComboBox? In this article, I will demonstrate how to do all these and more with the ComboBox.
Your Project: CrazyCombos
As the name implies, you are really going to go a bit crazy with extending the ComboBox’s uses.
Create a new Windows Forms project, named CazyCombos.
Fonts Combo
The first thing that I will cover is creating a Font ComboBox. A Font ComboBox displays a list of all the available fonts on the user’s PC, similar to what you use to change the Font in MS Word or MS Excel, for example. Apart from listing the available fonts, you also can display a small sample of each particular font by writing the current font name with the current font. For example, if you want to display Comic Sans MS, you must use the Comic Sans MS font to write Comic sans MS; in other words, the name of the font.
To create a Font ComboBox, follow these steps:
- Click Project.
- Click Add Class…
- Name the class FontCbo.cs.
This class will create a new font.
Import the Drawing Namespace at the top of FontCbo.cs.
using System.Drawing; //Import Drawing NameSpace
Create a Font object:
public Font FCFont; //Font Used
Edit the Class constructor as follows:
public FontCbo(Font FCCurrFont)
{
   //Set This Font Equal To Font Supplied
   FCFont = FCCurrFont;
}
Override the built-in ToString method to display the current font’s name:
   /// <summary>
   /// Override ToString Method To Display Current Font's Name
   /// </summary>
   /// <returns></returns>
public override string ToString()
{
    return FCFont.Name;    //Display Font Name
}
Build your project.
Go to frmCrazy’s Design view and add a ComboBox named cboFontsCrazy to it. Set cboFontsCrazy’s DrawMode property to OwnerDrawVariable. This enables you to display custom items in the list. Add the following variable to frmCrazy:
private SolidBrush FontForeColour; //Font's Colour
Load All the Fonts
In frmCrazy_Load add the following:
//FontCombo
//Obtain & Store System fonts Into Array
FontFamily[] families = FontFamily.Families;

//Loop Through System Fonts
foreach (FontFamily family in families)
{
//Set Current Font's Style To bold
   FontStyle style = FontStyle.Bold;

   //These Are Only Available In Italic, Not In "Regular",
   //So Test For Them, Else, Exception!!
   if (family.Name   == "Monotype Corsiva"
      || family.Name == "Brush Script MT"
      || family.Name == "Harlow Solid Italic"
      || family.Name == "Palace Script MT" ||
      family.Name    == "Vivaldi")
   {
      //Set Style To Italic, To Overt "Regular" & Exception
      style = style | FontStyle.Italic;
   }
   //Display The Font Combo Items
   cboFontsCrazy.Items.Add(new FontCbo(new Font(family.Name, 12,
                           style, GraphicsUnit.Point)));
}
Here, you created an array to store all the system’s fonts, and then you looped through all of them. As you loop, you set each font’s style to Bold, so that it appears Bold in FontCbo. The interesting thing here to note is that not all of the fonts support the Bold style, not even the Regular font style. What I had to do was to wait for the program to give me errors on the particular font(s) name(s). On each of the fonts in the if block, I received an error that they don’t support the regular or Bold styles. This meant that each of those fonts only support italic; that is why I had to identify them, tand hen change their styles to italic. You could have set the style just to italic in the first place, but still you may have received errors on fonts not supporting Bold. So, it is basically trial and error.
The physical drawing of each font happens in the cboFontsCrazy_DrawItem event:
/// <summary>
/// Drawing Of Fonts
/// </summary>
/// <param name="sender"></param>
/// <param name="e"></param>
private void cboFontsCrazy_DrawItem(object sender,
                                    DrawItemEventArgs e)
{
   Brush FontBrush;    //Brush To Be used

   //If No Current Colour
   if (FontForeColour == null)
   {
      //Set ForeColour
      FontForeColour = new SolidBrush(e.ForeColor);
   }
   else
   {
      //Fore Colour Changed, Create New Brush
      if (!FontForeColour.Color.Equals(e.ForeColor))
      {
         FontForeColour.Dispose();   //Dispose Old Brush
         //Create New Brush
         FontForeColour = new SolidBrush(e.ForeColor);
     }
   }

   //Set Appropriate Brush
   if ((e.State & DrawItemState.Selected) ==
        DrawItemState.Selected)
   {
      FontBrush = SystemBrushes.HighlightText;
   }
   else
   {
      FontBrush = FontForeColour;
   }

   //Current item's Font
   Font font = ((FontCbo)cboFontsCrazy.Items[e.Index]).FCFont;

   e.DrawBackground();    //Redraw Item Background

   //Draw Current Font
   e.Graphics.DrawString(font.Name, font, FontBrush, e.Bounds.X,
                         e.Bounds.Y);

   e.DrawFocusRectangle();    //Draw Focus Rectangle Around It

}
Edit the cboFontsCrazy_MeasureItem event to look like:
/// <summary>
/// Item Height Measurements
/// </summary>
/// <param name="sender"></param>
/// <param name="e"></param>
private void cboFontsCrazy_MeasureItem(object sender,
                                       MeasureItemEventArgs e)
{
   //Get Current Font In ComboBox
    Font font = ((FontCbo)cboFontsCrazy.Items[e.Index]).FCFont;

   //determine Its Size
   SizeF stringSize = e.Graphics.MeasureString(font.Name, font);

   //Set Appropriate Height
   e.ItemHeight = (int)stringSize.Height;
   //Set Appropriate Width
   e.ItemWidth  = (int)stringSize.Width;

}
You can build and run your program now, and test your Fonts ComboBox. If everything went well, you should be able to display and select Fonts, as displayed in Figure 1.
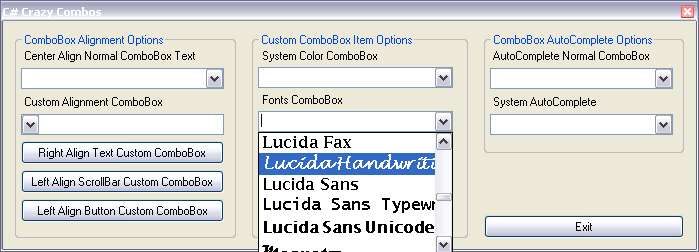
Figure 1: The Working Fonts ComboBox