Introduction
Many times developers come across situations where they need to write
similar code over and over again. Automating the generation of such boilerplate
code not only reduces the time spent but also reduces the chances of errors
while doing such monotonous development. To help developers achieve this
goal, Visual Studio
2010 includes what is known as Text Template
Transformation Toolkit (T4). T4 templates are text files that specify the
structure of the code or markup to produce. T4 comes with its own set of
directives and blocks, which allow you to you define the boilerplate for code
generation. This article introduces you to T4 basics and familiarizes you with the
various parts of a T4 template.
Use of T4 Templates
Just to give you an idea as to where T4 templates can come handy, suppose
that you are developing an application that deals with 20 database tables and
you wish to create entity classes for all these tables. In the absence of T4
(and any other such tool) you will have to manually code 20 classes each
representing a corresponding table from the database. Using T4, however, you
can automate this operation. You can design a T4 template such that it reads
table schema and outputs a class matching the table structure. This way you can
get rid of all the manual work involved in the process. In future if at all
table structure changes all you need is to re-run the template and the classes
will reflect the new schema.
This is just one of the situations where T4 comes in handy. There can be
many such opportunities where you can use the power of T4 templates.
Structure of a T4 template
In order to understand the structure of a T4 template, let’s create a sample
Console Application and try out how T4 templates work. So, begin by creating a
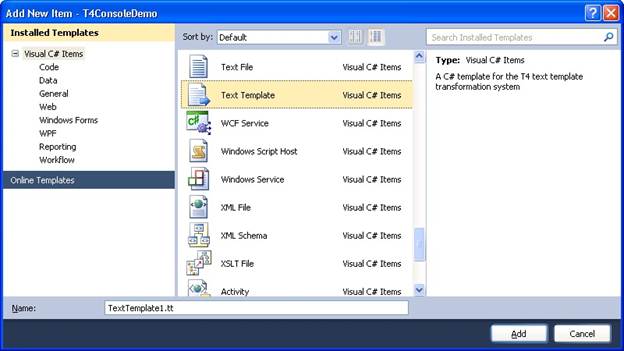
new Console Application and open the Add New Item dialog.

Figure 1: Add New Item – T4ConsoleDemo
As you can see in the above figure, there is an option – Text Template – for
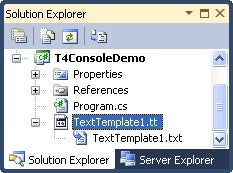
adding a T4 template. Notice that T4 templates have file extension of .tt and
each .tt file has an output file. The extension of the output file is developer
defined and defaults to .txt (see below).

Figure 2: T4 templates have file extension of .tt
A T4 template typically contains directives, control blocks and static text.
Let’s discuss each of these parts in detail.
T4 Directives
If you observe the default template file (.tt) you will see the following
two lines of markup:
<#@ template debug="false" hostspecific="false" language="C#" #>

<#@ output extension=".txt" #>
Both of the lines are of the form <#@ ….. #>. These two lines
represent the template and output directive of a T4 template respectively. If
you ever developed ASP.NET web forms
you will find this concept quite similar. (ASP.NET uses <%@ and %> to
represent a directive). In addition to template and output directives, there
are more. Some of the frequently used directives are as follows :
Template
The template directive gives information about the template itself. For
example, the language attribute of the template directive indicates the programming
language you will use in the template. The debug attribute indicates whether to
turn debug mode on or not. T4 templates can be processed by an external host
too (other than VS) and if so, the hostspecific attribute will indicate the
same.
Output
The output directive controls some aspects of the output file. The extension
attribute indicates the file extension of the output file. The default
extension is .txt but you can change it as per your requirement. For example,
if your template is generating a C#
class then you can change the extension to .cs. Additionally, you can also
specify the encoding of the output file (ASCII, Unicode etc.) using the
encoding attribute.
Assembly
The assembly directive serves the purpose of "Add reference"
dialog of Visual Studio within the template. Your template code might be using
types residing in an external assembly. If so you can refer that assembly using
the assembly directive.
Import
The import directive serves the same purpose as the "using"
statement of C# and is used to import namespaces into your template so that the
template code can use class names from those namespaces directly, instead of
fully qualified names.
Include
The include directive allows you to include contents of another file into
the current template. For example, you might have copyright or licensing
information in an external file that you want to include in the output file
generated by the template.
T4 Blocks
T4 blocks come in four flavors viz. static text blocks, statement control
blocks, expression control blocks and class feature control blocks. The static
text blocks simply represent what they mean – static text. These types of
blocks need no special syntax to identify them and can appear anywhere in the
template that you want to place them in the generated code file.
Statement Control Blocks
Statement control blocks contain C# language statements such as variable
declarations, loops and conditional branching. Statement control blocks are
represented by <# …. #> markup tags. For example, consider the
following fragment that runs an operation in a for loop.
<#

for(int i=0;i<10;i++)

{

  WriteLine("Hello World!");

}

#>
You can also interleave code statements and static text like this:
<#

for(int i=0;i<10;i++)

{

#>

Hello World!

<#

}

#>
Expression Control Blocks
Many times you need to output some value to the generated file. You can
certainly do that using statement control blocks and WriteLine() method but
there is an easiar way – expression control blocks. The expression control
blocks are represented by <#= and #> tags and are used as follows :
<#= DateTime.Now #>
Class Feature Control Blocks
Class feature control blocks contain reusable code that can be called from
other parts of the template. For example, you may create properties and methods
that are frequently needed by the rest of the template. They are represented by
<#+ and #> tags and must appear at the end of the template (.tt) file.
The following example shows how class feature control blocks are used :
<#

for(int i=0;i<10;i++)

{

  MyFunction(i);

}

#>

<#+

void MyFunction(int i)

{

  WriteLine("Value of i = ",i);

}

#>
Example Template
Now that you have some idea of what makes a T4 template, let’s develop a simple
T4 template that makes use of many of the pieces discussed above. The T4
template developed in this section needs an external component (.dll) in the
form of a .NET assembly. The Class
Library project for the component can be found in the source code accompanying
this article and we won’t discuss it here. The component physically resides as
T4DemoLibrary.dll and contains a single class – T4Helper. The T4Helper class
has two simple methods viz. GetClassNames() and GetPropertyNames(). The former
method returns an array of class names to be generated and the later returns an
array of property names for a specified class. In a more real world scenario
these methods will read database schema or XML file and decide which class
names and property names are to be generated. The complete markup of the
template is given below :
<#@ template debug="false" hostspecific="false" language="C#" #>

<#@ output extension=".cs" #>

<#@ assembly name="C:\Bipin\T4ConsoleDemo\bin\Debug\T4DemoLibrary.dll" #>

<#@ import namespace="T4DemoLibrary" #>

<#@ include file="copyright.txt" #>


<#

T4Helper helper = new T4Helper();

string[] classNames = helper.GetClassNames();

#>

namespace T4ConsoleDemo

{

<#

foreach(string s in classNames)

{

	WriteLine("\tpublic class {0}",s);

	WriteLine("\t{");

	string[] propNames = helper.GetPropertyNames(s);

	WriteProperties(propNames);

	WriteLine("\t}");

}

#>

}


<#+

	void WriteProperties(string[] propNames)

	{

		foreach(string p in propNames)

		{

			Write("\tpublic string {0}" , p);

			WriteLine(@"{get; set;}");


		}

	}

#>
The @template directive specifies that this template will be using C# as the
programming language. The @output directive specifies that the file extension
of the output file will be .cs. The template depends on an external assembly
for some helper methods. The external assembly is referred using the @assembly
directive. You should change the assembly path as per your directory structure.
The T4DemoLibrary.dll contains T4DemoLibrary namespace. The @import directive
imports this namespace so that classes from the T4DemoLibrary namespaces need
not be fully qualified every time. We wish to have a copyright notice at the
top of the generated class file. Instead of specifying the copyright notice as
a static text we prefer to place it in a separate file and then include it in
the current template using the @include directive. The Copyright.txt file looks
like this :
/*================================

Copyright (C) <#= DateTime.Now.Year #> XYZ Ltd. All rights reserved.

==================================*/
Notice that Copyright.txt file itself uses the T4 expression block for
outputting year. When this file is included in the main template, any T4
specific blocks are processed and then the result is included in the generated
file.
The next statement block (<# …. #>) instantiates T4Helper class from
the T4DemoLibrary assembly and retrieves class names using the GetClassNames()
method. It then outputs the namespace name using a static text block. Another
statement block iterates through the classNames array and outputs the
respective classes. Notice the use of Write() and WriteLine() utility methods
that allow you to write text to the resultant file. The for loop makes use of a
helper method – WriteProperties(). The WriteProperties() method is created
using class feature control block (<#+ …. #>) as seen at the end of the
template.
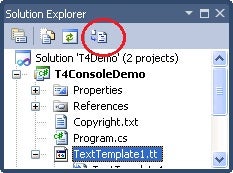
Once you key-in the above markup in the template file (.tt), save the file.
As soon as the template is saved, it is processed and the output file is
created. You can also manually process all the templates from a project using
the "Transform All Templates" option of Solution Explorer.

Figure 3: Manually process all templates using "Transform All Templates"
Clicking the "Transform All Templates" option will display the
result of processing in the Output Window as shown below:

Figure 4: "Transform All Templates" displays the result in the Output Window
Now, open TextTemplate1.cs file and it should resemble as shown below
:
/*================================

Copyright (C) 2011 XYZ Ltd. All rights reserved.

==================================*/

namespace T4ConsoleDemo

{

	public class Employee

	{

	public string EmployeeID{get; set;}

	public string FirstName{get; set;}

	public string LastName{get; set;}

	}

	public class User

	{

	public string UserName{get; set;}

	public string Password{get; set;}

	public string Email{get; set;}

	}

	public class Customer

	{

	public string CustomerID{get; set;}

	public string CompanyName{get; set;}

	public string ContactPerson{get; set;}

	}

}
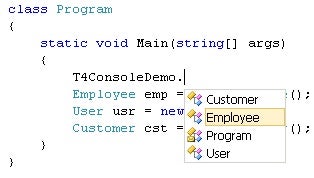
Once the output file (.cs in this case) is created, it becomes part of your
project and you can use the classes just like any other classes. The following
figure shows how Visual Studio shows the classes generated via template in the
IntelliSense.

Figure 5: Visual Studio shows the classes generated via template in the IntelliSense
Summary
Text Template Transformation Toolkit (T4) is a part of Visual Studio 2010
that allows you to generate code using templates. The T4 templates contain
directives (<#@ …. #>), statement control blocks (<# …. #>),
expression control blocks (<#= …. #>) and class feature control blocks
(<#+ …. #>). This article demonstrated just a small fraction of the
power and flexibility T4 templates offer. T4 templates can be of great use
where boilerplate code generation is needed. Using T4 templates not only
reduces time spent in writing boilerplate code but also reduces chances of
errors associated with such monotonous development.

