

When you think about the tiny Arduino family of homebrew devices, you typically don’t think of Intel. Most versions of the Arduino are powered by some type of ARM device. Even though the Netduino will run the .NET Micro Framework, it’s still based on the STMicro Cortex M3 ARM chip. The Intel Galileo is based on the Intel Quark SoC X1000 chip. It’s essentially a 32-bit Intel Pentium in a system on a chip (SoC) package.
It has a few other extras beyond the Netduino board including both a USB host and USB client port plus a full-sized mini-PCI Express slot. That makes it possible to add a standard issue laptop Wi-Fi card to wirelessly connect the device to a network without any additional add-on boards. You will need to do some software reconfiguration to make it all work, but the steps are pretty straightforward. The on-board operating system is a Linux variant and brings with it additional capabilities and language support from a simple embedded OS.
Getting Started
The best route to getting started with the Intel Galileo is to download the Arduino software for your platform from the Intel site. You’ll find versions for 32- and 64-bit Linux, Mac OSX and Windows. You’ll also find an SD card Linux image if you want to use a Wi-Fi card with the Galileo. A comprehensive Galileo Getting Started document is available for download from the same site. Once you have the Arduino software downloaded and installed you’ll have access to the Integrated Development Environment (IDE).
Coding for the Intel Galileo can be in any language you like as long as it’s in C. Figure 1 shows the IDE with the Blink sample loaded. The Arduino IDE uses the concept of a Sketch in much the same way that Visual Studio uses a project. Each Sketch can be comprised of multiple libraries or files, which get compiled and downloaded to the target platform. Communication with the Galileo happens over USB but uses a COM port connection. You’ll need to find out which COM port the Galileo connects with in order to configure your IDE properly. In Windows you can determine the correct port using Device Manger (see Figure 2).

Figure 1: IDE with the Blink sample loaded
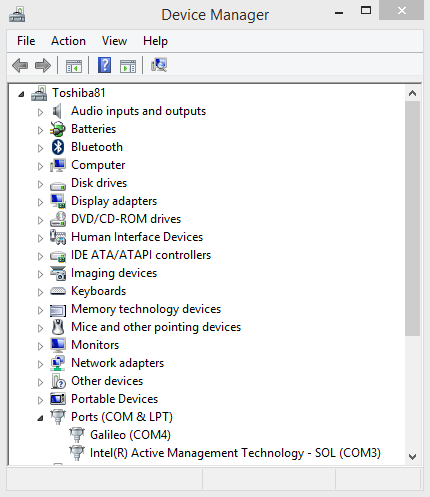
Figure 2: Determine the correct port using Device Manger
The visual micro project on the codeplex site offers a plugin for Visual Studio that works with the Galileo. They offer a paid-for version with debugging capabilities but the documentation is a bit sparse at this point. Intel provides an Eclipse-based environment as an alternative to the Arduino IDE. For the purposes of this article we decided to stick with the Arduino IDE as it was the easiest to get working.
Blinking LEDs
You’ll find several blinking LED samples in the Arduino IDE Example folder. Most Arduino boards have an LED on the board connected to pin 13 so to demonstrate blinking a single LED requires no external hardware. In order to demonstrate the same capability on both the Galileo and the Netduino boards we chose to blink six LEDs in sequence. While the code is in C, it really doesn’t differ much from the code for the Netduino. Listing 1 contains the code used for this example.
/*
  Blink
  Cycles thru six LEDs on for one second, then off for one second, repeatedly.
 */

int led;
// the setup routine runs once when you press reset:
void setup()
{
  // initialize the digital pin as an output.
  for (led = 2; led < 8; led++)
  {
    pinMode(led, OUTPUT);
  }
}

// the loop routine runs over and over again forever:
void loop()
{
  for (led = 2; led < 8; led++)
  {
    digitalWrite(led, HIGH);   // turn the LED on (HIGH is the voltage level)
    delay(1000);               // wait for a second
    digitalWrite(led, LOW);    // turn the LED off by making the voltage LOW
    delay(1000);               // wait for a second
  }
}
Listing 1 Sample code to blink six LEDs
It’s a little simpler in the C version to connect to the individual digitial I/O pins using the digitalWrite routine. You do need to configure the ports for output, which happens in the setup() routine with the call to pinMode.
Final Thoughts
The Intel Galileo definitely has more power and more connectivity options than the Netduino with the downside being you must write your code in C. The current low price for a Galileo on Amazon comes in at $84.95 which is about $25 over what you’ll pay for the Netduino Plus 2. The side benefit of the on-board Wi-Fi connectivity might be enough to push this device up your wish list, although you will have to pay extra for the actual Wi-Fi board.