Introduction
Most of the real world web applications require security in
one form or another. As far as ASP.NET is
concerned Forms Authentication is the most popular and common method of
protecting your website from unauthorized access. ASP.NET web forms and server controls
(such as Login and CreateUserWizard) make it extremely easy to implement Forms
Authentication in web forms based websites. However, if you are developing an ASP.NET MVC web application you need
to take care of some steps on your own. In this step-by-step tutorial you will
learn to implement Forms Authentication in ASP.NET MVC web applications. You
will also learn to use membership features, role based security and profile
features.
Enabling SQL Server Database for Membership, Roles and Profile Features
To begin with, create a new ASP.NET MVC 3 Web Application
using Visual
Studio 2010. Choose the Empty project template. The Internet
Application project template already includes controllers and views that make
use of Forms Authentication and membership features. Since we want to learn the
process step-by-step we are going to develop our example from the ground up and
hence we will go with the Empty project template. Also, make sure to select the
view engine as ASPX.
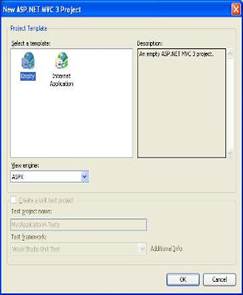
Figure 1: An empty ASP.NET MVC3 Project
Once the ASP.NET MVC Web Application is created, open the ASP.NET
Configuration tool from the Project menu. This will open the Web Site
Administration Tool. Go to the Provider tab and click on "Select a single
provider for all site management data" option. On the next screen you will
see AspNetSqlProvider. Click on Test if you wish to test, otherwise click Back
and close the tool.

Figure 2: Select a single provider for all site management data
Now, switch to the Security tab and create two roles –
Administrator and NormalUser for testing purpose.
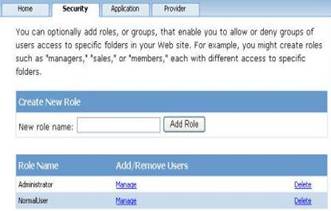
Figure 3: Switch to the Security tab and create two roles
The above step adds a SQL Server database (ASPNETDB.mdf) in
App_Data folder of your web application, pre-configured with tables required
for membership, roles and profile features.
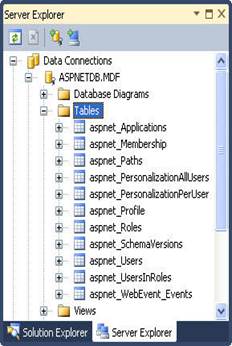
Figure 4: Adding a SQL Server database
If you wish to use an external SQL Server database you will
need to configure it using the aspnet_regsql.exe command line tool. Just follow
the wizard presented by the tool and it will create the required tables in the
specified database.
Configuring Forms Authentication in web.config
The next step is to configure your web application to enable
forms authentication, membership and role based security. Open web.config and
add the <authentication> section as shown below:
<authentication mode="Forms">
 <forms loginUrl="~/Membership/Login" timeout="2880" />
</authentication>
Using the <authentication> section you set the
authentication scheme to Forms and login URL to ~/Membership/Login. You will be
creating the Membership controller with Login action later.
Next, configure Membership and Roles providers as shown
below :
<membership defaultProvider="MyMembershipProvider">

B B B  <providers>

B B B B B B B  <add name="MyMembershipProvider"

B B B B B B B B B type="System.Web.Security.SqlMembershipProvider"

B B B B B B B B B connectionStringName="connstr" />

B B B  </providers>

</membership>


<roleManager enabled="true" defaultProvider="MyRolesProvider">

B B B  <providers>

B B B B B B B  <add name="MyRolesProvider"

B B B B B B B B B type="System.Web.Security.SqlRoleProvider"

B B B B B B B B B connectionStringName="connstr" />

B B B  </providers>

</roleManager>
The <membership> section configures the membership
provider (MyMembershipProvider) and the <roleManager> section configures
the roles provider (MyRolesProvider). The connectionStringName specifies the
database connection string that points to the SQL server database storing the
membership and roles information.
Creating a New User
Now that you have configured your web application to use
membership and roles features, let’s create a controller and a couple of views
that will allow users to register with the web application. In the sections
that follow we won’t pay much attention to validating the data for the sake of
simplicity. In a real world scenario, however, you will need to add those
features too.
Add a new controller class to the Controllers folder and
name it as MembershipController. Add two actions viz. CreateUser() and
CreateUser(CreateUserData obj) as shown below:
[HttpGet]
public ActionResult CreateUser()
{
B B B  return View();
}

[HttpPost]
public ActionResult CreateUser(CreateUserData data)
{
B B B  MembershipCreateStatus status;

B B B  Membership.CreateUser(data.UserID,data.Password,data.Email,data.Question,data.Answer,true, out status);

B B B B if (status == MembershipCreateStatus.Success)
B B B  {
B B B B B B B  ViewBag.StatusMessage = "User created successfully!";
B B B  }
B B B  else
B B B  {
B B B B B B B  ViewBag.StatusMessage = "Error creating user account!";
B B B  }
B B B  return View("CreateUserStatus");
}
Notice that the first CreateUser() action is marked with
[HttpGet] attribute indicating that it is intended to be used with GET
requests. It just displays CreateUser view for entering new user information.
The other version of CreateUser() action accepts a parameter
of type CreateUserData and is marked with [HttpPost] attribute. This version
will be invoked for POST requests. The CreateUserData class is a custom model
class that wraps the form POST data and looks like this:
public class CreateUserData
{
B B B  public string FirstName { get; set; }
B B B  public string LastName { get; set; }
B B B  public string UserID { get; set; }
B B B  public string Password { get; set; }
B B B  public string Email { get; set; }
B B B  public string Question { get; set; }
B B B  public string Answer { get; set; }
}
As you can see, the CreateUserData class simply contains a
series of properties. The FirstName and LastName properties will be used with
profile features. The remaining properties viz. UserID, Password, Email,
Question and Answer are used by ASP.NET membership features. The second version
of CreateUser() action uses the ASP.NET Membership object to create a new user.
The CreateUser() method of the Membership object accepts user information, such
as user name and password, and returns success or failure of the registration
operation via an output parameter. The output parameter is of enumeration type
MembershipCreateStatus. The code checks this status value and accordingly
stores a StatusMessage in the ViewBag. Finally, the CreateUserStatus view
displays the status to the end user.
Now, add the CreateUser view by right clicking on
CreateUser() action and then selecting Add View option.
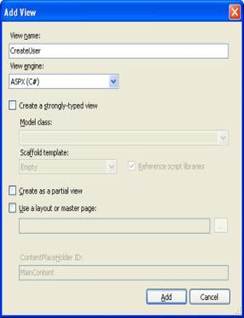
Figure 5: Add CreateUser view
Key-in the following HTML markup into the CreateUser view:
<form method="post" action="CreateUser">
<h1>Register</h1>
<table cellpadding="3" cellspacing="0" class="style1">
<tr>
<td align="right">First Name :</td>
<td><input name="FirstName" type="text" /></td>
</tr>
<tr>
<td align="right">Last Name :</td>
<td><input name="LastName" type="text" /></td>
</tr>
<tr>
<td align="right">User ID :</td>
<td><input name="UserId" type="text" /></td>
</tr>
<tr>
<td align="right">Password :</td>
<td>
<input name="Password" type="password" /></td>
</tr>
<tr>
<td align="right">Confirm Password :</td>
<td>
<input name="ConfirmPassword" type="password" /></td>
</tr>
<tr>
<td align="right">Email :</td>
<td><input name="Email" type="text" /></td>
</tr>
<tr>
<td align="right">Security Question :</td>
<td><input name="Question" type="text" /></td>
</tr>
<tr>
<td align="right">Security Answer :</td>
<td><input name="Answer" type="text" /></td>
</tr>
<tr>
<td align="center" colspan="2"><input id="btnSubmit" type="submit" value="Submit" /></td>
</tr>
<tr>
</table>
</form>
The CreateUser view basically renders an HTML form as shown
below:
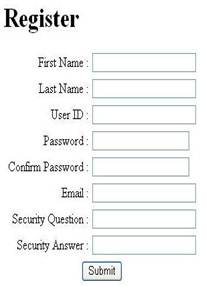
Figure 6: The CreateUser view renders an HTML form
Note that though we are not making use of First Name and
Last Name values in the CreateUser action we still accept these values. Later
you will store these values in the profile of a user. Also notice that the
various <input> fields have the same name as the respective properties of
CreateUserData class. This allows the ASP.NET MVC framework to correctly map
the form fields with the properties.
Also, add CreateUserStatus view and key-in the following
markup into it:
<center>
<strong><%= ViewBag.StatusMessage %></strong>
<br />
<br />
<%= Html.ActionLink("Register another","CreateUser") %>
Or
<%= Html.ActionLink("Log-in","Login") %>
</center>
Notice how the above markup makes use of the StatusMessage
member of the ViewBag. The CreateUserStatus view additionally renders to action
links – one pointing to CreateUser action (GET version) and the other pointing
to Login action. At runtime the CreateUserStatus view looks like this :
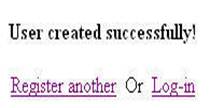
Figure 7: User created successfully
Before you go ahead, run the web application; navigate to
/Membership/CreateUser and create two users for testing purposes (say user1 and
user2). Add one of the users to Administrator role using the Web Site
Administration Tool.

Figure 8: Add one of the users to Administrator role
Authenticating Existing Users
In order to authenticate existing users, you will add two
actions in MembershipController. These actions are shown below:
[HttpGet]
public ActionResult Login()
{
B B B  return View();
}

[HttpPost]
public ActionResult Login(LoginData data)
{
B B B  if (Membership.ValidateUser(data.UserID, data.Password))
B B B  {
B B B B B B B  bool flag = (data.RememberMe == "on" ? true : false);
B B B B B B B  FormsAuthentication.SetAuthCookie(data.UserID,flag);
B B B B B B B  return RedirectToAction("Index", "Article");
B B B  }
B B B  else
B B B  {
B B B B B B B  ViewBag.ErrorMessage = "Invalid UserID or Password!";
B B B B B B B  return View();
B B B  }
}
Just like the CreateUser() action the Login() action also
has two versions – one for GET requests and the other for POST requests. The
former one simply returns the Login view. The later version of the Login()
action accepts a parameter of type LoginData. The LoginData class is a custom
model class as shown below:
public class LoginData
{
B B B  public string UserID { get; set; }
B B B  public string Password { get; set; }
B B B  public string RememberMe { get; set; }
}
Inside, the Login() action makes use of Membership object to
validate whether the user credentials are valid or not. Notice that the
RememberMe property returns "on" if the remember me checkbox is
checked. Accordingly, SetAuthCookie() method of the FormsAuthentication class
issues a forms authentication cookie. The user is then redirected to Index()
action from the Article controller (you will code it later). If the user
credentials are invalid an ErrorMessage is stored in the ViewBag and Login view
is rendered again.
The Login view required by the Login action is shown below:
<form method="post" action="Login">
<h1>Log-in</h1>
<table cellpadding="3" cellspacing="0" class="style1">
<tr>
<td align="right">User ID :</td>
<td><input name="UserId" type="text" /></td>
</tr>
<tr><td align="right">Password :</td>
<td><input name="Password" type="password" /></td>
</tr>
<tr>
<td align="right">Remember Me :</td>
<td><input name="RememberMe" type="checkbox" /></td>
</tr>
<tr>
<td align="center" colspan="2"><input id="btnSubmit" type="submit" value="Submit" /></td>
</tr>
<tr>
<td colspan="2" align="center">
<strong>
<%= (ViewBag.ErrorMessage == null?"":ViewBag.ErrorMessage) %>
</strong>
</td>
</tr>
</table>
<%= Html.ActionLink("New users register here","CreateUser") %>
</form>
When displayed the Login view will look like this :
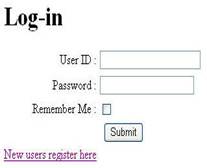
Figure 9: The Login view
To complete the login functionality, add another controller
named ArticleController. The ArticleController will have the Index() action.
The following code shows the Index() action.
[Authorize]
public ActionResult Index()
{
B B B  return View();
}
The Index() action is marked with [Authorize] attribute
indicating that only authenticated users can invoke this action. The Index view
simply contains a welcome message.
In order to test the functionality so far, run the web
application and navigate to /Article/Index. You will find that since we have
enabled the forms authentication, you will be automatically redirected to the
Login page. You will be taken to the Index page only after entering a valid
user ID and password. Also test the error message by entering some invalid user
credentials.
Role Based Security
Implementing role based security is a matter of setting the
Roles property of the [Authorize] attribute.
[Authorize(Roles="Administrator")]
The Roles property specifies a list of roles eligible to
invoke the action under consideration. If you run the Index action after
modifying the [Authorize] attribute to include the Roles property, you will be
redirected to the Login page again if the current user does not belong to the
Administrator role.
Storing and Retrieving Profile Information
ASP.NET Profile features allow you to capture user specific
information and then render a personalized experience in web pages. In order to
store and retrieve profile information for the users, you must configure the
profile provider and profile properties in the web.config file. You will use
the <profile> section to do so. The following markup shows the
<profile> section.
<profile enabled="true" defaultProvider="MyProfileProvider">
<providers>
<add name="MyProfileProvider"
type="System.Web.Profile.SqlProfileProvider"
connectionStringName="connstr"
applicationName="/"/>
</providers>
<properties>
<add name="FirstName" />
<add name="LastName" />
</properties>
</profile>
The enabled attribute of the <profile> section is set
to true. The <properties> section defines two profile properties, namely
FirstName and LastName. Recollect that you are accepting First Name and Last
Name on the user registration page. You need to store those values in the
profile of that user. To do so, modify the CreateUser POST action as shown
below:
...
if (status == MembershipCreateStatus.Success)
{
 ProfileBase profile = ProfileBase.Create(data.UserID);
 profile["FirstName"] = data.FirstName;
 profile["LastName"] = data.LastName;
 profile.Save();
 ViewBag.StatusMessage = "User created successfully!";
}
else
{
...
Notice the lines marked in bold letters. You use ProfileBase
class from System.Web.Profile namespace to get access to the profile of a
specific user. The Create() static method of ProfileBase class accepts a user
name whose profile is to be retrieved and returns an instance of ProfileBase
class. You can then set profile properties on the ProfileBase object thus
returned. Once all the properties are set, the Save() method is called to
persist the profile property values in the underlying database.
You can now access the FirstName and LastName profile
properties in the ArticleController.
[Authorize]
public ActionResult Index()
{
B B B  ProfileBase profile = ProfileBase.Create(Membership.GetUser().UserName);
B B B  ViewBag.DisplayName = profile["FirstName"] + " " + profile["LastName"];
B B B  return View();
}
In the code shown above, you first get ProfileBase object as
before. This time, however, you use the Membership.GetUser() method to retrieve
the currently logged in user. The FirstName and LastName profile properties are
then retrieved and stored in ViewBag as DisplayName member. There is an
alternative to the above way of accessing the user profile. You can also
retrieve the profile properties like this:
string fname = HttpContext.Profile["FirstName"] as string;
string lname = HttpContext.Profile["LastName"] as string;
The HttpContext.Profile points to the ProfileBase instance
for the currently logged in user. You can then access the individual profile
properties as before.
The DisplayName member of the ViewBag can be accessed in the
Index view as shown below:
...
<h1>Welcome <%= ViewBag.DisplayName %>!</h1>
...
Summary
Using ASP.NET Forms Authentication you can restrict the
users accessing your web application. In this article you secured an ASP.NET
MVC application using Forms Authentication, Membership and Roles features. The
[Authorize] attribute indicates that an action can be invoked only by authenticated
users. You can implement role based security by setting the Roles property of
the [Authorize] attribute. Forms Authentication, Membership, Roles and Profile
features together help you to secure your web application from unauthorized
access and also allow you to render personalized web pages.
About the Author:
Bipin Joshi is a blogger and writes about apparently
unrelated topics – Yoga & technology! A former Software Consultant by
profession, Bipin is programming since 1995 and is working with .NET framework
ever since its inception. He has authored or co-authored half a dozen books and
numerous articles on .NET technologies. He has also penned a few books on Yoga.
He was a well known technology author, trainer and an active member of Microsoft
developer community before he decided to take a backseat from the mainstream IT
circle and dedicate himself completely to spiritual path. Having embraced Yoga
way of life he now codes for fun and writes on his blogs. He can also be reached there.

