

Introduction
This article presents an assembly that demonstrates and simplifies the production of MDI applications using C#. Although the assembly is written in C#, it can be used in any of the .NET languages. It is loosely based on the MFC document/view structure. It features:
- A menu containing the standard file commands (Open, Save, Close, and so forth).
- A dynamically updated window menu item allowing quick switching between MDI child forms.
- A Help menu item with an automatically updated About box.
- A status bar that is updated with text for each of the menu commands.
- A document class similar to MFC’s CDocument class with associated views.
- Automatic detection of document classes using reflection and custom attributes.
- Serialization of the main form’s size and position between running instances.
- A recent files menu item containing the last 10 files opened/saved by the application.
- Drag and drop support.

Creating the Solution
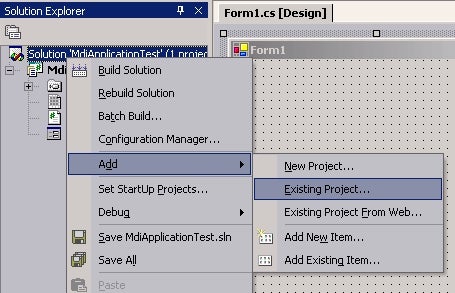
To use the MDI template assembly, first create a Windows application as you would normally do. We then need to add the assembly as a project to the solution. To do this, right-click on your new application’s solution in Solution view and select ‘Add/Existing Project’.
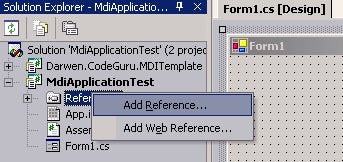
When the Browse dialog appears, go to the directory where the MDI template assembly resides and select the .csproj file. You’ll see that the assembly’s project has been added to the solution. We now need to add the project as a reference to the Windows application. Right-click on the ‘references’ item under your application and select ‘Add reference’.
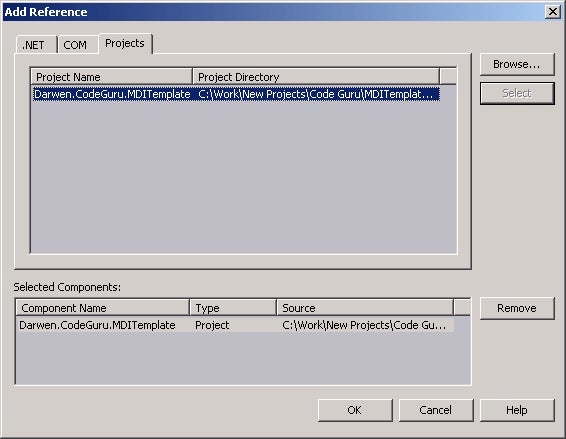
This will bring up the following dialog. Go to the ‘project’s’ tab, select the assembly’s project, and hit the ‘select’ button.
Now, click ‘OK’ and build the solution. The MDI Template assembly can now be used.
Application Attributes
The title of the application is taken from the Assembly Product specificed in the Assembly Info. Set these two lines in your application’s AssemblyInfo.cs file:
[assembly: AssemblyCompany("Darwen")]
[assembly: AssemblyProduct("MDI Application Test")]
Application specific data (for example, the last size of the window or the recent files list) are stored in the Registry under HKEY_CURRENT_USER/Software/<Company>/<Product>.
Creating the Main Form
To create the main form of the application, we must create an inherited form that derives from the MdiParentForm in the assembly. First, right-click on your application in the solution explorer. Select ‘Add/Add Inherited Form’.
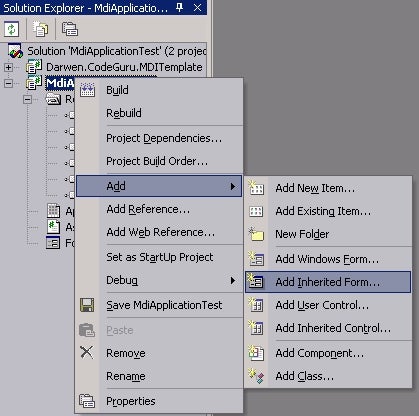
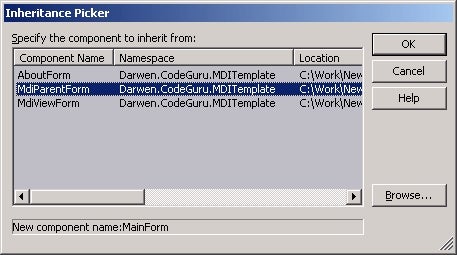
In the following dialog, enter MainForm and click OK. This will bring up the following dialog, requesting which form you want to derive from. Select Darwen.CodeGuru.MdiParentForm and click OK.
This will add a new form called MainForm to your application. We now need to change the main form of the application to our new form. Go to the source code for the initial form (usually Form1) and find the Main() function. Change the ‘new Form1()’ to ‘new MainForm()’. Rebuild the solution and run it. You’ll see that MainForm is being used as the main form of the application and not Form1.
Advanced
You can remove Form1 altogether and move the Main() function to the MainForm class instead. If you do this, you need to change the startup object in the properties for your application’s project.
Adding Document Types
If you now run the application and select ‘file/open’, you’ll see that only All files is available in the file type combo box. This is because we haven’t described any documents yet. The template automatically picks up document types and extensions from the executable assembly by using a combination of attributes and reflection.
To define a document type, first add a class that derives from Darwen.CodeGuru.MDITemplate.MdiDocument. Now, you need to add Darwen.CodeGuru.MDITemplate.DocumentAttributes to this class that gives the name of the document type and its extension. You can add more than one document attribute to a class so that a single document class can process more than one file type. You also need to implement the abstract methods OnCreateView, OnLoadDocument, and OnSaveDocument.
Below is an example of an empty document class that processes text files. Try adding it to your application.
using namespace System;
using namespace Darwen.CodeGuru.MDITemplate;
[Document("Test document files", ".txt")]
public class TestDocument : MdiDocument
{
   public TestDocument()
   {
   }
   protected override MdiViewForm OnCreateView()
   {
      return null;
   }
   protected override bool OnLoadDocument(string sFilePath)
   {
      return false;
   }
   protected override bool OnSaveDocument(string sFilePath)
   {
      return false;
   }
}
Recompile the project and run it. Go to the File/Open menu item and you’ll see that “Test document files” with the extension .txt has been added to the file type combo box.