

Introduction
Seeking confirmation of some important action, such as deleting a record, is
a common practice in web applications. There are two common approaches to seek confirmation
from the end user. In the first approach a dialog box is displayed to the user
seeking his consent to perform the delete operation and in the second approach the
user is shown a separate confirmation page. In the former approach the control
remains in the page where deletion is taking place whereas in the latter case
control moves to a confirmation page and the actual deletion operation happens
in the confirmation page. This article illustrates how both of these techniques
can be implemented in ASP.NET MVC.
Which Technique to Use?
As discussed earlier there are two common ways to seek confirmation of a delete
operation from the user :
- Show a dialog box to the end user seeking his consent for
the delete operation
- Take the user to a confirmation page where he confirms the
delete operation
Though there is no rigid rule as to which technique you should use,
generally the first technique is used when the user is not supposed to review
the entire record being deleted. Consider, for example, that you are working with
an order processing system and there is a web page showing a list of past
orders. Now the listing page might be showing only the partial information
about the order. If a user deletes an order without reviewing the complete
details of the order chances are that he is unaware of possible consequences of
deleting the record. It would be desirable that he is presented with the
complete order history along with notes, comments and special instructions
about the order before he deletes it. In such cases the first way of confirming
deletes is inadequate and you might prefer to use the second technique. The
second technique may also be required in situations where you wish to use a minimum
or no client side script.
Creating a Sample Application
In order to illustrate both of the techniques discussed above, you will
develop a sample ASP.NET MVC application. To begin with, create an empty
ASP.NET MVC application using ASPX view engine. The sample application will use
the Employees table from the Northwind database and you will need to create an
Entity Framework data model for the same. So, add a new ADO.NET Entity Data
Model in the Models folder and then drag and drop the Employees table on it.
Doing so will create a model as shown below :

Figure 1: Add a new ADO.NET Entity Data Model
Confirming Deletes Without Leaving the Current Page
Once the data model is ready add a new controller class and name it Home.
Add an action method – Index() – as shown below :
public ActionResult Index()

{

    NorthwindEntities db=new NorthwindEntities();

    var data = from item in db.Employees

                select item;

    ViewBag.Employees = data;

    return View();

}
As you can see, the Index() action method fetches all of the employees and
stores the collection in a ViewBag property (Employees). Then right click on
the Index() action method and add a view named Index. The Index view will
display all of the employee records and will have links to delete a record. The
Index view as shown in the browser looks like this :
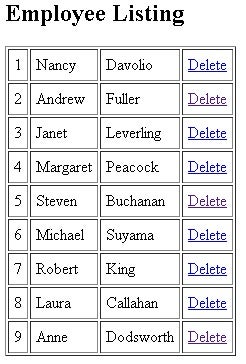
Figure 2: Index View of Employee Listing
The HTML markup of Index view is shown below :
<h2>Employee Listing</h2>

<%

using (Html.BeginForm()){

%>

<table border="1" cellpadding="5">

<%

foreach(var item in ViewBag.Employees)

{

%>

<tr>

<td><%= item.EmployeeID %></td>

<td><%= item.FirstName %></td>

<td><%= item.LastName %></td>

<td><%= Html.ActionLink("Delete", "Delete", new { @employeeid = item.EmployeeID }, new { @class="delete", @id=item.EmployeeID })%></td>

</tr>

<%

}

%>

</table>

<%

}

%>
As you can see, the view essentially renders a table and displays FirstName
and LastName columns. It also renders a hyperlink to initiate the delete
operation. Notice that ID attribute of the hyperlink is set to EmployeeID so
that you can detect the employee ID to be deleted later in the code. Also, the
hyperlink is assigned a CSS class named delete. This is done so that your
client side code can distinguish delete hyperlinks from rest of the hyperlinks
from the page.
Next, add an action method – DeleteAJAX() – that deletes a specified
employee record as shown below :
[HttpPost]

public JsonResult DeleteAJAX(int employeeid)

{

  NorthwindEntities db = new NorthwindEntities();

  Employee data = (from item in db.Employees

                   where item.EmployeeID == employeeid

                   select item).SingleOrDefault();

  db.Employees.DeleteObject(data);

  db.SaveChanges();

  return Json("Record deleted successfully!");

}
The DeleteAJAX() action method is intended to be called from client side jQuery code and hence
its return type is JsonResult. Inside, it deletes an employee record based on
the EmployeeID passed to it and returns a string message to the caller.
In this technique you will be using jQuery to call the DeleteAJAX() action
method. So, add a script reference to jQuery library.
<script src="../../Scripts/jquery-1.4.4.js" type="text/javascript"></script>
Then add a script block and write the following code in it :
    <script type="text/javascript">

        $(document).ready(function () {

            $('a.delete').click(OnDeleteClick);

        });


        function OnDeleteClick(e)

        {

            var employeeId = e.target.id;

            var flag = confirm('You are about to delete Employee ID ' + employeeId + ' permanently.

                                Are you sure you want to delete this record?');

            if (flag) {

                $.ajax({

                    url: '/home/DeleteAJAX',

                    type: 'POST',

                    data: { employeeid: employeeId },

                    dataType: 'json',

                    success: function (result) { alert(result); $("#" + employeeId).parent().parent().remove(); },

                    error: function () { alert('Error!'); }

                });

            }

            return false;

        }

    </script>
The ready() function wires click the event handler of the delete hyperlinks
to the OnDeleteClick function. Notice how the delete hyperlinks are filtered
using the class name we assigned earlier. The OnDeleteClick() function
retrieves the ID of the delete link being clicked, using the target.id
property. It then seeks confirmation from the user using the confirm()
JavaScript function. If the user clicks on OK, an AJAX call is made to the
DeleteAJAX() action method using jQuery $.ajax(). Notice how the options of
$.ajax() are specified. The url parameter indicates the URL of the action
method to be called, type parameter specifies the method to be used (POST) for
calling the action method. The data parameter is the JSON representation of the
employee ID to be deleted. Recollect that employeeid is the parameter name of
the DeleteAJAX() action method. When the remote action method completes
successfully a function, as specified by the success parameter, will be called.
In the above example, the success function simply displays the message as
returned by the DeleteAJAX() method. The concerned table row is then removed
using the remove() method. This way the deleted record will be removed from the
table. Notice the use of the parent() method. Since the delete hyperlink is
inside a <td> which is inside a <tr> you need to use it twice to
remove the table row.
Now, run the index view and try deleting a record. The following figure
shows the index view after a delete attempt.
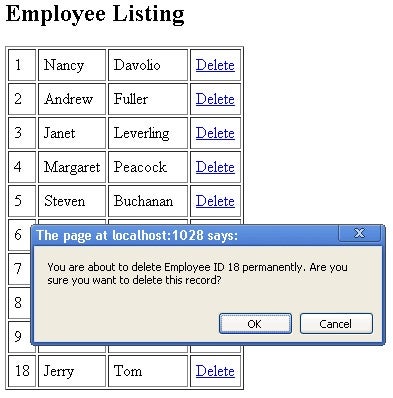
Figure 3: The index view after a delete attempt
Confirming Deletes by Navigating to a Confirmation Page
In the second technique of confirming deletes you will display an
intermediate confirmation page before deleting a record. In order to implement
this technique you need to add the following two action methods in the Home
controller.
public ActionResult ConfirmDelete(int employeeid)

{

    NorthwindEntities db=new NorthwindEntities();

    var data = from item in db.Employees

                where item.EmployeeID == employeeid

               select item;

    Employee employee = data.SingleOrDefault();

    return View(employee);

}


[HttpPost]

public ActionResult Delete(int employeeid)

{

    NorthwindEntities db = new NorthwindEntities();

    Employee data=(from item in db.Employees

                where item.EmployeeID == employeeid

                select item).SingleOrDefault();

    db.Employees.DeleteObject(data);

    db.SaveChanges();

    return View();

}
In the previous example you called the DeleteAJAX() method directly from the
client side code. In this case the delete operation will not happen from the
employee listing page. When a user clicks on the delete link, he will be taken
to the ConfirmDelete view wherein delete confirmation is sought. On the delete
confirmation page you will display details such as EmployeeID, FirstName,
LastName and Notes so that the user can review the record being deleted. The
ConfirmDelete() action method essentially retrieves an employee’s information
and passes it to the ConfirmDelete view. The ConfirmDelete view then calls the
Delete() action method if the user decides to delete that record. The Delete()
action method simply deletes an employee record from the database.
After completing the ConfirmDelete() and Delete() action methods, right
click on them one by one and add the respective views. While creating the
ConfirmDelete view make sure to create a strongly typed view based on Employee
class.
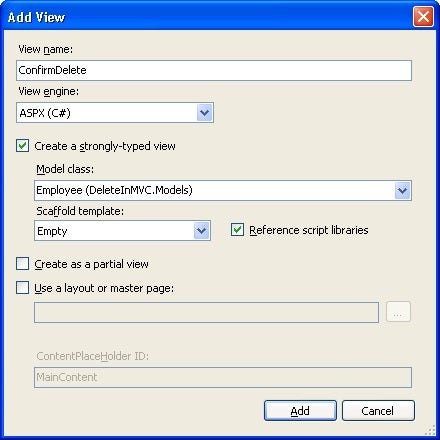
Figure 4: ConfirmDelete
The following figure and HTML markup shows what the ConfirmDelete view looks
like.
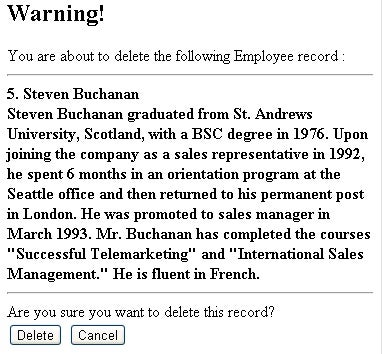
Figure 5: ConfirmDelete View
<% using (Html.BeginForm("Delete", "Home", FormMethod.Post))

{

%>

<h2>Warning!</h2>

You are about to delete the following Employee record :

<br /><hr />

<strong>

<%= Model.EmployeeID + ". " + Model.FirstName + " " + Model.LastName %>

<br />

<%= Model.Notes %>

</strong>

<br/><hr />

Are you sure you want to delete this record?

<br/>

<%= Html.HiddenFor(m => m.EmployeeID)%>

<input type="submit" value="Delete" />

<input type="button" value="Cancel" onclick="OnCancelClick();" />

<%} %>
As you can see, the ConfirmDelete view receives an employee instance as a
Model. It then displays EmployeeID, FirstName, LastName and Notes. Notice that
the HTML form will be submitted to the Delete() action method as indicated in
the BeginForm(). Also notice the use of a hidden form field for storing
EmployeeID. This way when the form is submitted the Delete() action method will
receive the EmployeeID to be deleted. Clicking on the Cancel button will call a
JavaScript function OnCancelClick() that will simply take the user to the
employee listing page. The OnCancelClick() function is shown below.
function OnCancelClick() {
window.location.href = '/home/index';
}
The ConfirmDelete action method needs to be wired with the Delete hyperlinks
of the Index view. So, modify the ActionLink() call that renders the Delete
link as follows :
<%= Html.ActionLink("Delete","ConfirmDelete",new { @employeeid = item.EmployeeID })%>
The Delete view simply displays a message informing successful record
deletion.
Figure 6: Record Deleted
 <h2>Record Deleted!</h2>

<%= Html.ActionLink("Back to Employee Listing", "Index") %>
That’s it! Now run the Index view and click on any of the Delete links. You will
be taken to the ConfirmDelete view wherein you can delete the record.
Summary
Seeking confirmation from the user prior to deleting a record is a common
practice in web applications. There can be multiple ways to implement this
functionality in a web page. This article covered two popular techniques of
confirming deletes in an ASP.NET MVC application. You can customize or modify
the techniques illustrated here to suit your requirements.