

In our development careers, many of us are and will be called upon to integrate either a stand-alone application or a web application to Crystal Reports. For must of these applications, you will not have access to a relational database where you could simply attach your report. So, there needs to be a way that you can display your data using Crystal Reports without the need for a dedicated database server.
Crystal Reports, like many other applications, connects to a database by way of a database driver, where each driver is designed to handle a specific database type or method of data access. With Crystal Reports, you can use one of two models of accessing data: “Pull” and “Push.” These two models are built into the database drivers for Crystal Reports, giving the developer greater flexibility in their design approach for data access.
Pull Model
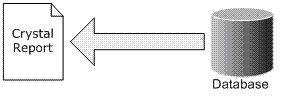
In this model, the report will connect to the database, using the parameters given to it a design time, to pull the data as needed. In this mode, all of the work is done by the report: connecting to the database and issuing the SQL commands; these are all handled without any coding from the developer. This is the default model of Crystal Reports.
Push Model
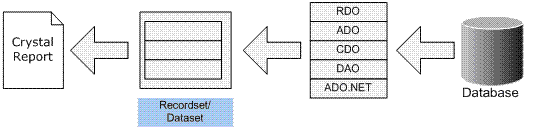
The push model involves code written by a developer that: creates and calls a connection on the database, executes the SQL commands, creates a recordset or dataset that matches the fields in the report, and then assignes the object to the report. This model also allows the shaping and filtering of data before it reaches the report.
Using the push model
In this article, I will lay out a simple solution that accepts XML data that can then be fed to a Crystal report. The method used in this article is called the “Push” model because the data is pushed to the report, as opposed to the data being retrieved by the report. The “Push” model opens the door for a multitude of ways for your application to accept data, converting it to XML if needed, and then displayed in a pretty report.
For this article, you will create a simple windows form application that reads XML data from a file, but you are free to use any data source you desire. The project will use Visual Studio 2005, and the code is written in C#.
You will modify an existing report that comes with Visual Studio, using your own dataset for a database. The report being used is the Product Catalog.rpt file that comes with the sample Crystal Decisions packaged with Visual Studio 2005.
Creating the Project
- Open Visual Studio and create a C# Windows Application.
- In the New Project dialog: Change the Name, Location, and Solution Name to that of your liking. For this article:
- Name: CrystalReportFeeder
- Location: Remains unchanged
- Solution Name: CrystalReportDemo
- Create directory for solution is checked.
- Add to Source Control is unchecked.
- Click the Ok button.
- In Solution Explorer, right-click the project name and choose the Add->New Folder.
- Change the folder name to Reports.
- Create two more folders and call one XmlData, and the other Datasets.
Creating Your Dataset
Before you do anything else, you first need to create the dataset that will be used by Crystal Reports to read from. I like to build the dataset first, so that when it comes time to create the report file all you need to do is select the dataset as the data source.
- Right-click the Datasets folder in Solution Explorer.
- Select Add->New Item.
- In the Add New Item dialog, click the DataSet object.
- Change the dataset name to Products.xsd.
- Click the Add button.
On the newly created Products.xsd page, right-click and select Add->DataTable. Change the name of the DataTable to product_type. Then, add the following items to the table:
- Right-click product_type dataset and select Add->Column a. Change the column name to type_id.
- In the Properties pane: AllowDBNull = False, DataType = System.Int32, Unique = True.
- Repeat Steps 1 and 2, adding two more columns, named type_name and description.
- In the Properties pane for both columns: AllowDBNull = True, DataType = System.String, Unique = False.
You now have created a data table that specifies the types of products that can be reported on. Next, you will create the data table that contains the products. So, use the previous steps to create a table named product. In this new table, you will add the following columns:
- product_id, AllowDBNull = False, DataType = System.Int32, Unique = True
- product_name, AllowDBNull = True, DataType = System.String, Unique = False
- color, AllowDBNull = True, DataType = System.String, Unique = False
- size, AllowDBNull = True, DataType = System.String, Unique = False
- gender, AllowDBNull = True, DataType = System.String, Unique = False
- price, AllowDBNull = True, DataType = System.Single, Unique = False
- type_id, AllowDBNull = False, DataType = System.Int32, Unique = False
- product_class, AllowDBNull = True, DataType = System.String, Unique = False
- supplier_id, AllowDBNull = False, DataType = System.Int32, Unique = False
Creating Your Report
Now to create the report that will consume your dataset. Please note that we will have to modify the report for this all to work.
- In Solution Explorer, right-click the Reports folder.
- Select Add->Existing Item.
- In the Add Existing Item dialog, navigate to the location where you installed Microsoft Visual Studio and locate the Crystal Reports sample directory. For my systemm it is: C:\Program Files\Microsoft Visual Studio 8\Crystal Reports\Samples\en\Reports\General Business,
- Double-click the Product Catalog.rpt file,
- Change the report name to ProductCatalog.rpt,