

Many of the posts I write for this column come directly from common things I see being asked in the community. That community might be Lidnug, it might be Stack Overflow, Code Project, or many of the small, obscure forum and help sites. The point here is, there are questions that I see over and over again, and one of them undoubtedly is the:
“How do I create a message box with a text input on it?”
Many of you might be thinking, “Well, that’s easy. I can do that no problem.” But, to many beginners, and even some that who been in the industry for some time, it might come as a surprise that the stock answer is:
“Use the “Microsoft.VisualBasic.Interaction” namespace. There’s a method called “InputBox” that will do what you need.”
This stack overflow post is a perfect example:
http://stackoverflow.com/questions/10797774/messagebox-with-input-field
Now, I don’t know about you, but if I’m working in C# (which I do 99% of the time), I really don’t like the idea of importing something that’s specific to VB.NET. I know that at the end of the day, they’re all just compiled assemblies, but stop and ask yourself this question:
If they are all just compiled assemblies, why did the language designers feel that this input box should be made available only to VB.NET in its runtime, and not globally in the base .NET libraries? Well, I can’t answer that question directly for you, but I can answer it in my own way.
Because in C# there’s a better way of doing this.
A Better Way?
Absolutely. Remember, you’re dealing with Windows Forms and strongly typed objects here. You can encapsulate things in C# in ways you can’t (or are difficult to do) in Visual Basic.
Now at this point, yes I realise I’m going to get the VB Zealots baying for my blood because I’ve dared say something negative about the VB Language, but In my own opinion (not representative of anyone else’s), this is the case that I’ve always found, time & time again.
So how can we do things better? Well, let’s start by firing up Visual Studio, and creating a new Windows Forms application. I’ll not repeat the steps for that, as it’s fairly easy. If you’ve done this correctly, you should be greeted with a bare WinForms app that looks something like this:
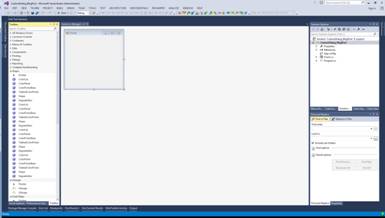
Figure 1: The beginnings of a WinForms app
By default, Visual Studio will have created a main form for you, and set up all the assemblies you need to develop a desktop application in .NET. At this point, if you were following the advice in the stack overflow post, you’d use the references section to find the Visual Basic stubs you need and import them, making the VB text input available to use.
We, however, are going to do things a little differently. Right-click your WinForms project, and add a new Windows Form.
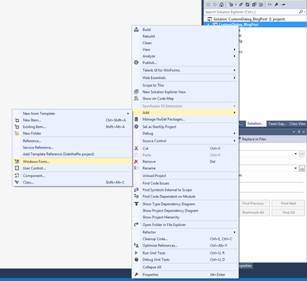
Figure 2: Adding a new Windows form
You can call it what you like, but I’ve called mine ‘MessageDialog’. We’ll start by making it into a very simple ‘MessageBox’ replacement.
In the properties for the new form, set “FormBorder” to “FixedDialog”; set “MaximizeBox” to “False”; set “MinimizeBox” to “False”; and set “StartPosition” to “CenterScreen”. Drag your form size for the new form, out to an average size message box, and then place a label and a button on it.
Give the Label an recognizable name (such as MessageText), and the button a name such as “OkButton”, set the label’s “AutoSize” property to “False”, and then stretch it out so that it fills the main part of your dialog box, then set its “TextAlign” property to “MiddleCentre”.
Back in the Form Properties, set the “AcceptButton” and “CancelButton” property to the name you gave your “Ok Button”. Set the text on the button to “Ok” and line it up in the bottom centre of your dialog.MessageDialog form. You should have something that looks like this:
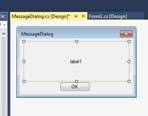
Figure 3: Aligning controls on the form
Press F7 to switch to the code view for your Dialog, and just below the constructor, add the following method.
public DialogResult Show(string title, string messageText)
{
   Text = title;
   MessageText.Text = messageText;
   return (ShowDialog());
}
Now, switch back to your initial form, add a button to that, double-click the button, and then add the following code into the button handler.
private void button1_Click(object sender, EventArgs e)
{
   MessageDialog messageDialog = new MessageDialog();
   messageDialog.Show("My Message",
      "This is my custom message dialog");
}
Press F5 to run the program, and, when you click the button, you should see your custom dialog. It should behave just like the normal message box one.
At this point, hopefully you can see now that’s your not that far away from adding multiple button sets and Icon sets just like the built-in MessageBox functionality. You could also make the entire class a static class, meaning you don’t need to “new the object up”; you can just use it the same way as the built-in MessageBox.
I leave all of that to you, however. For this one, we’re going to extend it to behave like the Visual Basic Input Box. If you look up the documentation for the VB input box, you’ll see the following information.
public static string InputBox(
   string Prompt,
   string Title,
   string DefaultResponse,
   int XPos,
   int YPos
)
The method call takes five parameters, the first of which, “Prompt,” is required. The rest are optional. Note also that the Input box is static too; we’ll not be making this one static, but if you 100% wanted to be true, you could do so easily.
Looking at an image of the Visual Basic input box, it has an OK & Cancel button to the top right, space for a question to the top left, and a text input all the way along the bottom.
Make the changes to your MessageDialog form to reflect this. Mine now looks like the following:
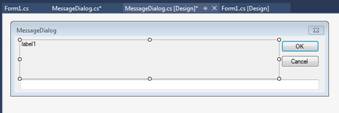
Figure 4: The revised MessageDialog form
The label is called “MessageText”, the buttons are “OkButton” and “CancelButton”, and the text input box is called “TextInput”. To make the calling structure the same as the original Visual Basic one, we also need to implement a method with the five parameters shown in the previous code snippet.
If you read the documentation on those parameters on MSDN, it has the following to say:
- Prompt: String, Required – The text to display in the message on the dialog approx 1024 chars in length.
- Title: String, Optional – Title to be shown on the dialog, defaults to application name if not provided.
- DefaultResponse: String, Optional – Response to return if the user does not enter anything in the box but still presses OK.
- Xpos/Ypos: Integer, Optional – The distance the upper left corner of the dialog is from the upper left corner of the screen, defaults to middle and approx one third down if omitted.
This means our method might look something like this:
public string InputBox(string Prompt , string Title = "",
   string DefaultResponse = "", int Xpos = 0, int Ypos = 0)
{
   MessageText.Text = Prompt;
   Text = String.IsNullOrEmpty(Title) ?
      Application.ProductName : Title;

   if (Xpos != 0) Left = Xpos;
   if (Ypos != 0) Top = Ypos;

   var resultCode = ShowDialog();
   if(resultCode == DialogResult.OK)
   {
      if(String.IsNullOrEmpty(TextInput.Text))
      {
         return DefaultResponse;
      }
      return TextInput.Text;
   }

   return String.Empty;
}
A few changes to the properties on your InputForm are also needed as follows:
Change the “DialogResult” property of your “OkButton” to “Ok”, and the “DIalogResult” property on the “CancelButton” to “Cancel”. Make sure that the “AcceptButton” property of the form is “OkButton” (or whatever name you gave your OK button), and make sure the “CancelButton” property is the name of your “CancelButton”.
Once you make these changes, and update the code in your main form to call the new method. If all goes correctly when you press F5, you should be greeted with the following:
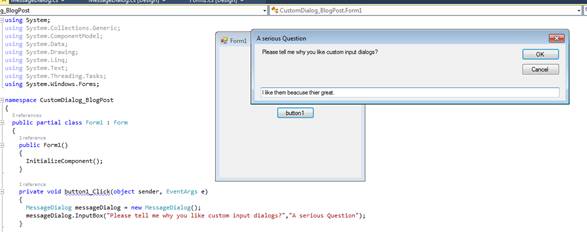
Figure 5: The updated main form
At this point, you should be able to click OK or Cancel and get the same return values as per the Visual Basic version, but you should also be able to see how much extra flexibility and potential you have for expansion. You could, for example, create a dialog that has a drop-down on it, or even create a new type of open/save dialog.
If you have anything about .NET that you’d like to know, a strange namespace you’ve found but not seen any documentation for, or a NuGet package that looks interesting, ping me on Twitter as @shawty_ds and I’ll see what I can do to write a blog post about it.