

One of the sore limitations of SharePoint 2003 was its obsessive/compulsive disorder to use Windows Authentication, only Windows Authentication, and nothing but Windows Authentication. This caused a typical Catch-22 in most implementations. Larger organizations that needed the collaboration features of SharePoint frequently had a pre-existing sign-on mechanism, to which SharePoint 2003 was completely blind. They could put an ISAPI filter in front of SharePoint 2003’s ISAPI filter to fake the authentication, but then SharePoint wouldn’t integrate with ASP.NET—a less-than-ideal solution.
SharePoint 2007 is changing all that. In SharePoint 2007, you can use any membership provider to enable custom authentication. This article discusses how to switch the membership provider on a SharePoint Web application. Of course, you could write your own membership provider, but to keep things simple, this article uses the AspNetSqlMembershipProvider that ships with the .NET Framework 2.0.
Before diving into the details, however, take a quick crash course on how SharePoint runs on a machine.
SharePoint 2007 Installation: A Quick Rundown
When you double-click on the installation for SharePoint 2007, run through the configuration wizard, and finally look at a sample SharePoint site in your browser at http://localhost:<someportnumber/>, a number of things happen along the way:
- SQL Server databases set up for SharePoint. The exact details are specific to your choice of either a farm installation or a stand-alone installation. But, on a single machine, you may see a new instance of SQL Server created at <<yourmachinename>>/OFFICESERVERS. These will serve as the back-ends for all your Web applications, configuration database, and so forth.
- Web applications set up on your IIS. Assuming that you can view a SharePoint Web site at port 80, you have at least two Web applications set up that you can use through the browser. One is http://localhost, and the second is the SharePoint Central Administration Web (SCAW) application. The SCAW is nothing but another SharePoint 2007 Web application that lets you manage the server or farm as a whole.
- If you open your IIS Manager under control panel\Administrative Tools, you will note that each of these Web applications has a home directory at $Inetpub\wwwroot\wss\VirtualDirectories\<SomePath>. The <SomePath> is usually a GUID by default, though you do have the flexibility of specifying anything else you want at the time you are setting up the site. Also, within each of these Web applications, you have a web.config and various virtual directories such as _controltemplates, _layouts, _vti_bin, _wpresources, and so on.
- All ASPX and binaries are missing from the Web application folders. These live deep under c:\Program Files\Common Files, and you shouldn’t have to hand-edit these in most circumstances. Through the front end of the Web site, you should be able to launch SharePoint Designer 2007 and edit the necessary HTML in both master pages and ASPX pages. This action will not create new physical files. Editing existing pages will store only the delta changes that you produce in the database, which will be combined by the ASP.NET 2.0 runtime to present a single ASPX (database + file system) to SharePoint 2007.
The details of this mechanism are beyond the scope of this article, but this does present a significant architectural change and improvement over SharePoint 2003.
Enabling Custom Authentication: The Steps
You have at least two Web applications with their own web.configs. This is importantbecause you will have to make some changes to both Web applications if you want them to understand your membership provider. The http://localhost application obviously needs access for all its authentication needs, but SCAW also would need access because it needs to assign a primary and secondary site administrator, based on the users supplied by your custom membership provider.
Setting up the custom membership provider
First, you need a membership provider. You could write your own as previously stated, but for this article, set up the AspNetSqlMembershipProvider that ships with the .NET Framework 2.0. To do so, run the following command at the command line to create an aspnetdb database:
%WINDIR%\Microsoft.NET\Framework\v2.0.50727\aspnet_regsql
Running the above command brings up a wizard that will help you create the aspnetdb database in the default instance of SQL Server running on your machine. Once the database is created, open SQL Server Management Studio and enable SQL Server authentication on the database. Give it a username and password, so you can connect to it using the following connection string:
Data Source=(local);Initial Catalog=aspnetdb;
                    User Id=username;Password=password
Once the database is set up, the next step is to add membership users to the database. There are a number of ways to do this, but the simplest is to drop an ASPX with a login control in the home directory for the Web application sitting at http://localhost. What you have to be careful of is which database you are running against when you run the WAT (Website Administration Tool). By default, AspNetMembershipProvider targets a database called “LocalSqlServer” defined in machine.config. You must modify its definition by opening the web.config in the home directory for http://localhost and adding the following:
<connectionStrings>
<remove name="LocalSqlServer"/>
<add name="LocalSqlServer" connectionString="Data Source=(local);
     Initial Catalog=aspnetdb;User Id=username;Password=password"/>
</connectionStrings>
Doing this effectively removes the definition of LocalSqlServer in machine.config and adds a new one pointing to the database you just created. You then can add membership users.
Here’s the way I did it: I opened Visual Studio 2005 and opened C:\Inetpub\wwwroot\wss\VirtualDirectories\850832ce-d9d4-4a58-b4c9-b06e40870062 as a Web site. I then dropped a default.aspx and put a login control on the Web form surface. Next, I clicked the “Administer Website” link in the smart tag as shown below:

Once the WAT came up, I changed the provider to AspNetSqlSqlProvider and I changed the authentication type under security to “From the Internet”. I also set up two users called smartdude and dumbdude.
Once you’ve added membership users, close the browser and make sure that you delete the default.aspx from the home directory of http://localhost.
Your membership provider is now set up and populated with two users. The next step is to administer the http://localhost Web site through SCAW and teach http://localhost to use your membership provider.
Configuring the site through SCAW
The preceding steps changed your authentication mode at http://localhost from <authentication mode="Windows" /> to <authentication mode="Forms" />. This is pretty much what you were trying to achieve, but it leaves two big questions unanswered:
- Which of my two users—smartdude and dumbdude—are site administrators? Does the other user even have access to the site?
- What is the path to the login page?
Thus, it is premature to change the authentication mode; this is best left to SCAW to modify. Therefore, change the web.config for http://localhost back to <authentication mode=”Windows”/>. It is, however, safe to leave the connection strings that you added earlier unchanged.
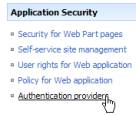
Next, fire up SCAW in the browser and go to Application Management. Under “Application Security”, click on “Authentication Providers” as shown here:
Then, on the top right-hand corner, make sure the application at port 80 (or whichever application you are modifying) is selected. In my case, it looks like this:
![]()
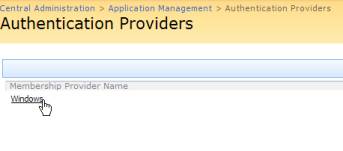
Under the Membership Provider Name (which should say “Windows”), click the “Windows” word as shown below:
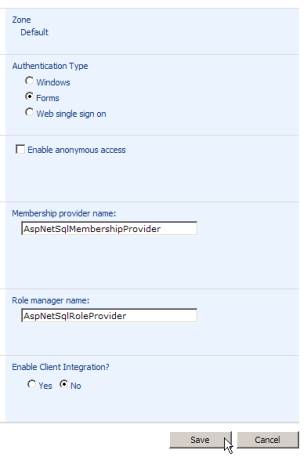
When prompted to Edit Authentication, type in “AspNetSqlMembershipProvider” for the membership provider name and “AspNetSqlRoleProvider” for the role manager name. Also, disable Client Integration because applications such as MS Word do not understand ASP.NET membership-provider–based authentication. The following image shows how you’d input these changes:
Note: If you were writing your own membership providers, you would have to make the necessary changes to the web.config file. AspNetSqlMembershipProvider and AspNetSqlRoleProvider work out of the box only because they are pre-configured for use in machine.config.