

Introduction
Displaying records in a table is a very common requirement in many web applications. Such a table also needs facilities such as sorting the data based on a specific column and pagination for the sake of easy navigation and display. Unlike ASP.NET web forms, MVC doesn’t have readymade server controls such as GridView to ease your job. One needs to either use a third-party helper or make some custom provision to accomplish this task. This article shows how persistent and bidirectional sorting as well as paging can be implemented in ASP.NET MVC without any external dependencies.
Defining the Requirements
In the example discussed in this article, you will meet the following requirements:
- The data should be displayed in an HTML table.
- The column headings should be clickable. Clicking on a column should sort the data shown in the table.
- The sorting should be persistent and bidirectional. Clicking on a column header should toggle the sort order between ascending and descending. The sort order must be persistent even when the page index changes.
- The bottom of the table should display a pager row with page numbers. Clicking on a page should display only the records belonging to that page.
Figure 1 shows the final outcome of the example discussed in this article.
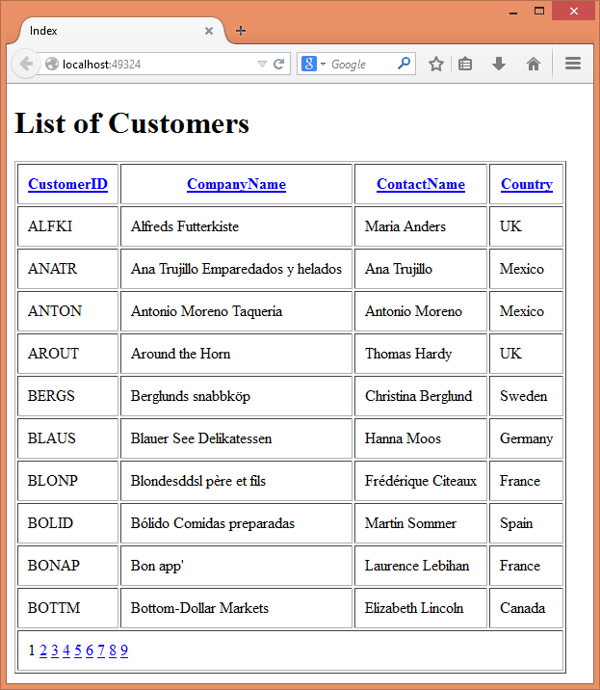
Figure 1: The Customers list
As shown above, the column headers are clickable hyperlinks. They don’t point to any specific resource. They are simply used to indicate a clickable heading. The same holds true for hyperlinks shown in the pager row of the table. The click event raised by a hyperlink is trapped with jQuery code and the form is submitted to the server programmatically for further action.
Creating the Model
To develop this example, begin by creating a new ASP.NET MVC application. Right-click the Models folder and add a new ADO.NET entity data model for the Customers table of the Northwind database. Figure 2 shows the Customer entity class in the Visual Studio designer.
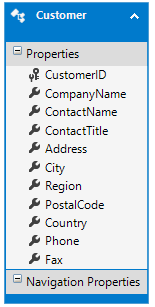
Figure 2: The Customer entity class properties
In addition to the Customer entity class, you need an auxiliary class—SortingPagingInfo. This class contains all the settings used by the sorting and paging features, such as the field on which the data is to be sorted and total number of pages. The SortingPagingInfo class is shown in the following code segment:
public class SortingPagingInfo
{
   public string SortField     { get; set; }
   public string SortDirection { get; set; }
   public int PageSize         { get; set; }
   public int PageCount        { get; set; }
   public int CurrentPageIndex { get; set; }
}
As you can see, the SortingPagingInfo class consists of five properties; they are SortField, SortDirection, PageSize, PageCount, and CurrentPageIndex. These property names are self explanatory and therefore are not discussed here.
Creating the Controller
Now that the model is ready, add a Home controller class in the Controllers folder. The HomeController class contains two action methods. The first action method serves the initial request and assigns default values and initial data to be displayed. This method is shown below:
public ActionResult Index()
{
   using (NorthwindEntities db = new NorthwindEntities())
   {
      SortingPagingInfo info = new SortingPagingInfo();
      info.SortField = "CustomerID";
      info.SortDirection = "ascending";
      info.PageSize = 10;
      info.PageCount = Convert.ToInt32(Math.Ceiling((double)(db.Customers.Count()
                     / info.PageSize)));
      info.CurrentPageIndex = 0;
      var query = db.Customers.OrderBy(c=>c.CustomerID).Take(info.PageSize);
      ViewBag.SortingPagingInfo = info;
      List<Customer> model = query.ToList();
      return View(model);
   }
}
As shown above, the Index() action method creates an instance of SortingPagingInfo and sets its properties. The default SortField is set to CustomerID and PageSize is set to 10. The PageCount is calculated with the help of the Ceiling() method. Initially, the first 10 records are to be displayed in a table. So, the Take() method is used to pick only the first ten records. The SortingPagingInfo object is passed to the view through the SortingPagingInfo ViewBag property. The model in the form of List of Customer objects is passed to the Index view.
When a user clicks the column heading or page number, the form is POSTed to the server and reaches the other Index() method. This Index() action is shown below:
[HttpPost]
public ActionResult Index(SortingPagingInfo info)
{
   using (NorthwindEntities db = new NorthwindEntities())
   {
      IQueryable<Customer> query = null;
      switch(info.SortField)
      {
         case "CustomerID":
            query = (info.SortDirection == "ascending" ?
                     db.Customers.OrderBy(c => c.CustomerID) :
                     db.Customers.OrderByDescending(c => c.CustomerID));
            break;
         case "CompanyName":
            query = (info.SortDirection == "ascending" ?
                     db.Customers.OrderBy(c => c.CompanyName) :
                     db.Customers.OrderByDescending(c => c.CompanyName));
            break;
         case "ContactName":
            query = (info.SortDirection == "ascending" ?
                     db.Customers.OrderBy(c => c.ContactName) :
                     db.Customers.OrderByDescending(c => c.ContactName));
            break;
         case "Country":
            query = (info.SortDirection == "ascending" ?
                     db.Customers.OrderBy(c => c.Country) :
                     db.Customers.OrderByDescending(c => c.Country));
            break;
      }
      query = query.Skip(info.CurrentPageIndex
            * info.PageSize).Take(info.PageSize);
      ViewBag.SortingPagingInfo = info;
      List<Customer> model = query.ToList();
      return View(model);
   }
}
The preceding Index() method has a parameter of type SortingPagingInfo. The model binding framework fills this object with the form field values (discussed later). A switch statement checks the SortField property of the SortingPagingInfo object. Based on the SortField and SortDirection properties, a query in the form of IQueryable is formed. Because you are interested only in the records belonging to the current page to be displayed, the Skip() and Take() methods are used. Notice how the Skip() method is used to skip certain records from the beginning of the result set and how Take() is used to pick only the desired number of records. The model in the form of a List of Customer objects is passed to the Index view as before.
Creating the View
After you create the controller, next create the Index view. Right-click any of the Index action methods and select the Add View option. Name the view as Index and it is the key in the following code to its <body>.
<h1>List of Customers</h1>
@{
   SortingPagingInfo info = ViewBag.SortingPagingInfo;
}

@using (Html.BeginForm("Index","Home",FormMethod.Post))
{
   @Html.Hidden("SortField",        info.SortField)
   @Html.Hidden("SortDirection",    info.SortDirection)
   @Html.Hidden("PageCount",        info.PageCount)
   @Html.Hidden("PageSize",         info.PageSize)
   @Html.Hidden("CurrentPageIndex", info.CurrentPageIndex)

   <table border="1" cellpadding="10">
      <tr>
         <th><a href="#" data-sortfield="CustomerID"
                         class="header">CustomerID</a></th>
         <th><a href="#" data-sortfield="CompanyName"
                         class="header">CompanyName</a></th>
         <th><a href="#" data-sortfield="ContactName"
                         class="header">ContactName</a></th>
         <th><a href="#" data-sortfield="Country"
                         class="header">Country</a></th>
      </tr>
      @foreach(var item in Model)
      {
         <tr>
            <td>@item.CustomerID</td>
            <td>@item.CompanyName</td>
            <td>@item.ContactName</td>
            <td>@item.Country</td>
         </tr>
      }
         <tr>
            <td colspan="4">
               @for(var i=0;i<info.PageCount;i++)
                  {
                     if(i==info.CurrentPageIndex)
                     {
                        <span>@(i+1)</span>
                     }
                     else
                     {
                        <a href="#" data-pageindex="@i"
                           class="pager">@(i + 1)</a>
                     }
               }
            </td>
         </tr>
   </table>
}
The code above grabs the SortingPagingInfo object passed through the ViewBag. Then comes the important piece of code. The settings from SortingPagingInfo bject are transferred into five hidden form fields. This is done by using the Hidden() HTML helper. Notice that names of these hidden fields are kept the same as the properties of the SortingPagingInfo class. This will enable the model binding framework to populate the SortingPagingInfo parameter of the second Index() action as expected. Also notice that the whole HTML table that displays the data is placed inside a <form> tag, by using the BeginForm() HTML helper.
The HTML table has four columns to display CustomerID, CompanyName, ContactName, and Country columns. The column headings are displayed using anchor elements. The data-sortfield custom data attributes of anchor elements are set to the actual column names. This way, you can keep the actual heading being displayed different from the column name (for example, you may display Customer ID in the heading whereas the data-sortfield will store CustomerID). The anchor elements have a CSS class set to header. This is primarily done to simplify the jQuery code (you may resort to some other selector to grab the anchor elements instead of using the class selector).
A foreach loop iterates through the model data and emits table rows containing the actual customer information. Although the Customer entity class has many properties, this example uses only four of them: CustomerID, CompanyName, ContactName, and Country.
The last row of the table represents the pager row. A for loop generates anchor elements representing the individual page number. The current page number is displayed in a <span> tag whereas other page numbers are rendered as anchor elements. The anchor elements acting as clickable page numbers have a CSS class of pager. Notice that the data-pageindex custom data attribute of the anchor elements is set to the zero-based page number. Just like the data-sortfield attribute, the data-pageindex attribute is used by the jQuery code.
Next, add a <script> reference to jQuery in the head section of the Index view. Also, add an empty <script> block and key in the following jQuery code.
$(document).ready(function () {
   $(".header").click(function (evt) {
      var sortfield = $(evt.target).data("sortfield");
      if ($("#SortField").val() == sortfield)
      {
         if($("#SortDirection").val()=="ascending")
         {
            $("#SortDirection").val("descending");
         }
         else
         {
            $("#SortDirection").val("ascending");
         }
      }
      else
      {
         $("#SortField").val(sortfield);
         $("#SortDirection").val("ascending");
      }
      evt.preventDefault();
      $("form").submit();
   });

   $(".pager").click(function (evt) {
      var pageindex = $(evt.target).data("pageindex");
      $("#CurrentPageIndex").val(pageindex);
      evt.preventDefault();
      $("form").submit();
   });
});
The preceding jQuery code consists of two click event handlers. The first piece of code selects all the anchors having its header in the CSS class (column headers). Inside, the code retrieves the data-sortfield custom data attribute using the jQuery data() method and stores it in a local variable. The if condition checks whether the user is clicking the same column header again. If so, the code toggles the sort direction from ascending to descending and vice versa; otherwise, the SortField hidden field is set to the value of data-sortfield and the SortDirection is set to ascending. After assigning SortField and SortDirection, the form is submitted programmatically using the submit() method.
The second piece of code deals with the click events of the pager anchor elements. It selects all the elements having the pager CSS class. The code then grabs the data-pageindex custom data attribute and stores it in a local variable. The CurrentPageIndex hidden field is set to this page index value and the form is submitted programmatically by using the submit() method.
Recollect that the BeginForm() helper sets the form action to Index and the method to POST. So, after submitting the form programmatically, it is handled by the second Index() action method.
That’s it! Run the application and test whether sorting happens in ascending as well as descending order. Also, test whether clicking a page number displays the correct records. Figure 3 shows a sample run with a PageSize of 5, CurrentPageIndex of 5 (page number 6), and records sorted in the descending order of Country column.
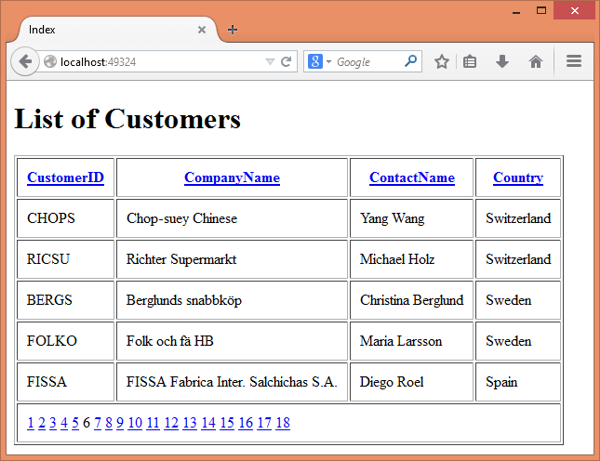
Figure 3: The Customers list, sorted in descending order on the Country column
Summary
Displaying data in HTML tables is a very common requirement in web applications. Such a display often needs features such as sorting and paging. This article discussed one easy way to implement persistent and bidirectional sorting as well as paging in ASP.NET MVC. You can customize the code discussed in this article to fine-tune the sorting and paging behavior of the resultant table.