Introduction
The Azure Blob storage solution is used to store unstructured physical objects in Microsoft Cloud. It’s optimized for storing massive amounts of unstructured data, such as text or binary data which could be accessed by using HTTP and HTTPS protocols from anywhere an Internet connection is available. In this article, I will provide you a step-by-step demonstration on how to create a Blob storage solution from Azure Portal and create and download files from Blob storage programmatically from C# code.
Concepts of Blob Storage
Blob storage exposes three resources:
- Storage account
- The containers in the account
- The blobs in a container
You also can add folders into the container. A Blob storage is ideal for serving images or documents, storing files for distributed access, streaming video and audio, writing to log files, storing data for backup and restore, disaster recovery, and archiving.
Client applications can access Blob storage through client libraries available in various languages, including .NET, Java, Node.js, Python, PHP, and Ruby.
A blob container organizes a set of blobs, similar to a folder in a file system. All blobs reside within a container. A storage account can include an unlimited number of containers, and a container can store an unlimited number of blobs.
Create Blob Storage from Azure Portal
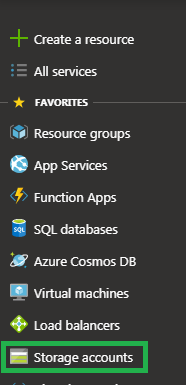
For developers, those who have a Microsoft account can sign in by using Hotmail/Outlook account details to Azure Portal and use the service free for 30 days. If your subscription is already expired, you need to buy a subscription. After successful login to https://portal.azure.com, create an Azure Storage Account by clicking the Storage Account link on the left of the menu. This is highlighted in Figure 1.
Figure 1: Azure Storage Account
Next, click the + Add button on the top left of the screen to add a Blob storage, as shown in Figure 2.
Figure 2: Azure Storage Account Creation
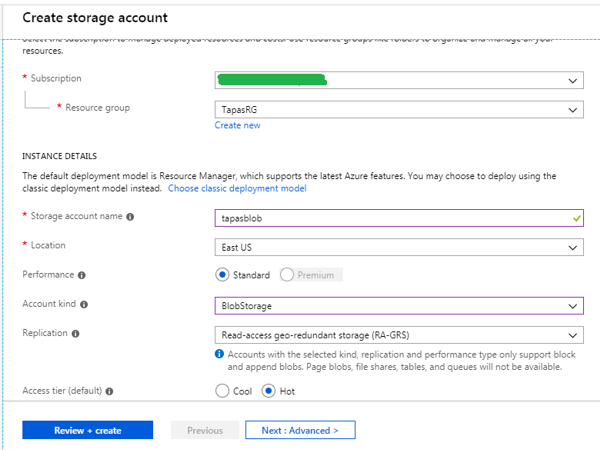
On the Create Storage Account page, add all required details as mentioned in Figure 3. Click the Review + Create button.
Figure 3: Azure Blob Account Creation
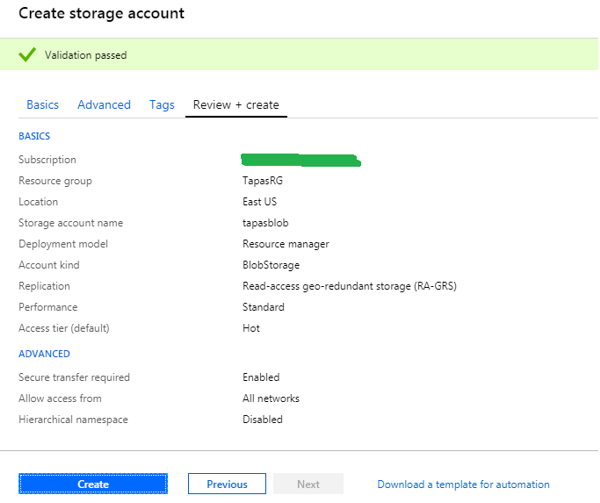
On the next review page, verify all details entered in the previous screen and click Create. If you have to change anything, click the Previous button to edit (see Figure 4).
Figure 4: Azure Blob Account Creation Review
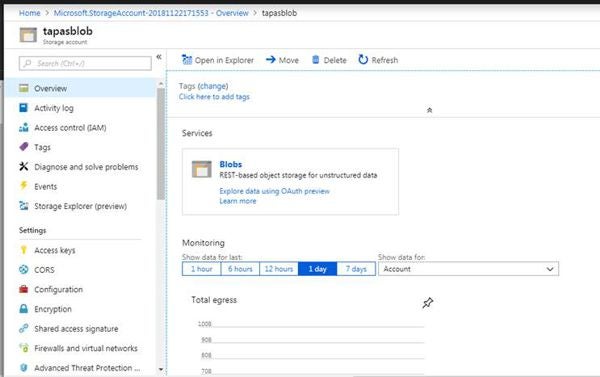
You will see what’s shown in Figure 5 after successful creating your Azure Blob storage.
Figure 5: Azure Blob Account Created Successfully
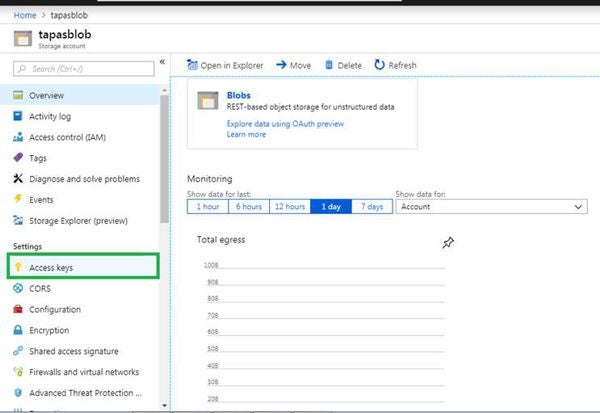
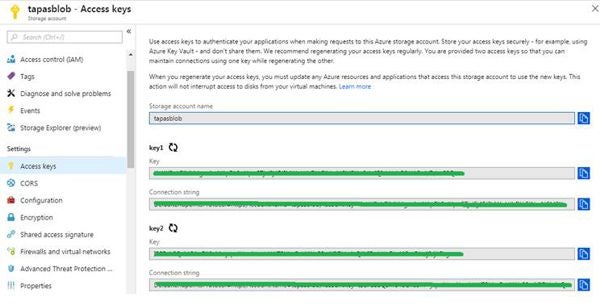
After creating your Azure Storage Account, go to that account and copy the access key and connection string of that account, as shown in Figure 6. It will be used in our C# application for storing and downloading files from Blob.
Figure 6: Azure Blob Account Access Keys
Figure 7 demonstrates Access Keys and Connections strings. A pair of keys and connection strings will be available; you can use any of these keys.
Figure 7: Azure Blob Account Connection String
Upload and Download a File from Blob Using C#
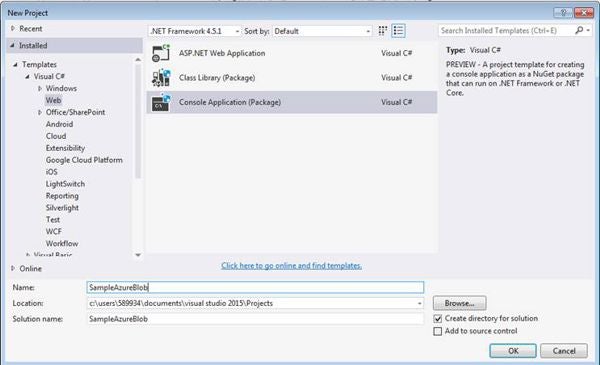
Create a .NET console application, as you can see in Figure 8. Name it SampleAzureBlob.
To create a Sample .NET console project, I have used .Net Framework 4.6, the Windows Azure Storage 8.1.1 package, and Visual Studio 2015.
Figure 8: .NET New Console Application
Next, go to the NuGet package manager console window and install -> “Install-Package WindowsAzure.Storage -Version 9.1.1” (see Figure 9).
Figure 9: Install NuGet Package
Once the package is installed successfully, add the following required references in the program.cs file.
using Microsoft.Azure;
using Microsoft.WindowsAzure.Storage;
using Microsoft.WindowsAzure.Storage.Blob;
Add the Azure Storage Account Connection String in App.config; I explained this in the previous section. Copy the following code and Reference the file to be uploaded. In my code, I have added it in the Program.cs file. Remember, before uploading the file to blob, we need to get the reference on the container. Once the container is available in the storage account, we can upload the files to the storage account.
public void UploadFileInBlob ()
{

   string BlobstorageConnection = CloudConfigurationManager
      .GetSetting("MyBlobStorageConnectionString");
   CloudStorageAccount mycloudStorageAccount = CloudStorageAccount
      .Parse(BlobstorageConnection);

   if (await cloudBlobContainer.CreateIfNotExistsAsync())
   {

      await cloudBlobContainer.SetPermissionsAsync(new
         BlobContainerPermissions { PublicAccess =
         BlobContainerPublicAccessType.Blob });

   }

   string imageName = "Sample-" +
      Path.GetExtension(imageToUpload.FileName);

   CloudBlockBlob cloudBlockBlob = cloudBlobContainer
      .GetBlockBlobReference(imageName); cloudBlockBlob
      .Properties.ContentType = imageToUpload.ContentType;

   await cloudBlockBlob.UploadFromStreamAsync(imageToUpload
      .InputStream);
}
Next, To download files from Azure Blob using C# code, I have added the following DownloadFileFromBlob function.
public void DownloadFileFromBlob()
{
   var containerName = "myblobcontainer";
   string BlobstorageConnection = CloudConfigurationManager
      .GetSetting("BlobStorageConnectionString");
   CloudStorageAccount MycloudStorageAccount = CloudStorageAccount
      .Parse(BlobstorageConnection);
   CloudBlobClient MyblobClient = MycloudStorageAccount
      .CreateCloudBlobClient();

   CloudBlobContainer MycloudBlobContainer = MyblobClient
      .GetContainerReference(containerName);
   CloudBlockBlob MYblockBlob = MycloudBlobContainer
      .GetBlockBlobReference("Myuploadedfilename.ext");

   MemoryStream memStream = new MemoryStream();

   MYblockBlob.DownloadToStream(memStream);

   HttpContext.Current.Response.ContentType = MYblockBlob
      .Properties.ContentType.ToString();
   HttpContext.Current.Response.AddHeader("Content-Disposition",
      "Attachment; filename=" + MYblockBlob.ToString());

   HttpContext.Current.Response.AddHeader("Content-Length",
      MYblockBlob.Properties.Length.ToString());
   HttpContext.Current.Response.BinaryWrite(memStream.ToArray());
   HttpContext.Current.Response.Flush();
   HttpContext.Current.Response.Close();

}
Conclusion
In this article, I have given a walkthrough on how to upload and download a file into Azure Blob Storage. You also can list Blob files/contents in a browser. I hope you now can experiment with Azure Blob in your projects.
That’s all for today. Happy coding!


