Introduction
TypeScript is a superset of JavaScript that provides typed nature to your code. TypeScript can also be used with existing popular JavaScript libraries such as jQuery. This allows you to make use of the rich functionality offered by these external libraries in your TypeScript code. To that end this article explains how jQuery can be integrated with TypeScript to make Ajax calls to an ASP.NET Web API. The example discussed shows how CRUD operations can be carried out using TypeScript, jQuery and Web API.
NOTE:
If you are not familiar with TypeScript you may consider reading this article before continuing any further. In the remainder of the article it is assumed that you are familiar with the TypeScript basics and TypeScript editor plugin for Visual Studio.
The Sample Application
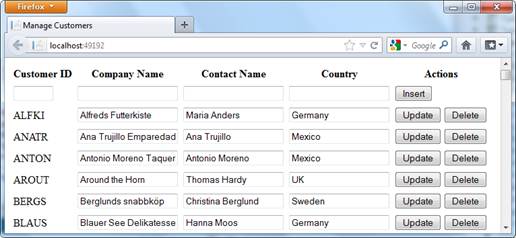
To understand how TypeScript can be used to perform CRUD operations you will develop a simple ASP.NET MVC application as shown below:
A simple ASP.NET MVC application
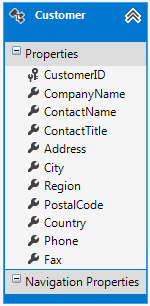
The View shown above essentially displays records from the Customers table of the Northwind database. It allows you to Insert, Update and Delete Customer records. The actual database manipulations happen through Entity Framework data model. The Entity Framework data model is shown below:
The Entity Framework data model
The Customers table contains many columns. However, in this example you will make use of only four of them, viz. CustomerID, CompanyName, ContactName and Country. The actual database operations of inserting, updating, deleting and selecting the data will be carried through a Web API. The communication between the View and the server will happen using TypeScript code. The TypeScript code will make use of $.ajax() of jQuery to invoke the Web API.
Creating an ASP.NET Web API to Perform CRUD Operations
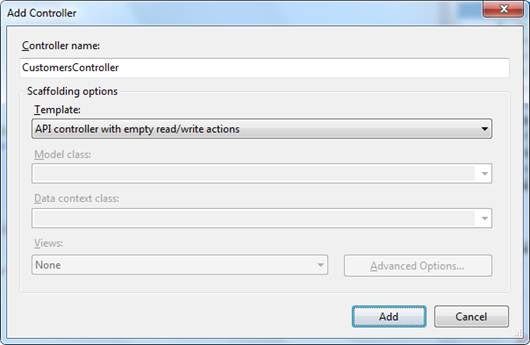
In order to create a Web API controller that deals with the CRUD operation add a new Web API Controller in the application and name it as CustomersController.
Web API Controller
Add the following methods – Get(), Post(), Put() and Delete() – to the CustomersController class.
public class CustomersController : ApiController
{
    public IEnumerable<Customer> Get()
    {
        NorthwindEntities db=new NorthwindEntities();
        var data = from item in db.Customers
                    select item;
        return data.ToList();
    }

    public void Post(Customer obj)
    {
        NorthwindEntities db = new NorthwindEntities();
        db.Customers.Add(obj);
        db.SaveChanges();
    }

    public void Put(Customer obj)
    {
        NorthwindEntities db = new NorthwindEntities();
        var data = from item in db.Customers
                    where item.CustomerID == obj.CustomerID
                    select item;
        Customer old = data.SingleOrDefault();
        old.CompanyName = obj.CompanyName;
        old.ContactName = obj.ContactName;
        old.Country = obj.Country;
        db.SaveChanges();
    }

    public void Delete(Customer obj)
    {
        NorthwindEntities db = new NorthwindEntities();
        var data = from item in db.Customers
                    where item.CustomerID == obj.CustomerID
                    select item;
        Customer c = data.SingleOrDefault();
        db.Customers.Remove(c);
        db.SaveChanges();
    }
}
The code in the CustomersController is quite straightforward. The Get() method selects all the records from the Customers table and returns them as an IEnumerable of Customer objects. The Post() method adds a new Customer to the database. The Put() and Delete() methods update and delete an existing record from the database respectively. Remember that the Post(), Put() and Delete() methods accept a parameter of type Customer.
Using jQuery with TypeScript
The TypeScript code that you will use in this example is going to use jQuery library for DOM manipulation and Ajax calls. In order to get the IntelliSense of jQuery API in your TypeScript code you need to do some extra work. In addition to having a reference to the jQuery library, you also need typing for jQuery. You can download the typing for jQuery here. Once downloaded save the file as jquery.d.ts. You will need to refer to this file in all the TypeScript files that use jQuery. The reference is added as follows:
/// <reference path="jquery.d.ts" />
The comments syntax is used to place the <reference> element. The path attribute points to the typing file for jQuery. Once the reference is added you can create the TypeScript code.
Creating CustomerModule TypeScript Module
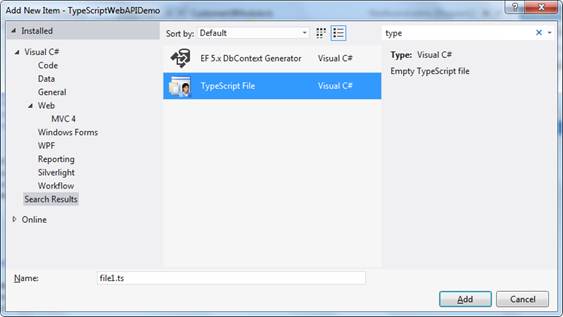
In this section you will create a TypeScript module that contains a single class – CustomerModule. You can add a TypeScript to the application using the “Add New Item” dialog.
Add a TypeScript to the application
Add the TypeScript file in the Scripts folder and name it as CustomerModule.ts.
The Customer class is responsible for invoking the Insert, Update, Delete and Select operations on the Web API. A TypeScript module is a sort of component that houses one or more classes and interfaces. This grouping allows for modular design and helps you to isolate a component code from the rest of the system. In this example the module has the following skeleton:
/// <reference path="jquery.d.ts" />

module CustomerModule {
    export class Customer {
       ...
    }
The module keyword defines CustomerModule module. The CustomerModule consist of Customer class. The export keyword added to the class definition indicates that this class will be accessible from outside of the module.
The Customer class consists of four properties as shown below:
export class Customer {
    CustomerID: string;
    CompanyName: string;
    ContactName: string;
    Country: string;
    ...
}
As seen from the above code the Customer class consists of four properties, viz. CustomerID, CompanyName, ContactName and Country. Notice how TypeScript allows you to specify the data type for the properties (string in this case).
The Customer class contains four functions – SelectAll(), Insert(), Update() and Delete() that call the respective Web API methods using jQuery. The following code shows the SelectAll() method.
SelectAll(callback: any) {
    $.getJSON("api/customers", callback);
}
The SelectAll() method makes use of jQuery $.getJSON() to call Get() method of Web API. The SelectAll() method accepts a callback function that will be passed to the $.getJSON(). This callback function is invoked once the Get() method of the Web API successfully returns data to the client. In this example you will isolate all the callback functions in a separate TypeScript module as discussed later in this article.
The Insert, Update and Delete functions are quite similar in that all of them make use of jQuery $.ajax() to invoke the appropriate Web API. The Insert function is shown below:
Insert(callback: any): number {
    var data = '{"CustomerID":"' + this.CustomerID + '","CompanyName":"' + this.CompanyName +
                '","ContactName":"' + this.ContactName + '","Country":"' + this.Country + '"}';

    $.ajax({
        type: 'POST',
        url: '/api/customers/',
        data: data,
        contentType: "application/json; charset=utf-8",
        dataType: 'json',
        success: callback,
        error: function () { alert('Error'); }
    });
    return 0;
}
The Insert function also accepts a callback. Inside the Insert function constructs a JSON object from the properties of this Customer instance. This Customer JSON object is passed to the Post() Web API method using $.ajax() of jQuery. Notice that the type of request is POST and that success parameter is set to the callback function that is passed to the Insert method. The Insert function returns a number although in this case you simply pass 0 indicating a successful execution of the function.
The Update and Delete methods are similar to the Insert method with one exception. They set the request type to PUT and DELETE respectively. This completes the CustomerModule.
Creating CustomerUI TypeScript Module
In this section you will create another module – CustomerUIModule – that deals with the DOM element from the View. The functions from the CustomerUIModule are essentially the callback functions that are passed to the CustomerModule. The skeleton of CustomerUIModule is as follows:
/// <reference path="jquery.d.ts" />
/// <reference path="CustomerModule.ts" />

module CustomerUIModule {
    export class CustomerUI {
       ...
    }
Notice that this time CustomerModule is also referred at the top so that the Customer class can be accessed. The CustomerUI class consists of a single function LoadCustomers() that displays Customer data returned by the Web API into an HTML table. The LoadCustomers() function is shown below:
LoadCustomers(data) {
    $("#customerTable").find("tr:gt(1)").remove();
    $.each(data, function (key, val) {
        var tableRow = '<tr>' +
                        '<td>' + val.CustomerID + '</td>' +
                        '<td><input type="text" value="' + val.CompanyName + '"/></td>' +
                        '<td><input type="text" value="' + val.ContactName + '"/></td>' +
                        '<td><input type="text" value="' + val.Country + '"/></td>' +
                        '<td><input type="button" name="btnUpdate" value="Update" /> <input type="button" name="btnDelete" value="Delete" /></td>' +
                        '</tr>';
        $('#customerTable').append(tableRow);
    });

    $("input[name='btnInsert']").click(function () {
      ...
    });

    $("input[name='btnUpdate']").click(function () {
      ...
    });


    $("input[name='btnDelete']").click(function () {
        ...
    });
}
Notice the LoadCustomers() function carefully. It does several tasks. Firstly it receives the Customer data returned by the Web API as the data parameter. It then gets hold of the HTML table (customerTable) and adds rows to it for each Customer row. This is done using the $.each() method of jQuery. The $.each() is executed once for all the items in the data collection.
The LoadCustomers() function also wires event handlers for the click event of Insert, Update and Delete buttons. The click event handler for the Insert button is shown below.
$("input[name='btnInsert']").click(function () {
    var customerId = $("#txtCustomerId").val();
    var companyName = $("#txtCompanyName").val();
    var contactName = $("#txtContactName").val();
    var country = $("#txtCountry").val();
    var customer = new CustomerModule.Customer();
    customer.CustomerID = customerId;
    customer.CompanyName = companyName;
    customer.ContactName = contactName;
    customer.Country = country;
    customer.Insert(function () {
        $("#txtCustomerId").val('');
        $("#txtCompanyName").val('');
        $("#txtContactName").val('');
        $("#txtCountry").val('');
        alert('Customer Added !');
    });
});
The click event handler of the Insert button grabs the values entered in various textboxes. It then creates an instance of Customer class. Notice how the Customer class is qualified by the module name. After assigning various properties of the Customer class, Insert() method of the Customer class is called. A callback function is also passed directly to the Insert() function. This callback function simply empties the textboxes and displays a success alert() to the end user.
The click event handlers of the Update and Delete buttons are quite similar to that of the Insert button and hence are not discussed here.
Compiling the TypeScript Code
Now that you are ready with the CustomerModule and CustomerUIModule it’s time to compile the TypeScript code. If you are using the TypeScript project template and TypeScript Editor plugin for Visual Studio, compiling the project will also compile the TypeScript code. You can also use TypeScript command line compiler to compile the TypeScript code. Just issue the following commands at the Command Prompt.
tsc.exe CustomerModule.ts

tsc.exe CustomerUIModule.ts
Compiling the TypeScript code will produce two JavaScript files – CustomerModule.js and CustomerUIModule.js. You can refer these JavaScript in your View.
Creating an MVC View
The Index view houses the HTML table that displays the list of Customers. The Index view refers jQuery, CustomerModule.js and CustomerUIModule.js as follows:
<script type="text/javascript" src="Scripts/jquery-1.7.1.js"></script>
<script type="text/javascript" src="Scripts/TypeScript/CustomerModule.js"></script>
<script type="text/javascript" src="Scripts/TypeScript/CustomerUIModule.js"></script>
Make sure to replace the path of the script files as per your folder structure. The Index view then initiates the data loading operation as soon as the page is loaded in the browser. This is done with the help of jQuery ready() as shown below:
$(document).ready(function () {
    var customer = new CustomerModule.Customer();
    var customerUI = new CustomerUIModule.CustomerUI();
    customer.SelectAll(customerUI.LoadCustomers);
});
As you can see the ready() function creates an instance of Customer and CustomerUI class respectively. It then calls the SelectAll() method of the Customer object and passes the LoadCustomers function as the callback.
That’s it! You can now run the view and test select, insert, update and delete operations.
Summary
TypeScript allows you to easily integrate popular JavaScript libraries with TypeScript code. This article illustrated how jQuery $.ajax() can be used in TypeScript code to make Ajax calls to an ASP.NET Web API. Using this approach, it is quite easy to implement CRUD operations.
About the Author:
Bipin Joshi is a blogger and author who writes about apparently unrelated topics – Yoga & technology! A former Software Consultant and Trainer by profession, Bipin is programming since 1995 and is working with .NET framework ever since its inception. He has authored or co-authored half a dozen books and numerous articles on .NET technologies. He has also penned a few books on Yoga. Having embraced Yoga way of life he now writes about Yoga, life and technology on his website. He can also be reached there.


