Microsoft has just released another edition of its flagship development platform—Visual Studio 2017. Unit testing is the process of testing units of your code to ensure that they comply with the acceptance criteria. It is a process that helps you to reduce or eliminate bugs earlier in the software development life cycle. Live Unit Testing is a new feature that has been introduced in Visual Studio 2017. This article presents a discussion on what Live Unit Testing is all about and how to work with it in Visual Studio 2017.
What is Visual Studio 2017 Live Unit Testing?
Okay; what is Live Unit Testing—what’s there to care about? Support for Unit Testing was there in Visual Studio for quite some time. Okay; relax! Your queries would soon be answered. Let’s now understand what Visual Studio Live Unit Testing is all about.
Till now, you have had to run your unit tests manually or automatically after each build. With this new feature around, you no longer need to wait till the build gets generated. You need not even save your source code file—as soon as the code changes, the associated unit tests would start running in the Visual Studio 2017 IDE.
Configuring Live Unit Testing
Live Unit Testing is integrated with the Test Explorer and can be configured using Tools->Options->Settings in the Visual Studio 2017 IDE. You can start, stop, or pause Live Unit Testing easily while you are working in the IDE. You also can view the code coverage details and navigate easily to the test that has failed.
Here’s what Microsoft states 1: “Live Unit Testing automatically runs the impacted unit tests in the background as you edit code, and visualizes the results and code coverage live, in the editor, in real-time. In addition to giving feedback on the impact that your changes had on the existing tests, you also get immediate feedback on whether the new code you added is already covered by one or more existing tests.”
Note that this feature is available as part of the Enterprise Edition of Visual Studio 2017, and can be used for your C# or VB.NET projects. Also, note that Visual Studio 2017 Live Unit Testing is supported in the NUnit, xUnit, and MSTest frameworks. Support for Live Unit Testing in .NET Core is not yet available but is there in the roadmap.
Working with Visual Studio 2017 Live Unit Testing
To work with Live Unit Testing in Visual Studio 2017, follow these steps.
- Open Visual Studio 2017 IDE.
- Click File -> New -> Project.
- Create a new Unit testing project.
- Name and save the project.
This would create a new unit testing project in the name you specified. Next, double-click the “UnitTest1.cs” file in the Solution Explorer window. Now, replace the TestMethod1 unit test method with the following code.
[TestMethod]
   public void TestMethod1()
   {
      Assert.AreEqual("Hello", "World");
   }
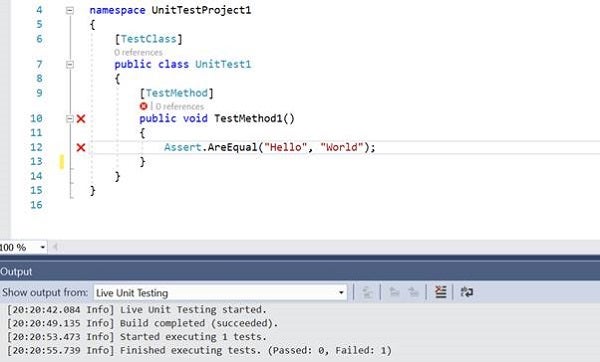
Now, click Test -> Live Unit Testing ->. Start in the menu bar to start Live Unit Testing. And, that’s all you would need to do! This would start Live Unit Testing and you would observe that this test fails because the strings don’t match. You can change your code—Live Unit Testing continues to run in the background and displays the results in the Output Window. You also can pause, stop, or restart this feature as and when needed. Figure 1 illustrates Live Unit Testing in action—our unit test fails because the strings don’t match.
Figure 1: Live Unit Testing in action!
Let’s now write another unit test method—one that would pass. Refer to the test method code that follows.
[TestMethod]
   public void TestMethod2()
   {
      Assert.AreEqual("Hello World", "Hello World");
   }
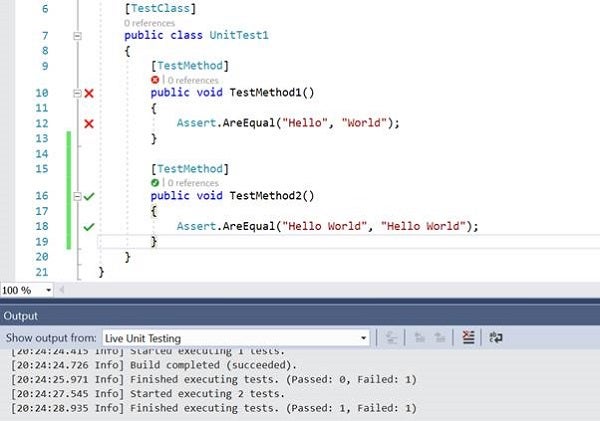
As soon as you restart Live Unit Testing (assuming that it was stopped while you were writing the unit test method), the tests are both executed—one of them fails and the other succeeds. Here’s how the output looks when both the unit test methods have been executed.
Figure 2: Live Unit Testing in action—one of the tests pass and the other fails
Summary
Live Unit Testing boosts developer productivity by enabling you to know the outcome of your code changes right at the time you are writing your code in Visual Studio 2017 IDE. This article presented a glimpse of one of the most striking new features in Visual Studio 2017, Live Unit Testing, why is it helpful, and how we can work with it.
You can learn more on Live Unit Testing in Visual Studio 2017 from this article.
Reference
1https://blogs.msdn.microsoft.com/visualstudio/2016/11/18/live-unit-testing-visual-studio-2017-rc/


