

Introduction
Windows Store applications are required to provide a splash screen, which is displayed when the application is first activated. In fact, every Windows Store is mandated to display a splash screen that consists of splash screen image and background color. This is meant to allow the application to provide the user immediate feedback about their action, while allowing the application to begin background actions needed to prepare the application for interaction.
The application launch experience can be customized by changing the default splash image, as well as the background color.
Creating a splash screen is easy. Splash screen images have to be 620 x 300 pixels using a 1x scaling factor.
For Windows Store applications created in XAML, you can double click on Package.appxmanifest. This opens the Application Manifest UI. Click on Visual Assets to navigate to the screen that offers the settings for Splash screen.
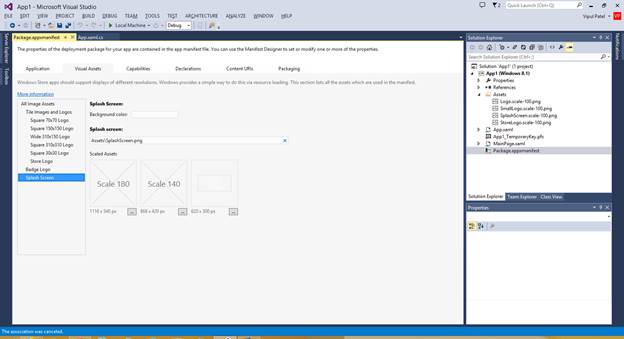
Splash Screen Settings
Supported Background Colors for Splash Screen
The background color can be one of the following:
|
aliceBlue |
antiqueWhite |
aqua |
aquamarine |
azure |
beige |
|
bisque |
black |
blanchedAlmond |
blue |
blueViolet |
brown |
|
burlyWood |
cadetBlue |
chartreuse |
chocolate |
coral |
cornflowerBlue |
|
cornsilk |
crimson |
cyan |
darkBlue |
darkCyan |
darkGoldenrod |
|
darkGray |
darkGreen |
darkKhaki |
darkMagenta |
darkOliveGreen |
darkOrange |
|
darkOrchid |
darkRed |
darkSalmon |
darkSeaGreen |
darkSlateBlue |
darkSlateGray |
|
darkTurquoise |
darkViolet |
deepPink |
deepSkyBlue |
dimGray |
dodgerBlue |
|
firebrick |
floralWhite |
forestGreen |
fuchsia |
gainsboro |
ghostWhite |
|
gold |
goldenrod |
gray |
green |
greenYellow |
honeydew |
|
hotPink |
indianRed |
indigo |
ivory |
khaki |
lavender |
|
lavenderBlush |
lawnGreen |
lemonChiffon |
lightBlue |
lightCoral |
lightCyan |
|
lightGoldenrodYellow |
lightGreen |
lightGray |
lightPink |
lightSalmon |
lightSeaGreen |
|
lightSkyBlue |
lightSlateGray |
lightSteelBlue |
lightYellow |
lime |
limeGreen |
|
linen |
magenta |
maroon |
mediumAquamarine |
mediumBlue |
mediumOrchid |
|
mediumPurple |
mediumSeaGreen |
mediumSlateBlue |
mediumSpringGreen |
mediumTurquoise |
mediumVioletRed |
|
midnightBlue |
mintCream |
mistyRose |
moccasin |
navajoWhite |
navy |
|
oldLace |
olive |
oliveDrab |
orange |
orangeRed |
orchid |
|
paleGoldenrod |
paleGreen |
paleTurquoise |
paleVioletRed |
papayaWhip |
peachPuff |
|
peru |
pink |
plum |
powderBlue |
purple |
red |
|
rosyBrown |
royalBlue |
saddleBrown |
salmon |
sandyBrown |
seaGreen |
|
seaShell |
sienna |
silver |
skyBlue |
slateBlue |
slateGray |
|
snow |
springGreen |
steelBlue |
tan |
teal |
thistle |
|
tomato |
transparent |
turquoise |
violet |
wheat |
white |
|
whiteSmoke |
yellow |
yellowGreen |
If you look at the default splash screen created by Visual Studio 2013, it is sized at 630 x 300 pixels. You can change the contents of the default splash screen to contain the contents you want.
You can see my artistic skills in the splash screen image below.
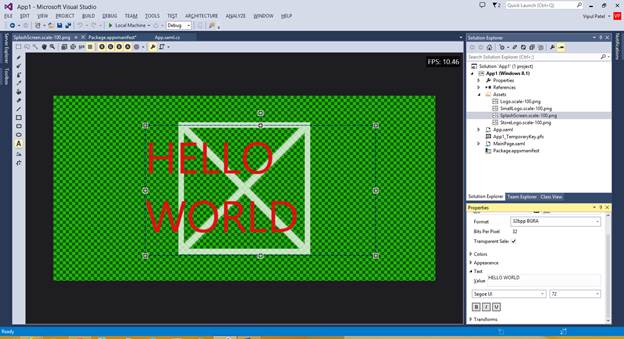
Splash Screen Image
Advanced Scenarios
In certain cases, there is a need to provide an extended duration where the splash screen is displayed. This is typically in the case where some background processing needs to happen involving something more than resource loading (e.g. checking with the server for certain settings, downloading the latest data to prepare the UI, etc.). To support such cases, Windows Store applications can provide an extended splash screen experience by mimicking the splash screen that is displayed when the application is first launched.
Let us walk through the steps for building such support.
To provide such an experience, here are the things we need to do programmatically.
- Use the same image as the splash screen image.
- Use the same background color as the splash screen background color.
- Use the same position as the splash screen image.
- Respond to Windows resize events.
In your Visual Studio 2013 Windows Store project, add a new XAML page titled Extended.xaml.
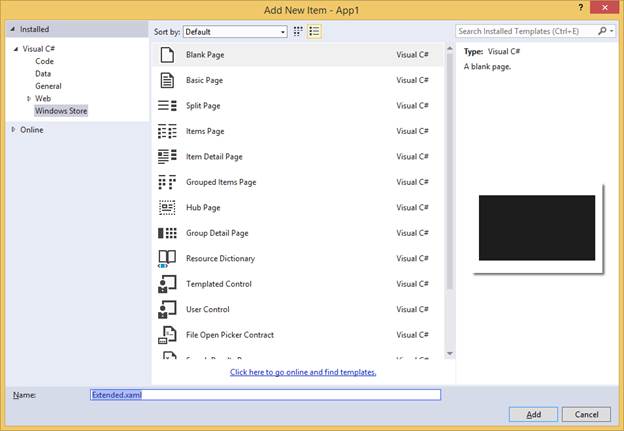
Add a New XAML Page
The default XAML markup created is below:
<Page
    x:Class="App1.Extended"
    xmlns="http://schemas.microsoft.com/winfx/2006/xaml/presentation"
    xmlns:x="http://schemas.microsoft.com/winfx/2006/xaml"
    xmlns:local="using:App1"
    xmlns:d="http://schemas.microsoft.com/expression/blend/2008"
    xmlns:mc="http://schemas.openxmlformats.org/markup-compatibility/2006"
    mc:Ignorable="d">

    <Grid Background="{ThemeResource ApplicationPageBackgroundThemeBrush}">

    </Grid>
</Page>
Change this to remove inheritance of the Page class (delete the Page tags and move the other declarations under the “grid” markup.
<Grid Background="moccasin"
    x:Class="App1.Extended"
xmlns="http://schemas.microsoft.com/winfx/2006/xaml/presentation"
xmlns:x="http://schemas.microsoft.com/winfx/2006/xaml"
xmlns:local="using:App1"
xmlns:d="http://schemas.microsoft.com/expression/blend/2008"
xmlns:mc="http://schemas.openxmlformats.org/markup-compatibility/2006"

mc:Ignorable="d">
</Grid>
Next, we add the grid and canvas elements.
<Grid Background="moccasin"
    x:Class="App1.Extended"
xmlns="http://schemas.microsoft.com/winfx/2006/xaml/presentation"
xmlns:x="http://schemas.microsoft.com/winfx/2006/xaml"
xmlns:local="using:App1"
xmlns:d="http://schemas.microsoft.com/expression/blend/2008"
xmlns:mc="http://schemas.openxmlformats.org/markup-compatibility/2006"

mc:Ignorable="d">
    <Grid.RowDefinitions>
        <RowDefinition/>
        <RowDefinition Height="180"/>
    </Grid.RowDefinitions>

    <Canvas Grid.Row="0">
        <Image x:Name="extendedSplashImage" Source="Assets/SplashScreen.scale-100.png" />
    </Canvas>
<StackPanel Grid.Row="1" HorizontalAlignment="Center">
        <TextBlock TextWrapping="Wrap" TextAlignment="Center" Padding="5" HorizontalAlignment="Center">
            Poor man's Plants vs Zombies is ready to load.
        </TextBlock>
        <Button x:Name="DismissButton" Content="Dismiss" HorizontalAlignment="Center" />
    </StackPanel>
</Grid>
Note that the source of the canvas is the same as the splash screen image. In addition, we have added a text block and a button, which help the user know that the application is ready.
Next, we open the code behind for Extended.xaml . By default, it should be as below.
using System;
using System.Collections.Generic;
using System.IO;
using System.Linq;
using System.Runtime.InteropServices.WindowsRuntime;
using Windows.Foundation;
using Windows.Foundation.Collections;
using Windows.UI.Xaml;
using Windows.UI.Xaml.Controls;
using Windows.UI.Xaml.Controls.Primitives;
using Windows.UI.Xaml.Data;
using Windows.UI.Xaml.Input;
using Windows.UI.Xaml.Media;
using Windows.UI.Xaml.Navigation;

// The Blank Page item template is documented at http://go.microsoft.com/fwlink/?LinkId=234238

namespace App1
{
    /// <summary>
    /// An empty page that can be used on its own or navigated to within a Frame.
    /// </summary>
    public sealed partial class Extended : Page
    {
        public Extended()
        {
            this.InitializeComponent();
        }
    }
}
First, we will remove the reference to Page as the class from which Extended is derived.
We will also add a few variables.
public sealed partial class Extended
    {
        internal Rect splashScreenCoordinates;
        internal bool dismissButtonClicked = false;
        internal Frame rootFrame;

        private SplashScreen splashScreen;
Next, delete the default constructor for Extended and replace it with the following code.
public Extended(SplashScreen splashscreen, bool loadState)
        {
            InitializeComponent();
            DismissButton.Click += DismissButton_Click;
            Window.Current.SizeChanged += Current_SizeChanged;
            splashScreen = splashscreen;
            if (splashScreen != null)
            {

                splashScreen.Dismissed += splash_Dismissed;

                // Retrieve the window coordinates of the splash screen image and store it.
                splashScreenCoordinates = splashScreen.ImageLocation;
                extendedSplashImage.SetValue(Canvas.LeftProperty, splashScreenCoordinates.X);
                extendedSplashImage.SetValue(Canvas.TopProperty, splashScreenCoordinates.Y);
                extendedSplashImage.Height = splashScreenCoordinates.Height;
                extendedSplashImage.Width = splashScreenCoordinates.Width;
                rootFrame = new Frame();

            }

        }

        void DismissButton_Click(object sender, RoutedEventArgs e)
        {
            rootFrame.Navigate(typeof(MainPage));

            Window.Current.Content = rootFrame;
        }

        void splash_Dismissed(SplashScreen sender, object args)
        {
            dismissButtonClicked = true;
        }

        void Current_SizeChanged(object sender, Windows.UI.Core.WindowSizeChangedEventArgs e)
        {
            if (splashScreen != null)
            {
                // Update the coordinates of splash screen
                splashScreenCoordinates = splashScreen.ImageLocation;
                extendedSplashImage.SetValue(Canvas.LeftProperty, splashScreenCoordinates.X);
                extendedSplashImage.SetValue(Canvas.TopProperty, splashScreenCoordinates.Y);
                extendedSplashImage.Height = splashScreenCoordinates.Height;
                extendedSplashImage.Width = splashScreenCoordinates.Width;
            }
        }
You can see that we have done the following in the above code snippet.
- Register the event handler for Dismiss button.
- Handle size changes.
- Store and update the coordinates of the splash screen when the screen size is changed.
- Track whether the splash screen is dismissed or not (this will be useful when the application is reactivated to determine whether to show the splash screen again or not).
Now, that our changes in Extended.xaml and Extended.xaml.cs are complete, we will now update App.xaml.cs to change the default implementation for OnLaunched event.
protected override void OnLaunched(LaunchActivatedEventArgs e)
        {

//#if DEBUG
//            if (System.Diagnostics.Debugger.IsAttached)
//            {
//                this.DebugSettings.EnableFrameRateCounter = true;
//            }
//#endif

//            Frame rootFrame = Window.Current.Content as Frame;

//            // Do not repeat app initialization when the Window already has content,
//            // just ensure that the window is active
//            if (rootFrame == null)
//            {
//                // Create a Frame to act as the navigation context and navigate to the first page
//                rootFrame = new Frame();
//                // Set the default language
//                rootFrame.Language = Windows.Globalization.ApplicationLanguages.Languages[0];

//                rootFrame.NavigationFailed += OnNavigationFailed;

//                if (e.PreviousExecutionState == ApplicationExecutionState.Terminated)
//                {
//                    //TODO: Load state from previously suspended application
//                }

//                // Place the frame in the current Window
//                Window.Current.Content = rootFrame;
//            }

//            if (rootFrame.Content == null)
//            {
//                // When the navigation stack isn't restored navigate to the first page,
//                // configuring the new page by passing required information as a navigation
//                // parameter
//                rootFrame.Navigate(typeof(MainPage), e.Arguments);
//            }

            if (e.PreviousExecutionState != ApplicationExecutionState.Running)
            {
                bool loadState = (e.PreviousExecutionState == ApplicationExecutionState.Terminated);
                Extended extendedSplash = new Extended(e.SplashScreen, loadState);
                Window.Current.Content = extendedSplash;
            }

            // Ensure the current window is active
            Window.Current.Activate();
        }
Comment out the original code inside this method and replace it with the blurb above. This changes the default implementation to show the Extended Splash screen at startup only once the application is launched.
Our changes are now complete.
Testing
If you now run the application, you will notice:

Run the App
After a few seconds, you will see:

Text Button Appears
You can see that a text and a button appear (this indicates that this is the extended splash screen being displayed to the user. When the button is clicked, the user is taken to Mainpage.xaml and the user can start interacting with the application.
Summary
In this article, we learned about the basics of a splash screen and how to build an extended splash screen experience for our application. I hope you have found this information useful.
About the Author
Vipul Patel is a Program Manager currently working at Amazon Corporation. He has formerly worked at Microsoft in the Lync team and in the .NET team (in the Base Class libraries and the Debugging and Profiling team). He can be reached at [email protected]