

Introduction
For those that have followed my articles lately, you will have noticed that I like to show you things based on my experience. I also always try to help similar developers out there that come from a desktop app programming background. This article is no exception. With this article I will show you the proper way to show users messages. These are called Toast Notifications. If you are like me and tried to use the MessageBox, and was just as amazed as I was that it didn’t work, this article will be very useful to you.
Notifications in Windows 8.x Apps
OK, let us set one thing straight. The MessageBox is not entirely dead in Windows 8.x, although the MessageBox class has been replaced by the MessageDialog class found in the Windows.UI.Popups namespace. It works a bit similar to the known MessageBox, but because of the changes in Windows 8.x the notification system has also changed. You can check out the MessageDialog class here.
You also get Toast notifications. These have actually been around for quite some time, especially in the mobile device world. All the Android messages are actually Toast notifications.
Now What is the Difference.
With a MessageBox (or rather the MessageDialog) you are presented with buttons that can be selected on it. We can then determine which button has been pressed. Good. Cool. But, those annoying Messageboxes that solely presented the user with a message that he or she has done something untoward or something is not allowed has fallen away. Yes, with the use of a nice graphical message in the top right corner of your screen (a Toast), you can present the user with that very same, now redundant message.
Our Program
For the few people that read my articles, you will know that I always try to accompany any article with a sample project. That is the only way you learn. That is how I learned. Fire up Visual Studio 2013 or 2012 and create a new VB.NET Windows Store Project. Name it anything you like, as long as you have designed it as shown in Figure 1.

Figure 1 – Our Design
The resulting XAML code for MainPage.xaml looks as follows:
    <Grid Background="{StaticResource ApplicationPageBackgroundThemeBrush}">
        <Button x_Name="btImageTextToast1" Content="Text And Image Toast 1" HorizontalAlignment="Left" VerticalAlignment="Top" Margin="306,185,0,0"/>
        <Button x_Name="btTextToast2" Content="Text Toast 2" HorizontalAlignment="Left" VerticalAlignment="Top" Margin="176,185,0,0"/>
        <Button x_Name="btTextToast1" Content="Text Toast 1" HorizontalAlignment="Left" VerticalAlignment="Top" Margin="61,185,0,0"/>
        <TextBlock HorizontalAlignment="Left" TextWrapping="Wrap" Text="VB.NET Toast Example" VerticalAlignment="Top" Margin="76,96,0,0" Height="43" Width="419" FontSize="36"/>
        <TextBlock x_Name="tbError" HorizontalAlignment="Left" Margin="231,293,0,0" TextWrapping="Wrap" Text="TextBlock" VerticalAlignment="Top"/>
        <Button x_Name="btChangeSound" Content="Change Toast Sound" HorizontalAlignment="Left" VerticalAlignment="Top" Margin="61,233,0,0"/>
        <Button x_Name="btToastDuration" Content="Toast Duration" HorizontalAlignment="Left" VerticalAlignment="Top" Margin="418,233,0,0"/>
        <Button x_Name="btMuteSound" Content="Mute Toast Sound" HorizontalAlignment="Left" VerticalAlignment="Top" Margin="248,233,0,0"/>

    </Grid>
You obviously have carte blanche to name your objects as you please, as long as you can follow my example. I have tried to keep the names simple enough though.
Toast Notifications
There is a total of eight different toasts you can use in your apps. They are listed as follows:
- ToastText01
- ToastText02
- ToastText03
- ToastText04
- ToastImageAndText01
- ToastImageAndText02
- ToastImageAndText03
- ToastImageAndText04
By the descriptive names you can already see that there are two categories : Text-Only and Text and Image. You can see an example of each one’s usage at The toast template catalog (Windows Store apps).
Minor Things to do Before We Start Coding
Because we are dealing with Toast Notifications we have to make our program Toast Capable. We have two options here:
Option 1 – Manifest
Make your app Toast Capable by selecting Yes from the given options. This looks like Figure 2.
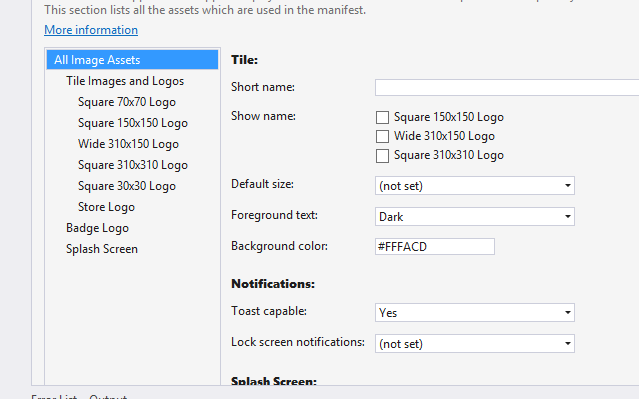
Figure 2 – Toast Capable
Option 2 – Edit the XAML code
Edit your MainPage’s XAML code to include Toast capabilities. The code would look something like this:
      <m2:VisualElements DisplayName="Toast_VB_Example" Square150x150Logo="Assets\Logo.png" Square30x30Logo="Assets\smallTile.png" Description="Toast_VB_Example" ForegroundText="dark" BackgroundColor="#FFFACD" ToastCapable="true">
        <m2:SplashScreen Image="Assets\SplashScreen.png" />
      </m2:VisualElements>
Code
Right, now we have a nice background of what to expect. I will not cover all the Toasts here as this just serves as a foundation to get you started.
Add the following Namespaces to your MainPage.Xaml.vb file:
Imports Windows.UI.Notifications 'Notifications Namespace
Imports Windows.Data.Xml.Dom 'XML Capabilities
We make use of the Notifications Namespace in order to produce our desired Toasts, and the XML Namespace for the formatting of our toasts. If you haven’t worked with XML before, do not worry.
Add the following Modular Variables:
    Private xmlToast As XmlDocument = New XmlDocument 'New XmlDocument Object
    Private tnToast As ToastNotification 'Toast Notification
We will use these with all our buttons, so instead of recreating the objects every time, we only create them once.
Add the next code behind the Text Toast 1 button:
    'Shows Default Short Toast
    Private Sub btTextToast1_Click(sender As Object, e As RoutedEventArgs) Handles btTextToast1.Click

        Try
            'Get Correct Toast Template
            xmlToast = ToastNotificationManager.GetTemplateContent(ToastTemplateType.ToastText01)

            'Get Access To TEXT Tag In XML Document
            Dim ttTextNode = xmlToast.GetElementsByTagName("text")

            'Add The Message We Want To Show
            ttTextNode(0).AppendChild(xmlToast.CreateTextNode("Message 1"))

            'Create New ToastNotification Object
            tnToast = New ToastNotification(xmlToast)

            'Show Toast
            ToastNotificationManager.CreateToastNotifier().Show(tnToast)

        Catch ex As Exception

            'In Case Of Error
            tbError.Text = ex.Message

        End Try

    End Sub
This is the most difficult part of today’s article to understand. Have a smoke break quickly or indulge in something sweet. Back? OK, good. The first statement after the opening Try block, sets our XML Document object equal to the Toasttext01 Template. This gives xmlToast all the capabilities and functionalities of a Toast notification.
We do not have any text inside our notification yet, that is where the next line comes in. ttTextNode gets access to the xmlToast object’s text tag.
We then add a new child tag inside of it, and specify our Message.
We create the Toast Notification object next, then show it. Once run, your screen will resemble Figure 3.
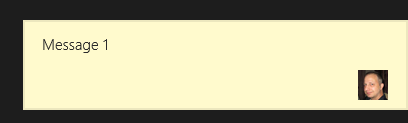
Figure 3 – Default Toast Notification
Who is that ugly guy in the message? That is unfortunately me. It is always nice to include your app’s logo inside a Toast as it looks more professional and more rounded. This was also explained inside the adding Toast Capabilities section earlier in my article. Add any image to your Solution Explorer to be used as your company logo. While you’re at it, add another image in there for our Image And Text Toast which I will cover shortly. My Solution Explorer with the added images looks like Figure 4.
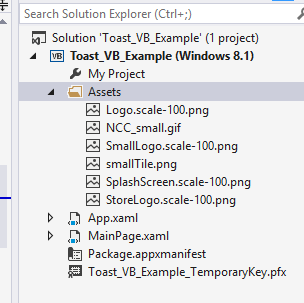
Figure 4 – Solution Explorer with added images
Let us add the next Toast Notification. Add the following code behind the Text and Toast 2 button:
    'Toast Notification 2 ( BOLD TEXT )
    Private Sub btTextToast2_Click(sender As Object, e As RoutedEventArgs) Handles btTextToast2.Click

        Try
            xmlToast = ToastNotificationManager.GetTemplateContent(ToastTemplateType.ToastText02)

            Dim ttTextNode = xmlToast.GetElementsByTagName("text")

            ttTextNode(0).AppendChild(xmlToast.CreateTextNode("Message 2"))

            'Add Actual Message Under Heading Of "Message 2"
            ttTextNode(1).AppendChild(xmlToast.CreateTextNode("This Is Message 2"))

            tnToast = New ToastNotification(xmlToast)

            ToastNotificationManager.CreateToastNotifier().Show(tnToast)

        Catch ex As Exception

            tbError.Text = ex.Message

        End Try

    End Sub
See the difference? The code looks almost identical. This is why Toast Notifications are so easy! All we did was to specify a different Toast template and add another Child Node under the existing Text section of the XML Document.
Run it now, and you will see a notification similar to Figure 5.
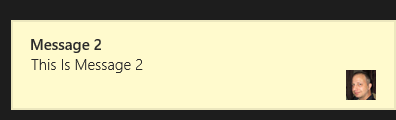
Figure 5 – ToastText02
The heading is in bold.
Add the next code for our Text And Image Toast 1 button:
    'Shows Toast With Image
    Private Sub btImageTextToast1_Click(sender As Object, e As RoutedEventArgs) Handles btImageTextToast1.Click

        Try
            'Image And Text Template
            xmlToast = ToastNotificationManager.GetTemplateContent(ToastTemplateType.ToastImageAndText01)

            Dim ttTextNode As XmlNodeList = xmlToast.GetElementsByTagName("text")

            'Search For Tag Named "image"
            Dim ttImageNode As XmlNodeList = xmlToast.GetElementsByTagName("image")

            'Once "image" Tag Found, Set Its src and alt Attributes
            DirectCast(ttImageNode(0), XmlElement).SetAttribute("src", "ms-appx:///Assets/NCC_small.gif")
            DirectCast(ttImageNode(0), XmlElement).SetAttribute("alt", "Whatever Text")

            'Show Text Next To Image
            ttTextNode(0).AppendChild(xmlToast.CreateTextNode("Image and Message 1"))

            tnToast = New ToastNotification(xmlToast)

            ToastNotificationManager.CreateToastNotifier().Show(tnToast)

        Catch ex As Exception

            tbError.Text = ex.Message

        End Try

    End Sub
Again, same principle is being employed. We now get the Image tag inside the XML file and add its source (src) and alternative text (alt) attributes. You can use the following HTTP protocols to specify the location of your picture you’d like to use:
| Protocol | Description |
|---|---|
| http:// or https:// | A web-based image. |
| ms-appx:/// | An image included in the app package. |
| ms-appdata:///local/ | An image saved to local storage. |
| file:/// | A local image. (Only supported for desktop apps.) |
Figure 6 shows the Image and Text Toast we have just created.
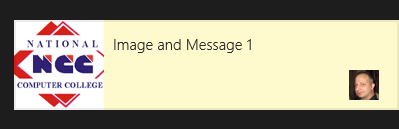
Figure 6 – TextAndImageToast01
Toast Notification Settings
Apart from showing a specified message inside a Toast, we can change each Toast’s behavior. We can change the notification sound, or mute it, and the notification duration.
Add the next code behind the Toast Duration button:
    'Change Toast Duration
    Private Sub btToastDuration_Click(sender As Object, e As RoutedEventArgs) Handles btToastDuration.Click

        Try
            'Use Simplest Template Again ( 1 )
            xmlToast = ToastNotificationManager.GetTemplateContent(ToastTemplateType.ToastText01)

            'Search For Main "TOAST" Tag
            Dim ttToastNode As XmlNodeList = xmlToast.GetElementsByTagName("toast")

            'Edit Tag To Include "duration" Attribute
            DirectCast(ttToastNode(0), XmlElement).SetAttribute("duration", "long")

            Dim ttTextNode = xmlToast.GetElementsByTagName("text")

            ttTextNode(0).AppendChild(xmlToast.CreateTextNode("Long Living Message"))

            tnToast = New ToastNotification(xmlToast)

            ToastNotificationManager.CreateToastNotifier().Show(tnToast)

        Catch ex As Exception

            tbError.Text = ex.Message

        End Try

    End Sub
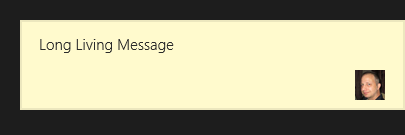
Figure 7 – Long Toast Duration
We identify the Toast XML element and edit its attributes by adding the duration attribute. Now, a normal Toast displays for about 7 seconds and then disappears. By setting the Duration to Long, the Toast will be shown for 25 seconds. Test it out. You will see that the Toast displays for a very long time.
Add the next code behind the Change Sound and Mute buttons respectively:
    Private Sub btChangeSound_Click(sender As Object, e As RoutedEventArgs) Handles btChangeSound.Click

        Try
            'Use Basic Toast Template
            xmlToast = ToastNotificationManager.GetTemplateContent(ToastTemplateType.ToastText01)

            Dim ttToastNode As XmlNodeList = xmlToast.GetElementsByTagName("toast")

            'Create "audio" Element
            Dim aaAudioNode = xmlToast.CreateElement("audio")

            'Set Audio "src" and "loop" Attributes
            aaAudioNode.SetAttribute("src", "ms-winsoundevent:Notification.IM")

            aaAudioNode.SetAttribute("loop", "true")

            'Add Audio Tag
            ttToastNode(0).AppendChild(aaAudioNode)

            Dim ttTextNode = xmlToast.GetElementsByTagName("text")

            ttTextNode(0).AppendChild(xmlToast.CreateTextNode("Message With Different Sound"))

            tnToast = New ToastNotification(xmlToast)

            ToastNotificationManager.CreateToastNotifier().Show(tnToast)

        Catch ex As Exception

            tbError.Text = ex.Message

        End Try

    End Sub

    'Make Silent Toast
    Private Sub btMuteSound_Click(sender As Object, e As RoutedEventArgs) Handles btMuteSound.Click

        Try

            xmlToast = ToastNotificationManager.GetTemplateContent(ToastTemplateType.ToastText01)

            Dim ttToastNode As XmlNodeList = xmlToast.GetElementsByTagName("toast")

            Dim aaAudioNode = xmlToast.CreateElement("audio")

            'Set "silent" Attribute
            aaAudioNode.SetAttribute("silent", "true")

            ttToastNode(0).AppendChild(aaAudioNode)

            Dim ttTextNode = xmlToast.GetElementsByTagName("text")

            ttTextNode(0).AppendChild(xmlToast.CreateTextNode("Message With No Sound"))

            tnToast = New ToastNotification(xmlToast)

            ToastNotificationManager.CreateToastNotifier().Show(tnToast)

        Catch ex As Exception

            tbError.Text = ex.Message

        End Try

    End Sub
Because the Audio element did not exist we had to create it, then we set the sound’s source or set the silent attribute to true.
I am attaching a working sample with this article for you to play with because I am actually a nice guy.
Conclusion
Now that you know how to use Toast Notifications there is no excuse for not using them. Until next time, happy coding!