

Introduction
Windows Store app lifecycle differs from that of a tradition desktop application considering the way a Windows Store app is run and managed by the operating system. For any developer new to Windows Store app development, it is necessary to understand how an app is managed by the operating system. An understanding of the app lifecycle will allow you to design your applications that fit nicely into the recommended programming model. To that end this article discusses some basic yet important concepts related to the Windows Store app lifecycle. It also illustrates how to maintain state information in a JavaScript and HTML app.
Important Stages in the Lifecycle of a Windows Store App
There are four important states in the lifecycle of a Windows Store app. They are as follows:
- Not Running
- Running
- Suspended
- Terminated
The Not Running state is quite straightforward. In this state an application is not running at all. An application might go into this state due to various reasons. For example, a user might have just installed the application but has never launched it. Another possibility is that a user might have ended the application using the Task Manager or might have just restarted the computer.
When you launch an app it changes its state from Not Running to Running. Such an app is the one that the user is interacting with at a given point of time and the OS has allocated required resources for it.
An app in the Running state can enter the Suspended state for several reasons. Say a user launched application App1, used it for some time and then switched to some other application, App2. In this case the OS suspends App1 after waiting for five seconds. This is done to conserve system resources. Since the user is using App2 now, App1 is suspended in order to provide resources to App2. The suspended application is still retained in the memory but none of its code runs. If the user switches to App1 again it goes into Running state and of course App2 is now suspended.
If there are no adequate system resources, the OS may terminate a suspended app in which case it will enter the Terminate state.
The following figure shows these four stages in pictorial form.
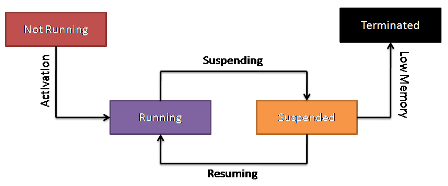
The four states of a Windows Store app
The process of taking an application to a Running state is known as app Activation. For Windows Store JavaScript and HTML apps the activation is carried out through WWAHost.exe. There can be many reasons for an app being activated including – an app being launched by tapping on its tile or a user switching back to an app. Depending on how an application is activated you can write different code blocks (more on that later).
Maintaining App State
Now that you understand the various stages of a Windows Store app, let’s discuss the impact of these stages on the state of an app. Consider a Windows Store app developed using JavaScript and HTML as shown below:
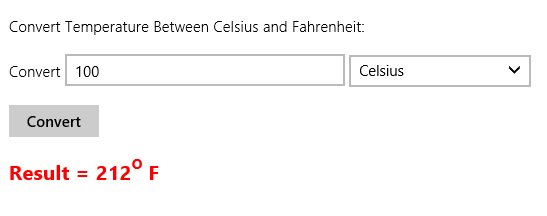
A Windows Store app
The above app simply converts temperature values from Celsius to Fahrenheit and vice a versa. The app allows you to enter a temperature value in a textbox, select its scale in a DropDownList and click on the Convert button to convert the value to the other scale. The result is displayed below the Convert button in a <div> element. The HTML markup that makes the UI of the above app is shown below:
<body>
    <p>Convert Temperature Between Celsius and Fahrenheit:</p>
    <p>
        Convert <input type="text" id="txtTemp" />
        <select id="ddlScale">
            <option value=""><-- Please select --></option>
            <option value="C">Celsius</option>
            <option value="F">Fahrenheit</option>
        </select>
    </p>
    <p>
        <input type="button" id="btnConvert" value="Convert" />
    </p>
    <div id="divResult" class="result"></div>
</body>
To understand the effect of application lifecycle on application state, open the project accompanying this article in Visual Studio 2012 and run it in debug mode. Then enter some value in the temperature textbox (say 100) and click on the Convert button. Doing so will display the result in a <div> element. Now switch to Visual Studio 2012 and “Suspend and shutdown” the application as shown below:
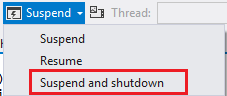
Suspend and shutdown the application
This will cause the application to be suspended. Now click on the run button again. This will take the application from suspended state to the running state. What happens to the textbox, DropDownList and the result message? The temperature value and the scale you entered previously is lost and no results are displayed in the <div> element. That means the application has lost its state information. To manage application state during suspend and terminate phases you need to write some code. The next sections discuss how that can be done.
Events of the Application Object
If you look at the source code of the default.js file accompanying this article you will find two important event handlers there:
 var app = WinJS.Application;

app.onactivated = function (args) {
  if (args.detail.kind === activation.ActivationKind.launch) {
    if (args.detail.previousExecutionState !== activation.ApplicationExecutionState.terminated) {
       // TODO: This application has been newly launched. Initialize
       // your application here.
    } else {
       // TODO: This application has been reactivated from suspension.
       // Restore application state here.
    }
    args.setPromise(WinJS.UI.processAll());
    ...
}
app.oncheckpoint = function (args) {
  ...
};
The two events of WinJS.Application object, viz. activated and checkpoint, allow you to deal with the application activation and application suspension respectively. The former event can be used to determine how an application was activated. Notice the ActivationKind enumeration. It has various values some of which are given below:
- launch : The user launched the application.
- search : The user wants to search with the application.
- shareTarget : The application is activated as a target for share operations.
- file : An application launched a file and this application is supposed to handle it.
- protocol : An application launched a URL whose protocol is supposed to be handled by this application.
- fileOpenPicker : The user wants to pick files or folders.
- fileSavePicker : The user wants to save a file.
- contactPicker : The user wants to pick contacts.
- printTaskSettings : The application handles print tasks.
- cameraSettings : The application uses the camera attached with the device.
The if-else block takes care of the most common scenario – you want to write a piece of code for a freshly launched app or you want to write a piece of code for an app that is being resumed from suspended state. Remember that code from this event handler must complete within fifteen seconds, otherwise the app is automatically terminated.
The other event – checkpoint – is your chance to persist app state into some medium before an app is suspended. This saved state can be reloaded again when an app is activated. Remember that the code from this event handler must complete within ten seconds otherwise the app is automatically terminated.
Session Wide and Application Wide State
The application state can be categorized into two types – session wide and application wide. As you might have already guessed the session wide state is confined to the current session of a user. A session ends when an application is closed using ALT + F4 or the computer is restarted or when a user logs off. The application wide state is persisted even when an app is no longer running.
To save state for a particular session you use WinJS.Application.sessionState object whereas to save the application state (often called app data) beyond sessions you can use Windows.Storage.ApplicationData object. The ApplicationData has roamingSettings and localSettings collections that can be used to store application data. In this code example you will use the roamingSettings object. The following fragment of code shows how data can be stored and retrieved in these objects.
//store data
Windows.Storage.ApplicationData.current.roamingSettings.values["myKey"] = "some data";
WinJS.Application.sessionState.MyProperty = "some data";
//retrieve data
var data = Windows.Storage.ApplicationData.current.roamingSettings.values["myKey"];
var data = WinJS.Application.sessionState.MyProperty;
As you can see a key named myKey is used to store some data in the roamingSettings collection and the same key is later used to retrieve the data back. The sessionState object uses MyProperty (a developer defined property name) to store some data and the same is later used to retrieve the data in the code.
Storing and Retrieving Session and Application State
Now let’s see how session and application wide state can be saved in the example app discussed earlier. In the case of this app the data entered in the textbox and selected in the DropDownList is saved in roamingSettings whereas the result of the temperature conversion is stored in sessionState. Add the following code inside the checkpoint event handler:
app.oncheckpoint = function (args) {
  var appData = Windows.Storage.ApplicationData.current;
  appData.roamingSettings.values["temperature"] = document.getElementById("txtTemp").value;
  appData.roamingSettings.values["scale"] = document.getElementById("ddlScale").value;
  WinJS.Application.sessionState.ResultMessage = document.getElementById("divResult").innerHTML;
};
As you can see the above code retrieves values from the textbox and the DropDownList and stores them in roamingSettings as temperature and scale keys respectively. The result of the temperature conversion that is displayed in a <div> element is stored in the ResultMessage property.
Next, add the following code in the activated event handler:
app.onactivated = function (args) {
 if (args.detail.kind === activation.ActivationKind.launch) {
    ...
 }
 args.setPromise(WinJS.UI.processAll());

 var button = document.getElementById("btnConvert");
 var textbox = document.getElementById("txtTemp");
 var dropdown = document.getElementById("ddlScale");
 var result = document.getElementById("divResult");

 button.addEventListener("click", OnConvertClick,false);

 var temperature = Windows.Storage.ApplicationData.current.roamingSettings.values["temperature"];
 var scale = Windows.Storage.ApplicationData.current.roamingSettings.values["scale"];
 var resultMsg = WinJS.Application.sessionState.ResultMessage;

 if (temperature) {
  textbox.value = temperature;
 }

 if (scale) {
  ddlScale.value = scale;
 }

 if (resultMsg) {
   result.innerHTML=resultMsg;
 }
}
};
As you can see the session and application wide state is retrieved from the respective storages (roamingSettings and sessionState) and assigned to the respective HTML controls.
To test the app you just completed, run it in debug mode, enter some temperature value and convert it to show the results. Now switch to Visual Studio 2012 and “Suspend and shutdown” the app. This will trigger the checkpoint event handler and state will be persisted in the respective storage locations. Now, run the application again so that activate event handler is called and the previously persisted state is loaded into the HTML elements.
As mentioned previously the code inside the checkpoint event must finish within ten seconds otherwise the application is terminated. In our example the code inside the checkpoint event handler was quite simple. If you expect your code to take more time it is recommended to save the state in “change” event handlers (or something similar) of various controls. This way instead of adding the burden on the checkpoint event handler you will be saving the state as and when the data changes. The code sample included with this article illustrates this approach too.
Summary
A Windows store app can be in any of these states – Not Running, Running, Suspended and Terminated. When an app is being activated due to any of the possible reasons, the WinJS.Application object raises an activated event whereas when an application is being suspended the checkpoint event is raised. The checkpoint event can be used to persist state in either roamingSettings or sessionState object. The activated event can then be used to load the previously saved state information back into the user interface.