

Activities are the building blocks of Windows Workflow Foundation (WF) workflows. They represent the basic steps within a workflow, which is constructed as a tree of activities. Activities make up the individual units of execution, and they allow for re-use. You can compose a solution by assembling activities, which themselves can be compositions of more than one activity. There are two types of WF activity: basic and composite. A basic activity is custom coded to provide its function set. A composite activity is built out of other existing activities.
A WF base activity library provides out-of-the-box activities, but you also can write custom activities or obtain them from third-party sources. The following are some common activities included in the activity library:
- Code: Executes the associated code
- Delay: Delays execution of the workflow for a specified duration
- IfElse: Executes different activities based on the condition
- InvokeWebService: Invokes a web service call from within a workflow
- Suspend: Suspends execution of the workflow
- Terminate: Terminates execution of the workflow
- While: Executes associated activities as long as the condition is true, where the condition can be based on declarative rules set at design time or based on code
As you can see, some powerful capabilities are available by default. You can use any of these to arrange a workflow. Along with being rules driven, activities can support transactions and sequential control. The activities’ declarative rules support is very powerful because it allows you to alter or change the logic without recompiling code.
Custom Activities
WF is a very powerful framework for building workflow-enabled applications, but its existing out-of-the-box activities likely won’t enable you to accomplish everything you want. That’s where custom activities come in. Rather than just embedding code, you can model custom application logic as activities in WF solutions and use it to encapsulate reusable business logic. This ensures that you stay within the WF execution model, as well as helping to ensure visibility and control of workflow solutions. It also is essential for the ability to provide dynamic updates.
A specific activity component model controls building custom activities. Each activity has a set of associated components. You associate the components with the activity by using attributes on the activity definition. If a particular component is not specified, then the parent’s attributes are applied instead. The components are:
- Designer: Controls the visible aspects of the activity within the workflow designer
- Validator: Used at design time, provides hints and information to the user (such as when mandatory properties have not been defined)
- Serializer
- Code Generator
One of the properties that you can control in your custom activity is the base class. A number of types are available, including the following:
- System.Workflow.Activities.CallExternalMethodActivity
- System.Workflow.Activities.HandleExternalMedthodActivity
- System.Workflow.Activities.SequenceActivity
- System.Workflow.Activities.SequentialWorkflowActivity
- System.Workflow.Activities.StateActivity
- System.Workflow.Activities.StateMachineWorkflowActivity
- System.Workflow.ComponentModel.Activity
- System.Workflow.ComponentModel.CompositeActivity
System.Workflow.Activities.SequenceActivity is the default activity type.
Building a Custom Activity
The following components are required to build the examples in this article:
- .NET Framework 3.0 Runtime Components
- Visual Studio 2005 Extensions for .NET Framework 3.0 (Windows Workflow Foundation)
I downloaded them and set up a .NET Framework 3.0 Virtual PC environment. I’ve found this to be a good practice for trying out new things without the risk of messing up my current environment and while preserving various environments. It is especially handy when you intermittently need to support a particular environment that is outside your normal development.
The example is a “Hello World!” sequential activity similar to the one built in “Get Ready for Windows Workflow Foundation.” In this case, you’ll turn the prior sequential workflow into a composite activity that you can use in its entirety. To begin, use the following steps to create a sequential workflow within Visual Studio 2005:
- Create a new project. This example uses C#, Workflow, Sequential Workflow Console Application as the project type.
- When you create the workflow project, it will use the workflow definition and code in the same file by default. I deleted it and added a new item Sequential Workflow (with code separation) and named it HelloWorkflow.xoml.
- Create another new project to add to the solution. This example uses C#, Workflow, Workflow Activity Library as the project type. I chose to name the project HelloWorldActivityLibrary.
- When you create the activity library project, it will use the activity definition and code in the same file by default. I deleted it and added a new item Activity (with code separation) and named it HelloWorldActivity.xoml.
- Add a property of bool type to the code behind file. Set the default value for the property to false. I chose to name the property IsTrue.
- Drag an IfElse activity to the top of the workflow designer.
- In the toolbox, you will find a Windows Workflow group. Drag a code activity onto the Sequential Workflow designer in the IfElse activity. I named my activity helloActivity.
- A Smart Tag on the control will indicate the property ExecuteCode is not set. The ExecuteCode property specifies the name of the code method that will be invoked by the runtime. Set the property as the name of what you called your activity followed by _ExecuteCode. I used helloActivity_ExecuteCode.
- Add Console.WriteLine("Hello World!"); to the event handler that was added. Additionally, add Console.ReadLine(); to the event handler.
- Add a terminate activity to the right branch of the IfElse activity.
- Use the Smart Tag on the ifElseBranchActivity1 to set a declarative rule condition. This will allow you to use the designer to set the logic condition to use. You should use the expression this.IsTrue == true, which will base the condition on the IsTrue property of the sequential workflow.
- Build the HelloWorldActivityLibrary project. Figure 1 shows a diagram of the completed composite activity.
- Return to the HelloWorkflow in the console project. In your toolbox in Visual Studio, you will now notice an additional tab called HelloWorldActivityLibrary, which contains the HelloWorldActivity. Drag an instance of the HelloWorldActivity onto the designer.
- Set a breakpoint in the workflow designer on the IfElse activity by right-clicking it and choosing Breakpoint > Insert Breakpoint. Build and execute your project in debug mode. You’ll notice that the “Hello World!” will be skipped because your condition is set to false by default.
- You’ve exposed IsTrue as a property on your custom activity. If you go back to the design view for the HelloWorkflow and go to the properties on the HelloWorldActivity you added, you’ll see the IsTrue property. Change the value to true and rebuild and execute the project. You’ll notice that this time the condition will be true and “Hello World!” will be displayed to the console.
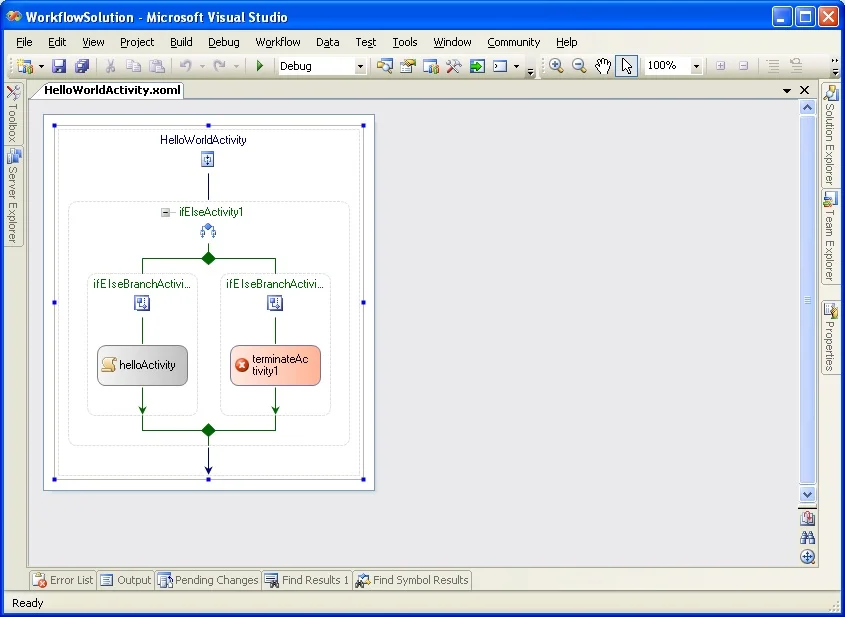
Figure 1. Diagram of the Completed Composite Activity
Here is a copy of the code that my project created. You should see a Program.cs that contains the main execution point for the console application and contains auto-generated code:
using System;
using System.Collections.Generic;
using System.Text;
using System.Threading;
using System.Workflow.Runtime;
using System.Workflow.Runtime.Hosting;

namespace HelloWorldWorkflow
{
   class Program
   {
      static void Main(string[] args)
      {
         using(WorkflowRuntime workflowRuntime = new WorkflowRuntime())
         {
            AutoResetEvent waitHandle = new AutoResetEvent(false);
            workflowRuntime.WorkflowCompleted += delegate(object sender,
               WorkflowCompletedEventArgs e) {waitHandle.Set();};
            workflowRuntime.WorkflowTerminated += delegate(object sender,
               WorkflowTerminatedEventArgs e)
            {
               Console.WriteLine(e.Exception.Message);
               waitHandle.Set();
            };

            WorkflowInstance instance =
               workflowRuntime.CreateWorkflow(
               typeof(HelloWorldWorkflow.HelloWorkflow));
            instance.Start();

            waitHandle.WaitOne();
         }
      }
   }
}