Ah, DOS… I remember growing up playing DOS games; yes, I am that old! The very first time my dad brought home a computer, we were so excited. It was not the first time I had seen a computer, because I was accustomed to accompanying my dad to work sometimes.
In any case, we played so many games: Police Quest, Space Quest, Outrun, Streetrod, Test Drive. I feel quite strange saying this, but I still have fond memories of those games. My very first game I ever played on a computer was Xonix.
I guess the point that I am trying to make is: DOS still has a soft place in my heart, as I am sure many of you will share the sentiment. I should probably start with the article, shouldn’t I ?
Today, I will teach you how to simulate the DOS Command Prompt window from a Visual Basic form.
For the uninformed:
DOS
Disk Operating System (DOS) is an operating system that runs from a hard disk drive. DOS also refers to a family of disk operating systems, most commonly Microsoft Disk Operating System (MS-DOS). An operating system, or OS, is software that controls a computer’s hardware and peripheral devices and allows other programs to function. The term Disk Operating System also describes several very similar command line disk operating systems, for example: PC-DOS, MS-DOS, CBM DOS, Atari DOS, and Apple DOS. More info on DOS can be found here.
DOS Command Prompt
The DOS Command Prompt is a command line interpreter application available in most Windows operating systems. Command Prompt is used to execute entered commands. Most of the commands are for batch files and to automate tasks via scripts, troubleshoot and solve Windows issues, and to perform advanced administrative functions.
Our Program
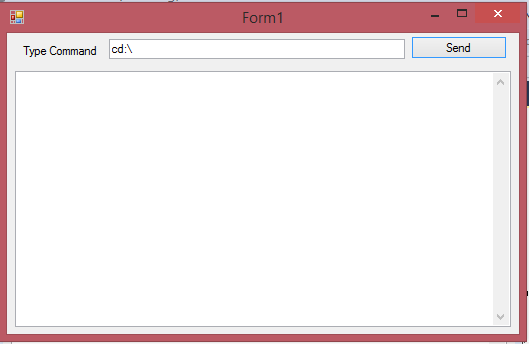
Open Visual Studio and create a new Visual Basic Windows Forms project. Add one button and two textboxes to your form, as shown in Figure 1.
Figure 1: Our design
Add the IO Namespace because we will be manipulating some text:
Imports System.IO
Add the following variables:
   Private strResults As String

   Private Delegate Sub delRefresh()

   Private ShowText As New delRefresh(AddressOf DisplayText)
strResults will be used to store the results of the output from DOS. ShowText makes use of a delegate named delRefresh that will in turn make use of another sub that we will define a bit later.
Add the following code behind the button labeled ‘Send’:
   Private Sub cmdSend_Click(sender As Object, e As EventArgs) _
      Handles cmdSend.Click

      Dim tOverride As New Threading.Thread(AddressOf OverrideCMD)
      tOverride.Start()

   End Sub
In this event, I spawn a new thread that will execute the following sub procedure:
   Private Sub OverrideCMD()

      Dim prcDOS As New Process
      Dim siDOS As New ProcessStartInfo

      siDOS.FileName = "cmd"

      siDOS.UseShellExecute = False
      siDOS.CreateNoWindow = True
      siDOS.RedirectStandardInput = True
      siDOS.RedirectStandardOutput = True

      prcDOS.StartInfo = siDOS
      prcDOS.Start()

      Dim srInput As StreamWriter = prcDOS.StandardInput
      Dim srOutput As StreamReader = prcDOS.StandardOutput

      srInput.WriteLine(txtCommand.Text)

      srInput.WriteLine("exit")

      strResults = srOutput.ReadToEnd

      srInput.Close()
      srOutput.Close()

      Invoke(ShowText)

   End Sub
In the OverrideCMD sub procedure, I have created a new Process object. The Process object (prcDOS) starts up the DOS program and produces no window. The next two lines (probably the most important lines) ensure that all the input for the DOS program and all the output for the DOS program gets redirected to the appropriate textboxes.
Because this is running in a thread, it continuously checks for input commands and then ensures that the output displays correctly. This happens when the ShowText sub gets invoked. Let’s add the ShowText sub procedure now:
   Private Sub DisplayText()

      txtResults.Text = strResults

   End Sub
This is straightforward, but I will still explain it. All that happens here is that the results from the input DOS command get displayed in the txtResults textbox.
Conclusion
DOS will always have a legacy, and knowing how to play with the Command Prompt can come in quite handy.


