

Introduction
I love PhotoShop. For me PhotoShop is the best tool to use to do any alterations to any pictures. Now, some of you may know that I am very curious. I always want to figure out how something works. Now what does any of this have to do with today’s article? Well, it is simple. Today I will show you how to create a Gaussian Blur effect with images in your VB.NET program.
What is Gaussian Blur?
According to Wikipedia, A Gaussian blur (also known as Gaussian smoothing) is the result of blurring an image by a Gaussian function. It is a widely used effect in graphics software, typically to reduce image noise and reduce detail. The visual effect of this blurring technique is a smooth blur resembling that of viewing the image through a translucent screen.
In simple terms, this means that the Gaussian Blur is used to provide a blur effect on an image. Depending on how it is used, you can quickly reduce noise from an image. Noise on an image can be anything from scratches, to pixelated dots (similar to some old black and white newspaper photo’s). It is quite handy. A Gaussian blur can also be applied to make your images blurry, as if you are looking through a glass lens. To give an example. Figure 1 shows an unedited picture. Figure 2 shows the very same picture with the Gaussian Blur applied to it. This is what I will teach you today.

Figure 1 – Normal Picture
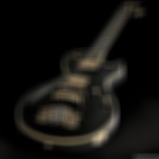
Figure 2 – Same picture with Gaussian Blur applied
As always, let us do an exercise!
Start Visual Basic.NET and create a new Windows Forms project. Once the project is created, design your form to resemble Figure 3. Obviously you may use different pictures and naming conventions, so keep that in mind when following this article.
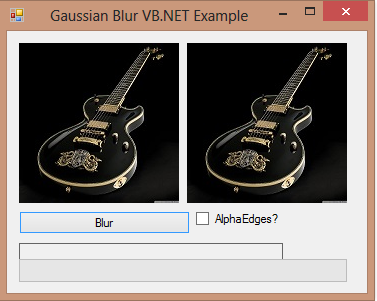
Figure 3 – Our Design
Code
The code is broken up into two major parts: The ColourAvg function that calculates each pixel’s current color, and to obtain the average of all colors present in the specified image; and the GaussianBlur procedure that does the physical blurring via the ColourAvg function and to update the User Interface.
ColourAvg Function
Add the following code:
    Private Function ColourAvg(ByVal szAvgSize As Size, ByVal szfImageSize As SizeF, ByVal intX As Integer, ByVal intY As Integer) As Color

        Dim arrlPixels As New ArrayList 'Host All Pixels

        Dim x As Integer 'X Location
        Dim y As Integer 'Y Location

        Dim bmpBlurDest As Bitmap = picBlurDest.Image.Clone 'Image To Be Cloned

        'Find Each Pixel's Colour And Add To ArrayList
        For x = intX - CInt(szAvgSize.Width / 2) To intX + CInt(szAvgSize.Width / 2) 'Left To Right

            For y = intY - CInt(szAvgSize.Height / 2) To intY + CInt(szAvgSize.Height / 2) 'Up To Down

                If (x > 0 And x < szfImageSize.Width) And (y > 0 And y < szfImageSize.Height) Then 'If Not Out Of Bounds

                    arrlPixels.Add(bmpBlurDest.GetPixel(x, y)) 'Add To ArrayList

                End If

            Next

        Next

        Dim clrCurrColour As Color 'Current Colour

        Dim intAlpha As Integer = 0 'Alpha Channel
        Dim intRed As Integer = 0 'Red Channel
        Dim intGreen As Integer = 0 'Green Channel
        Dim intBlue As Integer = 0 'Blue Channel

        For Each clrCurrColour In arrlPixels 'Loop Through Each Colour

            'Store Each Colour
            intAlpha += clrCurrColour.A
            intRed += clrCurrColour.R
            intGreen += clrCurrColour.G
            intBlue += clrCurrColour.B

        Next

        ' Return Average A, R, G, B
        Return Color.FromArgb(intAlpha / arrlPixels.Count, intRed / arrlPixels.Count, intGreen / arrlPixels.Count, intBlue / arrlPixels.Count)

    End Function
Do not run away!
Let me explain this function step by step:
- I created an ArrayList object to ultimately store each pixel inside the supplied image.
- I created X and Y objects to indicate each pixel stored on the X and Y axes.
- I created a copy of the Image I’d like to use the Blur on, via the Clone method of the Image class.
- I created the first loop to loop through the X axis.
- I created a nested loop to loop through the Y axis while looping through the X axis.
- I used the GetPixel method to grab each pixel and add it to the ArrayList.
- Now that I have each pixel (with all its associated colors and locations) I can store each pixel’s Alpha, Red, Green and Blue properties.
- Lastly, I can now manipulate each of these properties. How? Well, I return the average of each pixel’s Alpha, Red, Green and Blue properties. This will give me a faded look.
Gaussian Blur Procedure
Add the following code:
    'Blur Sub
    Private Sub GaussianBlur(ByVal blnAlphaEdges As Boolean, ByVal szBlurSize As Size)

        Dim Y As Integer 'Y
        Dim X As Integer 'X

        Dim bmpBlurDest As Bitmap = picBlurDest.Image.Clone 'Clone Of Image

        'Show Progress
        lblProgress.Text = "Applying Gaussian Blur " & szBlurSize.ToString

        prgBlurProgress.Maximum = bmpBlurDest.Height * bmpBlurDest.Width 'Set Max

        prgBlurProgress.Minimum = 0 'Set Min

        prgBlurProgress.Value = 0 'Initialize Value

        'Loop Through Image
        For Y = 0 To bmpBlurDest.Width - 1 'Top To Bottom

            ' Left To Right
            For X = 0 To bmpBlurDest.Height - 1

                If Not blnAlphaEdges Then 'AlphaEdges Not Chosen

                    bmpBlurDest.SetPixel(X, Y, ColourAvg(szBlurSize, bmpBlurDest.PhysicalDimension, X, Y)) 'Do Blur

                ElseIf bmpBlurDest.GetPixel(X, Y).A <> 255 Then 'Alpha Is Not Set To 255

                    bmpBlurDest.SetPixel(X, Y, ColourAvg(szBlurSize, bmpBlurDest.PhysicalDimension, X, Y)) 'Do Blur

                End If

                prgBlurProgress.Value += 1 'Update Progress

                Application.DoEvents() 'Ensure App Doesn't Hang

            Next

        Next

        picBlurDest.Image = bmpBlurDest.Clone 'Update Blurred Image

        bmpBlurDest.Dispose() 'Remove From Memory

    End Sub
Again, it looks more complicated than what it actually is. Let me explain :
- I again created the X and Y variables to keep track of where each pixel is in order to loop through them.
- I created a copy of the image I’d like to use the Gaussian Blur effect on.
- I do some User Interface things to update the progressbar and to show the user what he or she is busy with.
- I then loop through each Y pixel.
- Then through each X pixel and call the ColourAvg function to set the current pixel’s value to those that have been calculated, with the help of the SetPixel method.
- While setting each pixel to its new value, I determine whether or not the User chose the Alpha Edges option and if the image has been set to any transparency value.
Calling the Gaussian Blur Sub
Add the following code behind the button labelled “Blur“:
    Private Sub btnBlur_Click(ByVal sender As System.Object, ByVal e As System.EventArgs) Handles btnBlur.Click

        GaussianBlur(chkAlphaEdges.Checked, New Size(8, 8)) 'Call Blur Function

    End Sub
If the AlphaEdges CheckBox has been checked, the Blurring process will be quite faster as the function will only concentrate on the outline edges of whatever object is present in the desired image. This, as I have explained earlier will enhance the edges of the objects inside the given picture. If AlphaEdges has not been selected, then the Blurring process will take longer, as it has to blur each individual pixel.
I am providing this project as a download for you, just in case you have missed a step.
Conclusion
I hope that you have learned from this article, and also realize that this is only the beginning of your Graphics Programming endeavor. The onus now rests on your shoulders to learn about the other Blur effects you get, as well as delve into more Filters for your images. Until next time, cheers!