

Introduction
Occasionally, I get tired of plain old rectangular shaped WinForms applications and decide to add some simple rounded-rectangular-ly shaped elements to change it up. The problem is I have to remember how to make them. And, because it’s the holiday season, why not keep it fun and light? For your programming pleasure and amusement, in the spirit of the holidays, here is a simple control that rounds the edges of a panel.
Understanding the Coordinate System for Drawing Arcs with GDI+
Generally, in math classes or if you are a pilot or use maps, you think of the coordinate system with North (or 360° or 0°) as being situated at the top, rotation clockwise through 360°. In a Cartesian system this would situate 0° at the top and 180° at the bottom, representing the y-axis and 90° and 270° situated left and right representing the x-axis. GDI+ does not treat the coordinate system that way, at least as far as drawing arcs is concerned. The coordinate system is rotated 90° to the right, as shown in Figure 1.
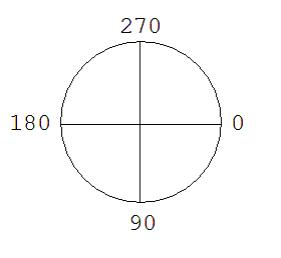
Figure 1: The Cartesian coordinate system is oriented titled to the right, so 0° is on the right or x-axis.
Knowing the orientation of significant reference points is important if you are going to draw anything manually with GDI+.
Technically, to draw a rounded corner you must know the radius of your circle. The radius will be the offset distance from any of the rectangle’s four edges. For example, a rounded upper-right corner would be start at width-d and 0 where d represents the arcs radius, width-d is the x-coordinate and 0 is the y-coordinate. Because the arc starts in the up position, the starting angle would be 270°; to obtain a quarter-circle, the arc would sweep 90°. (Four corners mean 360° divided by 4, yields 90° for each corner arc.) See Figure 2 for an illustration.

Figure 2: To round a corner, you need x and y and the starting angle and sweep; the upper right corner is 270° and a quarter circle is 90°.
Creating the Rounded-Rectangle Panel Control
To implement the rounded-rectangle effect, you need a graphics path with the lines and arcs that enclose the panel and assign this graphics path to the Region property of the panel. All of this additional code sits tidily packaged up in a class that inherits from Panel and overrides the OnPaint method of the Panel. Listing 1 provides the complete source code listing.
Listing 1: A complete listing for a rounded-rect Panel control.
Imports System
Imports System.Diagnostics
Imports System.ComponentModel
Imports System.Windows.Forms
Imports System.Drawing
Imports System.Drawing.Drawing2D


Public Class ShapedPanel
   Inherits Panel

   Private pen As Pen = New Pen(_borderColor, penWidth)
   Private Shared ReadOnly penWidth As Single = 2.0F

   Public Sub New()

   End Sub

   Private _borderColor As Color = Color.White
   <Browsable(True)> _
   Public Property BorderColor() As Color
      Get
         Return _borderColor
      End Get
      Set(ByVal Value As Color)
         _borderColor = Value
         pen = New Pen(_borderColor, penWidth)
         Invalidate()
      End Set
   End Property

   Protected Overrides Sub OnPaint(ByVal e As PaintEventArgs)
      MyBase.OnPaint(e)
      ExtendedDraw(e)
      DrawBorder(e.Graphics)
   End Sub

   Private _edge As Integer = 50
   <Browsable(True)> _
   Public Property Edge() As Integer
      Get
         Return _edge
      End Get
      Set(ByVal Value As Integer)
         _edge = Value
         Invalidate()
      End Set
   End Property


   Private Function GetLeftUpper(ByVal e As Integer) As Rectangle
      Return New Rectangle(0, 0, e, e)
   End Function

   Private Function GetRightUpper(ByVal e As Integer) As Rectangle
      Return New Rectangle(Width - e, 0, e, e)
   End Function

   Private Function GetRightLower(ByVal e As Integer) As Rectangle
      Return New Rectangle(Width - e, Height - e, e, e)
   End Function

   Private Function GetLeftLower(ByVal e As Integer) As Rectangle
      Return New Rectangle(0, Height - e, e, e)
   End Function

   Private Sub ExtendedDraw(ByVal e As PaintEventArgs)
      e.Graphics.SmoothingMode = SmoothingMode.AntiAlias
      Dim path As GraphicsPath = New GraphicsPath()
      path.StartFigure()
      path.StartFigure()
      path.AddArc(GetLeftUpper(Edge), 180, 90)
      path.AddLine(Edge, 0, Width - Edge, 0)
      path.AddArc(GetRightUpper(Edge), 270, 90)
      path.AddLine(Width, Edge, Width, Height - Edge)
      path.AddArc(GetRightLower(Edge), 0, 90)
      path.AddLine(Width - Edge, Height, Edge, Height)
      path.AddArc(GetLeftLower(Edge), 90, 90)
      path.AddLine(0, Height - Edge, 0, Edge)
      path.CloseFigure()
      Region = New Region(path)
   End Sub

   Private Sub DrawSingleBorder(ByVal graphics As Graphics)
      graphics.DrawArc(pen, New Rectangle(0, 0, Edge, Edge), _
                       180, 90)
      graphics.DrawArc(pen, New Rectangle(Width - Edge - 1, -1, _
                       Edge, Edge), 270, 90)
      graphics.DrawArc(pen, New Rectangle(Width - Edge - 1, _
                       Height - Edge - 1, Edge, Edge), 0, 90)
      graphics.DrawArc(pen, New Rectangle(0, Height - Edge - 1, _
                       Edge, Edge), 90, 90)
      graphics.DrawRectangle(pen, 0.0F, 0.0F, CType((Width - 1), _
                             Single), CType((Height - 1), Single))
   End Sub

   Private Sub Draw3DBorder(ByVal graphics As Graphics)
      'TODO Implement 3D border
   End Sub

   Private Sub DrawBorder(ByVal graphics As Graphics)
      DrawSingleBorder(graphics)
   End Sub
End Class