

Ok, so you’ve heard all about Entity Framework (EF), and about how marvelous it is, so you’ve gotten all fired up about it, and thought woo, yea! Time for me to get my EF hat on. Then you start reading the docs, and looking at the examples, and suddenly the realization sinks in. None of this is as simple as the video you watched would have you believe, you scratch your head in disbelief. All you want is to have your application talking easily to your database by the end of the week, but now it seems like it’s going to take you that week just to figure the rest out.
It’s Like any Other Technology in IT
We’ve all been there, and while it might look like it’s going to take you a million years to tame this, Entity framework is just like any other technology in IT.
If you’ve spent any time at all in the industry, then you’ll know that there’s a dozen different ways to do each thing. The trick is to not sit and try to cram it all in, in one go, but rather consume it in little bite sized chunks. That’s exactly what I found when I first started using Entity Framework.
In this post I’m going to show you the absolute simplest way of getting started using Code First.
Why Code First, and not Database First or Model First?
As a developer on the Microsoft platform, the last thing you want to be doing is putting another hat on. We already have enough hats to wear without needing to be a DBA too.
To me, Code First is the perfect balance; it keeps me focused on my code, and I only ever have to deal with objects. Once everything is running I don’t really have to think about things like tables, because everything just works and works well.
Others may disagree however, and there’s been plenty or religious wars over the years on this and other subjects, one which I’m not going to get involved in.
First Things First, Create a Database.
If you don’t already have a database, then you’ll need to pop open SQL Management Studio and create one.
If you don’t control your database server, then you’ll need to ask your network admin/DBA/IT support person to create one for you. However you do it, for reliability sake unless corporate policy dictates otherwise, ask for an SQL login and make sure that the login name has full read/write privileges on the new database.
If you have control of the database, then from SQL Management Studio, right click on databases in your server tree browser and select new database.
I’m not going to go through the entire process here, but what I generally do then is to make a new login, set the default database for that login as the database I just created, then go back to the new database properties and set the owner as the login I just created.
That’s all you have to do outside of Visual studio.
From Now on its Code All the Way.
Create yourself a new project in Visual Studio. For the purposes of this post I’m using VS2013 Ultimate, and I’ve created a simple winforms app with a button on so that I can test it.
For you, well you create any project type you’re comfortable with. I would strongly recommend that you don’t use any project templates that have any pre installed dependencies or code in them though as you never know what might, and might not get in your way while doing this.
Once you have your project up and running, right click on your project’s references entry in your solution explorer, then select ‘Manage NuGet Packages’
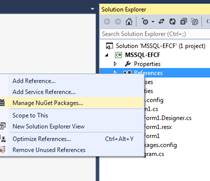
Manage NuGet Packages
When your NuGet package manger opens, type ‘Entity’ (that’s all you need…) into the search box in the online tab and wait a few seconds.

NuGet Package Manager
Click the install button, then close the NuGet dialog.
EF is now installed with its basic settings. Everything you need to connect to a standard Microsoft SQL Server instance is present and ready to use.
From this point on, how you organize your code should always be in the best interests of your project. For me I always keep my code in a folder called ‘Classes’ and any objects that are related to my database in a folder called ‘Entities’. If you wish to do things differently, just remember to adjust namespaces as required.
Right click on the home node (top of the tree) of your project and ‘Add -> new folder’
Create two folders, one called ‘Classes’ the other called ‘Entities’; your solution explorer should look something like the following:
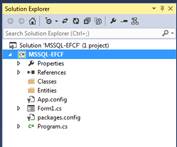
Solution Explorer
Right click on your ‘Classes’ folder, and ‘Add -> Class’, call this class ‘DataAccess’ and click ‘Add’ to add it to your project. The class file template should then open in Visual Studio, looking something like the following:
namespace MSSQL_EFCF.Classes
{
  class DataAccess
  {
  }
}
We’re going to modify this class to be our Entity Framework ‘Database Context’. Make sure your class is public, then extend the class so that it inherits from ‘DbContext’ as follows:
namespace MSSQL_EFCF.Classes
{
  public class DataAccess : DbContext
  {
  }
}
Also remember to make sure you add ‘System.Data.Entity’ to your classes using clause (I’m omitting using clauses in my code samples for brevity.
Once you have the framework for your code, you then need to create an empty constructor and make a call to the base class setting the name of the connection string you wish to use.
Lastly, you’ll need to add one or more ‘DbSet’ entries to your class to represent the tables in your database; we’re only going to use one this time, but in a future post I’ll introduce ‘Entity Framework Migrations,’ which will allow your data model to evolve over time and change as your application grows.
You’ll also most likely get a compile error at the moment, because we’ve not yet created any entities to represent our table objects. Don’t worry if you do, all will be put right soon.
If you’ve followed me, then your class should now look a little bit like the following:
using System.Data.Entity;

namespace MSSQL_EFCF.Classes
{
  public class DataAccess : DbContext
  {
    public DataAccess() : base("myConnectionString")
    {}

    public DbSet<MyTableObject> MyObjects { get; set; }

  }
}
And that’s actually enough to get EF to create a table in your database (once you have the object itself created.
‘MyConnectionString’ is created the same as any other connection string, by editing your app.config or web.config files; just remember that the name you specify here is the name you’ll need to give your connection string entry.
At this point, for the most part, Entity Framework will rely on a conventions based approach to work out specifics of your database. Most importantly if it needs to have restrictions such as field lengths and key settings, or you need for some reason to override the conventions, then you will need to create an override in your data class to override the ‘OnModelCreating’ method used by EF at start-up. Within this override you use a ‘ModelBuilder’ to configure certain aspects of your model to work the way you want them to.
In our class, we’re simply just going to set the key column and table name, using the following:
protected override void OnModelCreating(DbModelBuilder modelBuilder)
{
  modelBuilder.Entity<MyTableObject>().ToTable("MyTableObjects");
  modelBuilder.Entity<MyTableObject>().HasKey(x => new { x.RecordId });
}
As before we have some red in there, because we’ve not yet created the object we’re going to use for our entity.
Add the above override, just after the ‘DbSet’ you created, defining your table.
Now our Database Context is ready, we just have to create our object to go into the table.
Right click on your Entities folder, and add a new class in the same way as you added the data class to your classes folder.
Call this new class ‘MyTableObject’ to match the name used above in the ‘DbSet.’ Make sure this class is public, and let’s add a field for our primary key, and a name and email address.
When you’re done, it should look something like this:
namespace MSSQL_EFCF.Entities
{
  public class MyTableObject
  {
    public int RecordId { get; set; }
    public string Name { get; set; }
    public string Email { get; set; }

  }
}
If you then go back to your data context class and add:
using MSSQL_EFCF.Entities;
(Remembering to adjust namespaces as needed) to the classes using clause, you should find that all the angry red colours in your data context should now go away:
using System.Data.Entity;
using MSSQL_EFCF.Entities;

namespace MSSQL_EFCF.Classes
{
  public class DataAccess : DbContext
  {
    public DataAccess() : base("myConnectionString")
    {}

    public DbSet<MyTableObject> MyObjects { get; set; }

    protected override void OnModelCreating(DbModelBuilder modelBuilder)
    {
      modelBuilder.Entity<MyTableObject>().ToTable("MyTableObjects");
      modelBuilder.Entity<MyTableObject>().HasKey(x => new { x.RecordId });
    }
  }
}
Congratulations, now all you need to do is start programming against the Entity Framework API.
As soon as you start making any calls, using your data context, EF will create any databases or objects it needs to, as it needs to.
For example, to insert a record into your database, you could use the following:
using(var db = new DataAccess())
{
  var myNewObject = new MyTableObject
  {
    RecordId = 0,
    Name = "Peter Shaw",
    Email = "[email protected]"
  };

  db.MyObjects.Add(myNewObject);
  db.SaveChanges();
}
There’s a little bit of magic going on here too. See how I’ve set the RecordId as a 0?
Well, if you do this, on a key column, EF will automatically generate the ID for you, so you don’t need to worry about ID generation for your records.
If you want to find an existing record, and modify it, that’s easy too:
using(var db = new DataAccess())
{
  var myObject = db.MyObjects.First(x => x.RecordId == 1);
  myObject.Email = "[email protected]";
  db.SaveChanges();
}
Remember that you also need to set your connection string correctly too. In my case as described previously, I created a new database (which I called ‘netnutsandbolts’) and I created a user to own the database and act as a login for it.
In your XXXX.config file, under the connection strings section, you need a key with the same name as the connection string you used in your data context, something like the following:
<connectionStrings>
  <add name="myConnectionString"
       connectionString="Data Source=VBOX01;Initial Catalog=netnutsandbolts;User ID=netnutsandbolts;Password=netnutsandbolts;MultipleActiveResultSets=True"
       providerName="System.Data.SqlClient" />
</connectionStrings>
One thing to be aware of with connection strings. Depending on your version and configuration of Visual Studio, you may have database technologies like “Local DB” available, or “MSSQL Compact”. If you don’t get your connection string correct, or fail to include it, Entity Framework will attempt to see if it can use one of these. What can happen here is that your app appears to work, but you then spend hours scratching your head, wondering why the database you were supposed to be writing to still has no data in it.
If you have any ideas for this column, or can think of anything you’d like me to cover, don’t hesitate to reach out to me. I can generally be found hovering around on Twitter as @shawty_ds , or you can find me in the ‘Lidnug’ users group on Linked-in that I help to run.