

Introduction
I have always been fascinated with drawing applications. It might be because my wife is quite a good artist; I much rather prefer words… In some of my previous articles, you have seen how I love graphics. Today, I will show you how to create odd shapes, specifically:
- Crescent moon
- Spiral
- Heart
GDI+
Any graphics or drawing operation in your app gets done through GDI+. GDI means Graphics Device Interface. The + signifies the fact that it is the .NET version of GDI that has been around a very, very long time before .NET was even an idea—okay, probably not that long.

This was quite a neat trick. The other two shapes will not be so easy…
Add the next procedure to your code:
    Public Sub DrawHeart(ByVal sender As Object,
      ByVal e As System.Windows.Forms.PaintEventArgs)

      Dim intArcHeight As Integer = 150
      Dim intArcWidth As Integer = 150
      Dim intArc1_x As Integer = 70
      Dim intArc2_x As Integer = 200
      Dim intArc1_y As Integer = 10

      Dim intArcSweepAngle As Integer = 195

      Dim intArc1StartAngle As Integer = 135
      Dim intArc2StartAngle As Integer = 210

      Dim intLine1_x1 As Integer = 92
      Dim intLine2_x1 As Integer = 327
      Dim intLine3_x1 As Integer = 327
      Dim intLine1_y1 As Integer = 139

      Dim intLine2_y As Integer = 139
      Dim intLine3_y As Integer = 139

      Dim pthHeartPath As New GraphicsPath

      pthHeartPath.AddArc(intArc1_x, intArc1_y, intArcWidth,
         intArcHeight, intArc1StartAngle, intArcSweepAngle)
      pthHeartPath.AddArc(intArc2_x, intArc1_y, intArcWidth,
         intArcHeight, intArc2StartAngle, intArcSweepAngle)

      pthHeartPath.AddLine(92, 139, 210, 270)

      pthHeartPath.AddLine(327, 139, 327, 139)

      e.Graphics.DrawPath(Pens.Black, pthHeartPath)


   End Sub
And add the call to this sub inside Form_Paint again, like this:
   Private Sub Form1_Paint(ByVal sender As Object, _
      ByVal e As System.Windows.Forms.PaintEventArgs) _
      Handles MyBase.Paint

      DrawHeart(sender, e)


   End Sub
The preceding code segment works as follows:
- I declared the variables that will be used during the drawing of the heart shape.
- I created the arcs as determined mostly through trial and error.
- I added the connecting lines from the arcs, to the heart’s ending point
Here is more information regarding the GraphicsPath object I have used to create the shape. The resulting drawing looks like Figure 3:
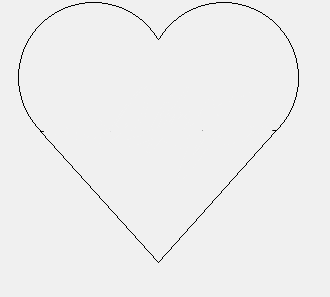
Figure 3: Heart
Add the following code for the DrawSpiral sub:
   Public Sub DrawSpiral(ByVal sender As Object, _
      ByVal e As System.Windows.Forms.PaintEventArgs)

      Dim PI As Double = 3.14159265358979
      '2.718281828 orientation
      Dim Orientation As Double = 3.356987413

      Dim penSpiral As New Pen(System.Drawing.Color.Blue)

      Dim cx As Integer
      Dim x As Integer
      Dim cy As Integer
      Dim y As Integer

      Dim rectSprial As New Rectangle(10, 10, 250, 250)

      cx = rectSprial.Width / 2
      cy = rectSprial.Height / 2

      Dim a As Single
      Dim b As Single
      Dim i As Long
      Dim ang As Double

      a = 0.15   'shape
      b = 0.15   'shape

      For i = 0 To 8000   'size of spiral

         ang = (PI / 720) * i

         x = cx + (a * (System.Math.Cos(ang)) * _
            (Orientation ^ (b * ang)))
         y = cy - (a * (System.Math.Sin(ang)) * _
            (Orientation ^ (b * ang)))

         'the higher the + number, the thicker the lines
         e.Graphics.DrawLine(penSpiral, x, y, x + 5, y + 5)

      Next i

   End Sub
Call the DrawSpiral sub as follows:
   Private Sub Form1_Paint(ByVal sender As Object, _
      ByVal e As System.Windows.Forms.PaintEventArgs) _
      Handles MyBase.Paint

      DrawSpiral(sender, e)


   End Sub
Spirals are different creatures… Anyway, here is what I did in the previous sub:
- I created the objects that will produce the resulting spiral.
- I created a rectangle object to establish the size of the resulting spiral.
- I used the For loop that physically creates the spiral.
Now, you need to understand math to really understand the logic behind the spiral creation process. It doesn’t mean that you cannot logically puzzle them out. Here is an explanation of how the spiral gets drawn mathematically.
You can now play around with this sub. Let’s say you change your code to look like the following:
   Public Sub DrawSpiral(ByVal sender As Object, _
      ByVal e As System.Windows.Forms.PaintEventArgs)

      Dim PI As Double = 3.14159265358979
      'Dim Orientation As Double = 3.356987413
      '2.718281828 orientation
      'orientation
      Dim Orientation As Double = 2.718281828

      Dim penSpiral As New Pen(System.Drawing.Color.Blue)

      Dim cx As Integer
      Dim x As Integer
      Dim cy As Integer
      Dim y As Integer

      Dim rectSprial As New Rectangle(10, 10, 250, 250)

      cx = rectSprial.Width / 2
      cy = rectSprial.Height / 2

      Dim a As Single
      Dim b As Single
      Dim i As Long
      Dim ang As Double

      a = 0.15   'shape
      b = 0.15   'shape

      For i = 0 To 8000   'size of spiral

         ang = (PI / 720) * i

         x = cx + (a * (System.Math.Cos(ang)) * _
            (Orientation ^ (b * ang)))
         y = cy - (a * (System.Math.Sin(ang)) * _
            (Orientation ^ (b * ang)))

         'the higher the + number, the thicker the lines
         e.Graphics.DrawLine(penSpiral, x, y, x + 5, y + 5)

      Next i

   End Sub
Notice the change? Yes, the spiral gets drawn from a different angle!
Change your code to:
   Public Sub DrawSpiral(ByVal sender As Object, _
      ByVal e As System.Windows.Forms.PaintEventArgs)

       Dim PI As Double = 3.14159265358979
      'Dim Orientation As Double = 3.356987413
      '2.718281828 orientation
      Dim Orientation As Double = 2.718281828   'orientation

      Dim penSpiral As New Pen(System.Drawing.Color.Blue)

      Dim cx As Integer
      Dim x As Integer
      Dim cy As Integer
      Dim y As Integer

      Dim rectSprial As New Rectangle(10, 10, 250, 250)

      cx = rectSprial.Width / 2
      cy = rectSprial.Height / 2

      Dim a As Single
      Dim b As Single
      Dim i As Long
      Dim ang As Double

      a = 0.15   'shape
      b = 0.15   'shape

      For i = 0 To 10000   'size of spiral

         ang = (PI / 720) * i

         x = cx + (a * (System.Math.Cos(ang)) * _
            (Orientation ^ (b * ang)))
         y = cy - (a * (System.Math.Sin(ang)) * _
             (Orientation ^ (b * ang)))

         'the higher the + number, the thicker the lines
         e.Graphics.DrawLine(penSpiral, x, y, x + 1, y + 1)

       Next i

   End Sub
Funky, isn’t it? You will notice that the spiral is not only larger, but it gives a much more polished look because the physical spiral line is not so thick. The Loop has increased, as well as the last line of code drawing the line was set to be smaller.
Here is some more information on:
The last segment of code produces the following picture:
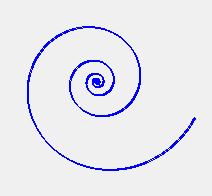
Figure 4: Spiral
Included in this article is the working sample project.
Conclusion
Thank you for reading. Until next time, cheers!