

NUnit 2.2.0 VB.NET Example from Scratch
One late night, while looking for best practices for .NET testing, I stumbled onto the Test Driven Development concept. Test Driven Development has put some of the practices that I have developed over time out of necessity into a coherent framework for the real-life application of a very useful mixture of important software development concepts such as UML’s Use Case Model, Quantifiable QA, and sensitive maintenance with refactoring.
At the heart of TDD practices implementation lies NUnit. It integrates with .NET and is KISS (keep it simple stupid)—intuitive to navigate and use. NUnit provides an automated testing framework for .NET. Following this intro, I have created a very rudimentary example of the use of NUnit with VB.NET. It will take you in 10 easy steps into the heart of TDD with NUnit.
The main objective of the example is to get you started with TDD using NUnit fast and with hands on. I have decided to post this example because if I had found something like this, I could have spent a couple more hours with my kids. For more information on TDD, go to http://www.agiledata.org/essays/tdd.html.
Some Basic Concepts
- <TestFixture()>: Identifies a Class that contains test code.
- <Test()>: Identifies test code to the NUnit runtime environment.
- <SetUp()>: Identifies code that would be run before the test code.
For more information on NUnit 2.2.0 syntax, go to: http://www.nunit.org/documentation.html.
- Download NUnit 2.2.0 (NUnit-2.2.0.msi) from http://www.nunit.org/download.html.
- Install NUnit 2.2.0.
- Download TestDriven.Net 1.0 (NUnit-2.2.0.msi) http://www.testdriven.net/.
- Install TestDriven.Net 1.0.
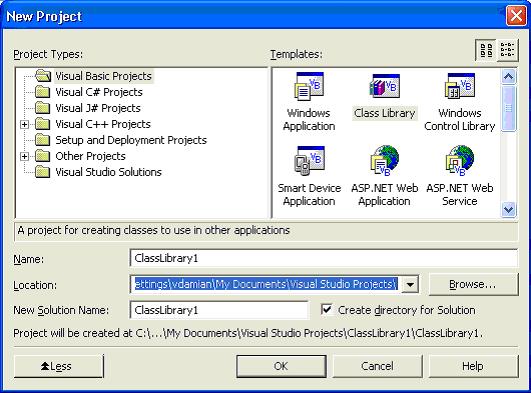
- Create a VB.NET project and select the Class Library.
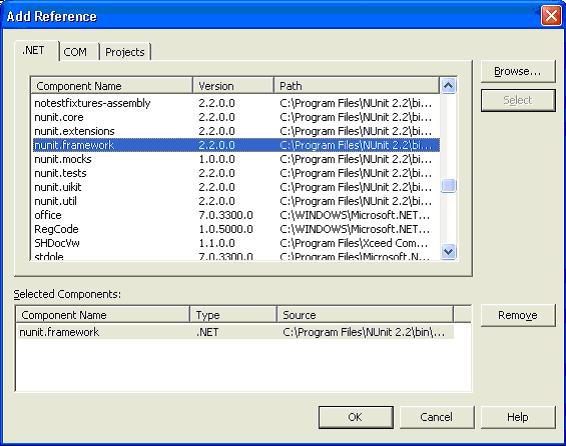
- Add a reference to the NUnit Framework.
- Write the class to test:
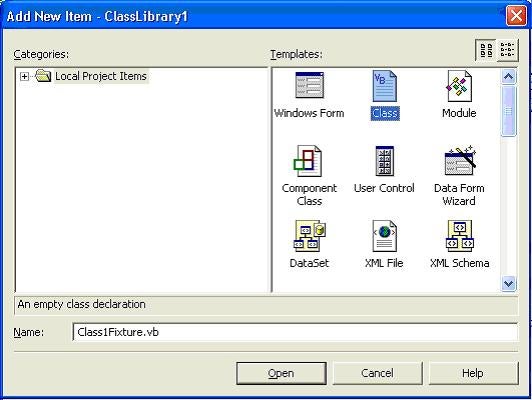
- Now, add your testing class.
- Write your testing code.
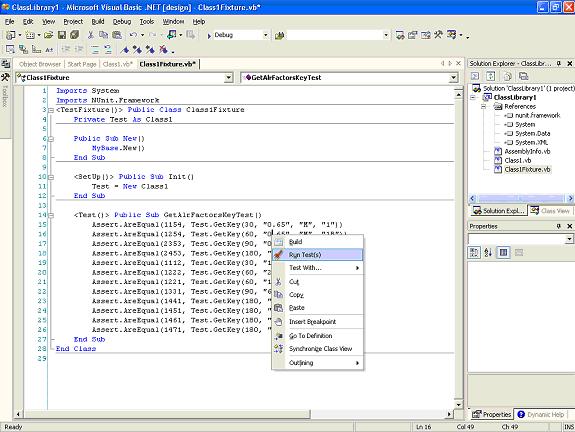
Here is the heart of TDD. The following code tests the GetKey method of the Test instance of Class1. It does so by using the Assert.AreEqual object from the NUnit.Framework library. The NUnit.Framework library objects provide Intellisense completion, so you will have fun getting to know them.
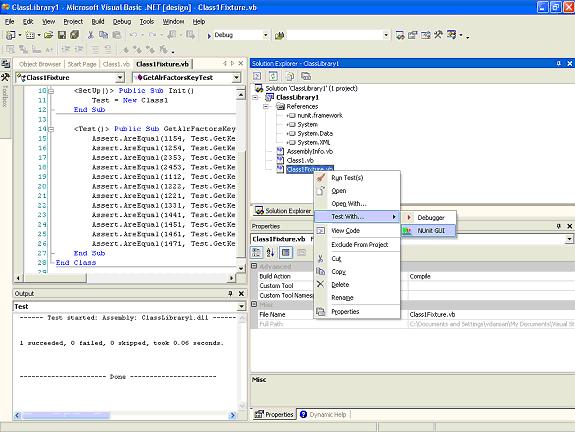
- Place your cursor on the testing code and select Run Test.

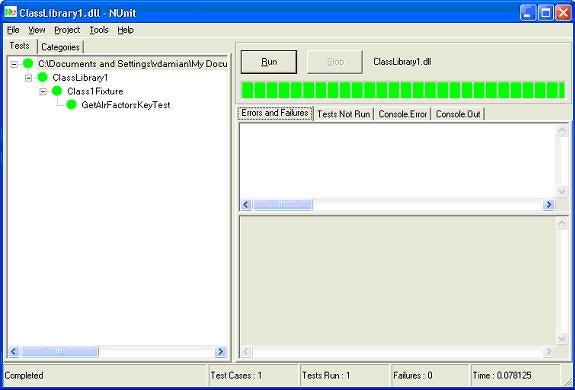
You will get the output window as follows:
- Now, right-click the testing class and select Test with -> NUnit. Press Run and don’t let the green grass fool you.
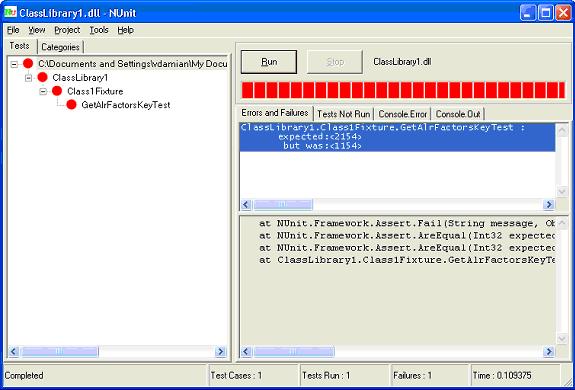
- Now, in the test class modify your code as follows; then perform step 9.
Note: You can select the typical installation process.
Note: You will have to register to download the program. Why install TestDriven.Net 1.0? Because it allows you to integrate diferent testing tools with the .NET IDE.
Note: You can select the typical installation process.
Public Class Class1

   'Private on Deployment
   'Public for testing
   Public Function GetKey(ByVal EP As Double, _
                          ByVal BP As String, _
                          ByVal Gender As String, _
                          ByVal OC As String) As Integer

      Dim key As Integer

      Try

         Select Case EP        'elimination period in days
            Case 30.0, Is < 30.0
               key += 100
            Case 60.0
               key += 200
            Case 90.0, 100.0
               key += 300
            Case 180.0, Is > 180.0
               key += 400
            Case Else
               key += 100
         End Select
         'TODO need to define BP standard for the Database
         Select Case BP        'benefit period in months
            Case "12"          '1YR
               key += 10
            Case "24", "18"    '2YRS, 18MO
               key += 20

            Case "60"          '5YRS
               key += 30
            Case "120"         '10YRS
               key += 40
            Case "0.65"        'TO65
               key += 50
            Case "0.67"        'TO67
               key += 60
            Case "0.99"        'TO99
               key += 70
            Case Else
               key += 70
         End Select
         Select Case Gender
            Case "M"           'Male
               key += 1000
            Case "F"           'Female
               key += 2000
            Case Else
               key += 1000
         End Select

         Select Case OC        'occupational class
            Case "1", "1B"
               key += 4
            Case "2", "1A"
               key += 3
            Case "3", "2A"
               key += 2
            Case "5", "4", "4A", "3A"
               key += 1
            Case Else
               key += 1
         End Select
         Return key
      Catch exp As Exception
         Debug.Write(exp.ToString)
      Finally

      End Try
   End Function

End Class
Imports System
Imports NUnit.Framework
<TestFixture()> Public Class Class1Fixture
   Private Test As Class1

   Public Sub New()
      MyBase.New()
   End Sub

   <SetUp()> Public Sub Init()
      Test = New Class1
   End Sub

   <Test()> Public Sub GetAlrFactorsKeyTest()
      Assert.AreEqual(1154, Test.GetKey(30,  "0.65",  "M", "1"))
      Assert.AreEqual(1254, Test.GetKey(60,  "0.65",  "M", "1B"))
      Assert.AreEqual(2353, Test.GetKey(90,  "0.65",  "F", "2"))
      Assert.AreEqual(2453, Test.GetKey(180, "0.65",  "F", "1A"))
      Assert.AreEqual(1112, Test.GetKey(30,  "12",    "M", "3"))
      Assert.AreEqual(1222, Test.GetKey(60,  "24",    "M", "2A"))
      Assert.AreEqual(1221, Test.GetKey(60,  "18",    "M", "5"))
      Assert.AreEqual(1331, Test.GetKey(90,  "60",    "M", "4"))
      Assert.AreEqual(1441, Test.GetKey(180, "120",   "M", "4A"))
      Assert.AreEqual(1451, Test.GetKey(180, "0.65",  "M", "3A"))
      Assert.AreEqual(1461, Test.GetKey(180, "0.67",  "M", ""))
      Assert.AreEqual(1471, Test.GetKey(180, "0.99",  "M", ""))
   End Sub
End Class
------ Test started: Assembly: ClassLibrary1.dll .

1 succeeded, 0 failed, 0 skipped, took 0.03 seconds.


---------------------- Done ----------------------
   <Test()> Public Sub GetAlrFactorsKeyTest()
      Assert.AreEqual(2154, Test.GetKey(30,  "0.65",  "M", "1"))
      Assert.AreEqual(3254, Test.GetKey(60,  "0.65",  "M", "1B"))
      Assert.AreEqual(4353, Test.GetKey(90,  "0.65",  "F", "2"))
      Assert.AreEqual(2453, Test.GetKey(180, "0.65",  "F", "1A"))
      Assert.AreEqual(1112, Test.GetKey(30,  "12",    "M", "3"))
      Assert.AreEqual(1222, Test.GetKey(60,  "24",    "M", "2A"))
      Assert.AreEqual(1221, Test.GetKey(60,  "18",    "M", "5"))
      Assert.AreEqual(1331, Test.GetKey(90,  "60",    "M", "4"))
      Assert.AreEqual(1441, Test.GetKey(180, "120",   "M", "4A"))
      Assert.AreEqual(1451, Test.GetKey(180, "0.65",  "M", "3A"))
      Assert.AreEqual(1461, Test.GetKey(180, "0.67",  "M", ""))
      Assert.AreEqual(1471, Test.GetKey(180, "0.99",  "M", ""))
   End Sub
Notice the failure detail and the obvious conclusion: Only the first failure is evident. Mmmmmm… Nothing is perfect
Happy testing, my fellow test driven newbies.