

Introduction
Welcome to today’s article! As you may know, I am very curious and I like to know how things work. Today’s topic is no exception! Today, I will show you how to unzip a file, or files, with VB 2013 and Windows 8.1. Let us get started.
Zip Files
I know I am probably wasting my time now, because we live in the 21st century and computers have been around for some time. So, I am basically trying to say that 99.9% of computer users should have encountered a zip file at some point in time before. Those people do not need an introduction to zip files. For the remaining 0.01%, a zipped file or folder is simply a compressed, compacted version of your file(s). This means that the content of the zip file is drastically smaller, making it a very comfortable way to transfer files from one computer to the next because a zip file can contain many files inside.
For more information on zip files, and how to get an unzip program, visit winzip.com‘s website.
A Sample Project
Today, I will demonstrate how to unzip files via the use of Windows 8.1 and VB 2013.
Design
Start Visual Studio 2013 and create a new Windows Store Application. If this is your first time doing Windows 8.1 development, I suggest you read the following articles first:
- Videos and VB.NET 2012 Part 4: Creating a Video Player for the Windows 8 Store
- Getting Started with Windows Phone 8 Programming
- Using the Microsoft Advertising SDK for Windows 8 Store with VB
- Async Programming with Visual Basic and Windows 8 / 8.1
You create a new Windows Store application by following these steps:
- Click File.
- Click New.
- Click Project.
- Select Visual Basic.
- Select Windows Store Apps, as shown in Figure 1:

Figure 1: New Windows Store Application
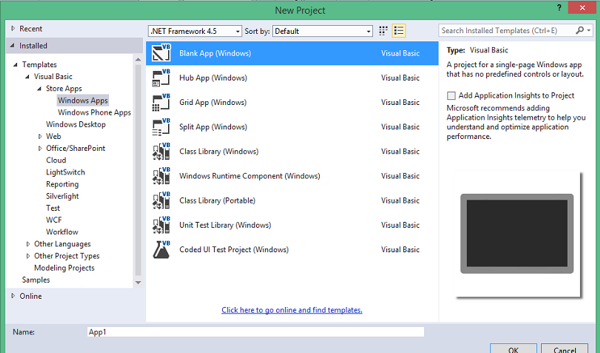
- Select Blank App.
- Type in a nice name for the project.
- Click OK.
This creates the Application and brings you to the design of MainPage.xaml. MainPage.xaml is your application (for now). Obviously, you can add more pages to your application, but this is the main entry point for your Windows 8.1 Store app.
If you are new to Windows 8.1 development, you will see that your “form” looks much different than what you may be accustomed to. This is because, in a Windows 8.1 app, you deal with pages instead of traditional Windows Forms. You also will notice that the controls inside the toolbox look very different than ordinary Windows controls, and, the Properties in the Properties Window works differently. Why am I telling you this? Well, because you have to realize that this is something completely different. It not only looks different, but you have to program the pages differently. This was the mistake I made when I had just started with Windows 8 and Windows 8.1 Store development. So, I am basically trying to open your eyes to a new world….
Add the following controls to your page:
- A button named btnUnzip
- A Textbox named txtFileName
| Note: In case you want to change the Button control’s text, have a look at the Content property inside the Properties Window. |
Once you have these controls set up, add a new Class to your project. You can add a new class to your project by following these steps:
- Click Project.
- Click Class.
- Select the Code item in the list.
- Click Class and give it a descriptive name. I have named mine Zippy, as in Figure 2:

Figure 2: Adding the class named Zippy
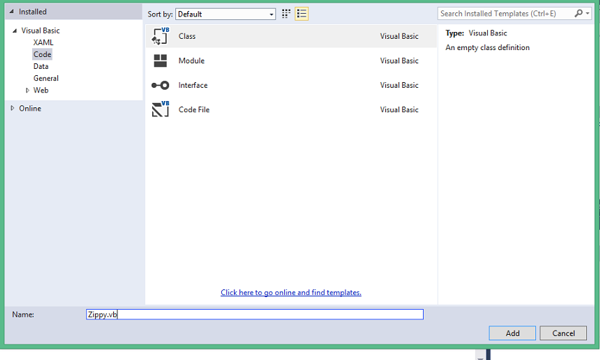
- Click Add and the new class will appear.
Code
The Design and the initial setup are done. Now, let us start coding. After all, that is why you are here today, isn’t it?
Zippy.vb
Make sure that the class Zippy is open in the code window. Add the following Imports statements:
Imports System.IO.Compression
Imports Windows.Storage
Imports Windows.Storage.Streams
Imports System.Threading.Tasks
Imports System.IO
Imports Windows.Foundation
These Imports will help all of the code I will use, work. System.IO.Compression assists in reading and writing compressed (zipped) files. Windows.Storage and Windows.Storage.Streams enable Windows to get access to your device’s storage area (your hard drive and its associated folders). System.Threading.Tasks helps your program make use of threads. If you have not heard of threads before, I suggest you read Introduction to Threading and VB.NET.
Add the first function to this class:
   Public Shared Function UnZipFileAsync(sfFile As StorageFile,
      sfDest As StorageFolder) As IAsyncAction

      Return UnZipFile(sfFile, sfDest).AsAsyncAction()

   End Function
This function calls the UnzipFile function that looks like:
   Private Shared Async Function UnZipFile(sfFile As StorageFile, _
      sfDest As StorageFolder) As Task

      If sfFile Is Nothing OrElse sfDest Is Nothing OrElse Not _
         Path.GetExtension(sfFile.Name).Equals(".zip", _
         StringComparison.OrdinalIgnoreCase) Then

         Throw New ArgumentException("Wrong File / File Does Not Exist")

      End If

      Dim streamZip As Stream = Await sfFile.OpenStreamForReadAsync()

      ' Create zip archive
      Using zaArchive As New ZipArchive(streamZip, ZipArchiveMode.Read)

         For Each file As ZipArchiveEntry In zaArchive.Entries

            Await UnzipZipArchiveEntryAsync(file, file.FullName, sfDest)

         Next

      End Using

   End Function
This function works asynchronously. Refer to the article, Async Programming, that I mentioned earlier. This function checks to see if a valid file or folder has been passed to it to be unzipped. If the file is not a zip file, or, if the specified location does not exist, it will throw an error. If a valid file and location have been passed, it will open the file as a stream and unzip each file via the call to the UnzipZipArchiveEntryAsync function that you should add now:
   Private Shared Async Function UnzipZipArchiveEntryAsync(entry As ZipArchiveEntry, _
      strFile As String, sfFolder As StorageFolder) As Task

      If IfFolder(strFile) Then
         ' Create sub folder
         Dim strSubFolder As String = Path.GetDirectoryName(strFile)

         Dim blnSubFolder As Boolean = Await IfFolderExistsAsync(sfFolder, _
            strSubFolder)

         Dim sfSubFolder As StorageFolder

         If Not blnSubFolder Then

            sfSubFolder = Await sfFolder.CreateFolderAsync(strSubFolder, _
               CreationCollisionOption.ReplaceExisting)

         Else

            sfSubFolder = Await sfFolder.GetFolderAsync(strSubFolder)

         End If

         Dim strPath As String = Path.GetFileName(strFile)

         If Not String.IsNullOrEmpty(strPath) Then

            Await UnzipZipArchiveEntryAsync(entry, strPath, sfSubFolder)

          End If

      Else

         Using streamEntry As Stream = entry.Open()

            Dim buffer As Byte() = New Byte(entry.Length - 1) {}

            streamEntry.Read(buffer, 0, buffer.Length)

            ' Create a file to store the contents
            Dim sfUncompressed As StorageFile = Await _
               sfFolder.CreateFileAsync(entry.Name, _
               CreationCollisionOption.ReplaceExisting)

            ' Store
            Using streamUncompressed As IRandomAccessStream = Await _
               sfUncompressed.OpenAsync(FileAccessMode.ReadWrite)

               Using streamOut As Stream = _
                  streamUncompressed.AsStreamForWrite()

                  streamOut.Write(buffer, 0, buffer.Length)

                  streamOut.Flush()

               End Using

            End Using

         End Using

      End If

   End Function
The first condition this function checks for is to make determine whether or not we are dealing with a zipped folder. The IfFolder function will be added later. If we are dealing with a folder, the function has to make sure that all the files and possible subfolders are extracted properly. We extract the file(s) and folder(s) recursively, by calling itself until done. If we are dealing with only a file, there is no need for recursion at all. We simply make use of the Stream’s capabilities to open and write each file’s contents to whatever location was specified.
Add the last two functions. These were called earlier in the previous function.
   Private Shared Function IfFolder(strZipEntry As String) As Boolean

      If String.IsNullOrEmpty(strZipEntry) Then

         Return False

      End If

      Return strZipEntry.Contains("\")

   End Function

   Private Shared Async Function _
      IfFolderExistsAsync(sfFolder As StorageFolder, _
      strSubFolder As String) As Task(Of Boolean)

      Try

         Dim siItems As IStorageItem = Await _
            sfFolder.TryGetItemAsync(strSubFolder)

         Return (siItems IsNot Nothing)

      Catch

          Return False

      End Try

   End Function
As mentioned earlier, these two functions just ensure that we are dealing with valid folders.
MainPage.xaml.vb
The unzipping logic is now done. Now, you have to edit the MainPage.xaml page to work with this class. Add the following Imports to your MainPage.xaml.vb file:
Imports Windows.Storage
Imports Windows.Storage.AccessCache
Imports Windows.Storage.Pickers
This simply gives you access to the Storage area of your device and gives File or Folder picking capabilities. Pickers are simply Open file or Open Folder dialogs.
Add the following code behind the btnUnzip button:
      Dim z As New Zippy

      Dim fpPicker As New FolderPicker()
      fpPicker.SuggestedStartLocation = _
         PickerLocationId.DocumentsLibrary

      fpPicker.FileTypeFilter.Add(".zip")

      Dim sfDest As StorageFolder = Await _
         fpPicker.PickSingleFolderAsync()
      Dim strFileName As String = txtFileName.Text

      Dim sfFile As StorageFile = Await _
         sfDest.CreateFileAsync(strFileName, _
         CreationCollisionOption.GenerateUniqueName)
      Dim sfUnzipLoc As StorageFolder = Await _
         sfDest.CreateFolderAsync(Path.GetFileNameWithoutExtension(sfFile.Name), _
         CreationCollisionOption.GenerateUniqueName)


      If sfDest IsNot Nothing Then

         StorageApplicationPermissions.FutureAccessList.AddOrReplace("PickedFolderToken", sfDest)

      Else
         Return

      End If

      Await Zippy.UnZipFileAsync(sfFile, sfUnzipLoc)

   End Sub
Here, I simply created a new FolderPicker object and customized it to show zip files only. I added the chosen folder’s location to the txtFileName textbox. Lastly, I dynamically created a new file stream and called the UnzipFileAsync method to unzip the files and folders to the specified location.
Conclusion
As you can see, once you know the basics of how something works, it is easy to implement that logic into your own apps. I hope you have learned from this article. Until next time, cheers!