

Introduction
I’m a VB guy. Always have been, and always will be. Technology keeps on changing, and sometimes I think when will it stop? Will the earth eventually be filled with robots? Will all the workers be replaced by robots? Probably. Time will tell. Now, as I’ve said, I love VB, although I am quite good with C# and Java as well. The one thing that really makes me sad (as a VB guy) is the fact that VB always has to play second fiddle to C#.
If you were to take a look at the XNA game studio for example, 99% of Microsoft samples are created for C#. 99% of all the web resources are solely dedicated to C#. So, if a VB guy like me wants to learn something new (without learning a whole new language) I have to figure everything out mostly on my own. That sucks.
Anyways, enough ranting from my side. Today I will demonstrate in Part 3 of my Videos and VB article series how simple it is to play a video through XNA, but how complicated it is just to get the right tools for the job.
Before we can start with the design and code, we need to ensure that we have the correct tools to create Windows 7-8 games.
What is needed?
- Minimum Visual Studio 2010 with Service Pack 1
- XNA Game Studio 4.0
- XNA Game Studio 4.0 Refresh
- Minimum Windows Phone 7.1 SDK
Without these basic requirements, you will not be able to do much with XNA and Visual Basic.
Where do I get these tools?
- Microsoft XNA Game Studio 4.0
- Microsoft XNA Game Studio 4.0 Refresh
- Windows Phone 7.1 SDK
- Microsoft Visual Studio 2010 Service Pack 1
Obviously these are the bare minimum requirements. If you were to have Visual Studio 2012 however, you might not need all of the above depending on your installation options. This article serves as a means to get the right tools in order to work with XNA.
Design
After you have installed the above tools and SDKs you will be able to program anything with XNA and VB.NET
You can fire up your version of Visual Studio, and select Visual Basic. You should notice a new Template (as shown in Figure 1) named XNA Game Studio 4.0; select it. Select Windows Game and give your project a descriptive name.
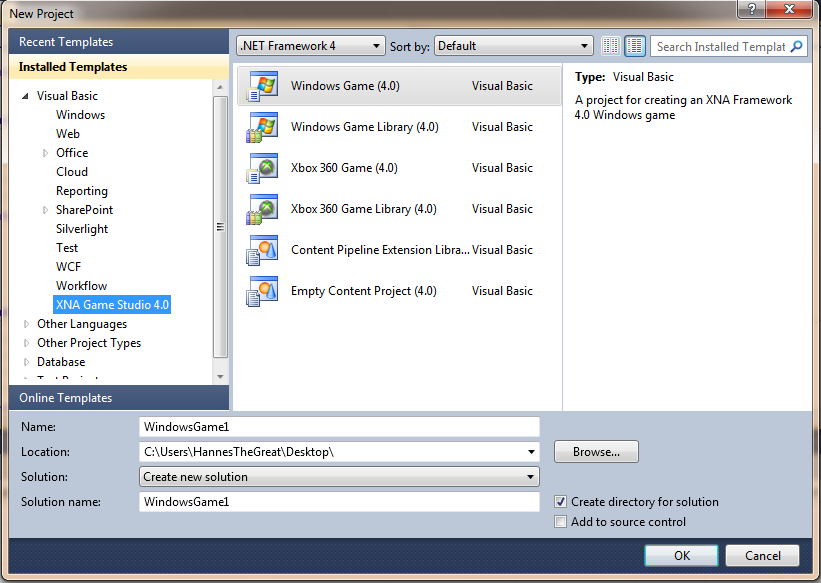
Figure 1 – New Project Templates
What is XNA Precisely?
Before we start coding, let us see what we will be dealing with. According to Wikipedia:
Microsoft XNA is a set of tools with a managed runtime environment provided by Microsoft that facilitates video game development and management. XNA is based on the .NET Framework, with versions that run on Windows, Windows Phone and Xbox. In many respects, XNA can be thought of as a .NET analog to Microsoft’s better known game development system, DirectX, but it is aimed at developers primarily interested in writing lightweight games that run on a variety of Microsoft platforms. XNA is the basic platform for Xbox Live Indie Games.
Getting to Know your XNA Project Screen
Your Solution Explorer will look like Figure 2.
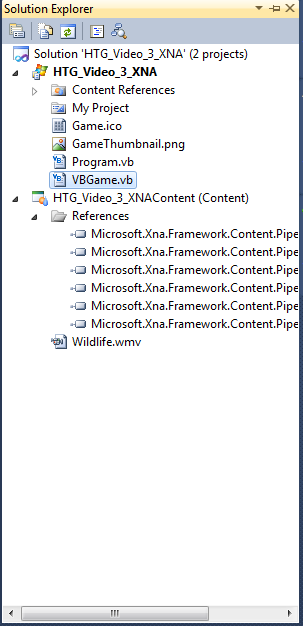
Figure 2 – Solution Explorer
You will notice that there seems to be two different projects inside. An XNA Game Studio solution contains a single content project to contain game assets to be managed through the Content Pipeline. This means that whatever video we would like to display should be included under the content section. In the above example, I have copied Wildlife.wmv from my C:\Users\Public\Videos\Sample Videos directory. For your example, you can copy any video, but just remember to update it in your code as well.
Coding
Upon project creation, a lot of code is inserted automatically for us. A GraphicsDeviceManager object and a SpriteBatch object is automatically created for us. The class constructor is created. The Initialize, LoadContent, UnloadContent, Update and Draw events have also been created for us.
All we need to do is to literally fill in the blanks.
First let us add an additional reference. Click Project, Click Add reference. On the .NET tab, scroll down towards Microsoft.Xna.Framework.Video and add a reference to it.
Add the following Import statements above your class definition:
Imports Microsoft.Xna.Framework
Imports Microsoft.Xna.Framework.Media
Add the next two objects, just underneath the SpriteBatch object declaration:
    Private vidVideo As Video
    Private vpvidPlayer As New VideoPlayer()
vidVideo will be our physical video we will load and VideoPlayer will play the video.
Add the next line into LoadContent:
vidVideo = Content.Load(Of Video)("Wildlife")
This loads the video named Wildlife into memory. If you have a different video name, obviously you’d have to change this line to reflect your video file.
In the Update event, add the following :
vpvidPlayer.Play(vidVideo)
This plays our video.
Add the next three lines inside your Draw method:
        spriteBatch.Begin()
        spriteBatch.Draw(vpvidPlayer.GetTexture(), New Rectangle(0, 0, vidVideo.Width, vidVideo.Height), Color.CornflowerBlue)
        spriteBatch.[End]()
This identifies what the SpirteBatch should do and what it should draw.
Simple. Easy Peasy. With the right tools…
In case of confusion, I am attaching my working project below, sans the video file. Here is the complete source code:
Imports Microsoft.Xna.Framework
Imports Microsoft.Xna.Framework.Media

''' This is the main type for your game
Public Class VBGame
    Inherits Microsoft.Xna.Framework.Game

    Private WithEvents graphics As GraphicsDeviceManager
    Private WithEvents spriteBatch As SpriteBatch

     ''' ''''''''''''''''''''added reference to xna.video
    Private vidVideo As Video
    Private vpvidPlayer As New VideoPlayer()

    Public Sub New()
        graphics = New GraphicsDeviceManager(Me)
        Content.RootDirectory = "Content"
    End Sub

    ''' Allows the game to perform any initialization it needs to before starting to run.
    ''' This is where it can query for any required services and load any non-graphic
    ''' related content.  Calling MyBase.Initialize will enumerate through any components
    ''' and initialize them as well.

    Protected Overrides Sub Initialize()
        ' TODO: Add your initialization logic here
        MyBase.Initialize()
    End Sub


    ''' LoadContent will be called once per game and is the place to load
    ''' all of your content.

    Protected Overrides Sub LoadContent()
        ' Create a new SpriteBatch, which can be used to draw textures.
        spriteBatch = New SpriteBatch(GraphicsDevice)

        vidVideo = Content.Load(Of Video)("Wildlife")
        ' TODO: use Me.Content to load your game content here
    End Sub

    ''' UnloadContent will be called once per game and is the place to unload
    ''' all content.

    Protected Overrides Sub UnloadContent()
        ' TODO: Unload any non ContentManager content here
    End Sub

    ''' Allows the game to run logic such as updating the world,
    ''' checking for collisions, gathering input, and playing audio.

    Protected Overrides Sub Update(ByVal gameTime As GameTime)
        ' Allows the game to exit
        If GamePad.GetState(PlayerIndex.One).Buttons.Back = ButtonState.Pressed Then
            Me.Exit()
        End If
        vpvidPlayer.Play(vidVideo)

        ' TODO: Add your update logic here
        MyBase.Update(gameTime)
    End Sub

    ''' This is called when the game should draw itself.
    Protected Overrides Sub Draw(ByVal gameTime As GameTime)
        GraphicsDevice.Clear(Color.CornflowerBlue)

        spriteBatch.Begin()
        spriteBatch.Draw(vpvidPlayer.GetTexture(), New Rectangle(0, 0, vidVideo.Width, vidVideo.Height), Color.CornflowerBlue)
        spriteBatch.[End]()

        ' TODO: Add your drawing code here
        MyBase.Draw(gameTime)
    End Sub

End Class
Conclusion
I hope you have learned from this article and that it was useful to you. Watch for the last part in this series where I will cover Videos with Windows 8 and VB. Until then, have fun!