

What is the Today Plug-In?
You obviously know what the Today screen is. You see it every time with the Microsoft logo (or whatever picture you’ve put beneath). And, you definitely won’t be surprised to know that the Today custom component is just a DLL. The only additional fact you should know about it is that such a DLL should export two predefined functions with the given ordinal number:
; Contents of .DEF file
LIBRARY CustomItem

EXPORTS
InitializeCustomItem        @240    NONAME
CustomItemOptionsDlgProc    @241    NONAME
Being more precise, only the first function is a must. The second one is required if you want to provide an Options dialog for your component. Before you will dig in into code samples, let me highlight a couple of trivial things regarding Today components.
First, your DLL will be loaded at startup by the shell and won’t be released until you turn off or reset the device. Unchecking the component in Today’s settings panel does not help you at all. Thus, it’s pretty hard to debug it. To release the problematic DLL, you should manually change the Registry settings and then reset the PDA.
The next thing to be considered is a place on the screen covered by your component. Due to lack of screen size, you should produce a relatively small-dimensioned GUI. Moreover, if there are too many Today items simultaneously presented on the screen, Windows CE adds a scroll bar, so the actual screen width will be smaller that the standard 240 pixels.
Installing Your Custom Today Item
Your component should be registered to let the OS know about its existence. Literally, it means to make some changes in the Tegistry. You can do it either by preparing a .cab file or developing your own application to update the CE registry. Below is the .inf-file section to command the installer to make the Registry changes:
[Registry.All]
; DWORD, Custom Items must always have Type = 4
HKLM,Software\Microsoft\Today\Items\CustomItem,Type,0x00010001,4
; DWORD
HKLM,Software\Microsoft\Today\Items\CustomItem,Enabled,0x00010001,1
; DWORD, If you're providing "Options" dialog, set this value to 1
HKLM,Software\Microsoft\Today\Items\CustomItem,Options,0x00010001,0
; STRING, This value keeps path to your DLL
HKLM,Software\Microsoft\Today\Items\CustomItem,DLL,0x00000000,
     "CustomItem.dll"
; DWORD, This value allows getting notifications by your component,
         set it to 2
HKLM,Software\Microsoft\Today\Items\CustomItem,Selectability,
     0x00010001,2
The following table gives you a short explanations of the Registry values:
| Value Name and Type | Description |
|---|---|
| DWORD: Type | Custom Items must have Type = 4 |
| DWORD: Enabled | 0 or 1; 1 causes Today panel to show your component; nevertheless, the user can control it via the Today applet in the Control Panel |
| DWORD: Options | if equals 1, the “Options” button in the Today applet will be enabled |
| SZ: DLL | Pull path to your component |
| DWORD : Selectability | New feature in Win Mobile 2003 SE; allows receiving additional notifications Values are used as follows:
|
In case you’ll want to develop your own registration program, following are a few tips of doing it more easily:
To Install
- Place the component DLL in the desired folder
- Add appropriate values to the Registry (see above)
- Send a broadcast message to cause the OS to accept changes:
SendMessage(HWND_BROADCAST, WM_WININICHANGE, 0xF2, 0)
To Uninstall
- Remove the key you created during Install (HKLM\SOFTWARE\Microsoft\Today\Items\YOURCOMPONENT)
- Send a broadcast message to cause the OS to accept changes:
SendMessage(HWND_BROADCAST, WM_WININICHANGE, 0xF2, 0); - Wait to let the OS release your component DLL
- Delete the DLL
Initializing a Custom Item
As you have told learned, your DLL will export two functions: InitializeCustomItem and optionally CustomItemOptionsDlgProc. In most cases, you’ll want to draw one or more icons or images. An important thing to be noted is that you should load all required resources at attaching the DLL and then release them when you exit:
HICON            g_hIcon;
HINSTANCE        g_hInst;
HWND             g_hWnd;
...
BOOL APIENTRY DllMain( HANDLE hModule, DWORD ul_reason_for_call,
                       LPVOID lpReserved)
{
   switch (ul_reason_for_call)
   {
   case DLL_PROCESS_ATTACH:

      // The DLL is being loaded for the first time by a given process.
      // Perform per-process initialization here. If the initialization
      // is successful, return TRUE; if unsuccessful, return FALSE.
      g_hInst = (HINSTANCE)hModule;

      //load the icon
      g_hIcon = (HICON)LoadImage(g_hInst,MAKEINTRESOURCE(IDI_DISPLAYICON),
                                 IMAGE_ICON,16,16,LR_DEFAULTCOLOR );

      //intialize the application class, and set the global window handle
      UnregisterClass((LPCTSTR)LoadString
                      (g_hInst, IDS_CUSTOM_ITEM_APPNAME,0,0), g_hInst);

      // Proceed component initialization
        InitilizeComponent();

      g_hWnd = 0;

      break;

   case DLL_PROCESS_DETACH:
      // The DLL is being unloaded by a given process. Do any
      // per-process clean up here, such as undoing what was done in
      // DLL_PROCESS_ATTACH. The return value is ignored.

      DestroyIcon(g_hIcon);

      UnregisterClass((LPCTSTR)LoadString
                      (g_hInst, IDS_TODAY_STORAGE_APPNAME,0,0), g_hInst);
      g_hInst = NULL;
      break;
   }

   return TRUE;
}
InitializeComponent simply creates and registers a window class for your custom Today item. The shell will call the InitializeCustomItem function when it attempts to create it initially. This function is responsible for all initialization procedures, windows creation, and so forth. Here, you actually initialize all your internal stuff. Below some sample implementation is presented:
HWND InitializeCustomItem(TODAYLISTITEM *ptli, HWND hwndParent)
{
   LPCTSTR appName = (LPCTSTR)LoadString
                     (g_hInst,IDS_TODAY_STORAGE_APPNAME,0,0);

   //create a new window
   g_hWnd = CreateWindow(appName,appName,WS_VISIBLE | WS_CHILD,
      CW_USEDEFAULT,CW_USEDEFAULT,240,0,hwndParent, NULL, g_hInst, NULL) ;

   // create the storage space progress bar
   g_hBatteryProgressBar =
      CreateWindow(PROGRESS_CLASS, TEXT("Battery Progress Bar"),
      WS_CHILD | PBS_SMOOTH, CW_USEDEFAULT,CW_USEDEFAULT,
      CW_USEDEFAULT, CW_USEDEFAULT,g_hWnd, NULL, g_hInst, NULL);
   SendMessage(g_hBatteryProgressBar,PBM_SETSTEP,1,NULL);

   // create the program memory progress bar
   g_hProgramProgressBar =
      CreateWindow(PROGRESS_CLASS, TEXT("Program Progress Bar"),
      WS_CHILD | PBS_SMOOTH, CW_USEDEFAULT,CW_USEDEFAULT, CW_USEDEFAULT,
      CW_USEDEFAULT,g_hWnd, NULL, g_hInst, NULL);
   SendMessage(g_hProgramProgressBar,PBM_SETSTEP,1,NULL);

   // create the storage space progress bar
   g_hStorageProgressBar =
      CreateWindow(TRACKBAR_CLASS, TEXT("Storage Track Bar"),
      WS_CHILD | TBS_AUTOTICKS | TBS_BOTTOM,
      CW_USEDEFAULT,CW_USEDEFAULT, CW_USEDEFAULT, CW_USEDEFAULT,
      g_hWnd, NULL, g_hInst, NULL);
   SendMessage(g_hStorageProgressBar, TBM_SETRANGE, 1,
               MAKELPARAM(0,100));

   // attach our winproc to the newly created window
   SetWindowLong(g_hWnd, GWL_WNDPROC, (LONG) WndProc);

   //display the window
   ShowWindow (g_hWnd, SW_SHOWNORMAL);
   UpdateWindow (g_hWnd) ;

   return g_hWnd;
}
In your sample, you will implement an informational panel to show different, useful system info:
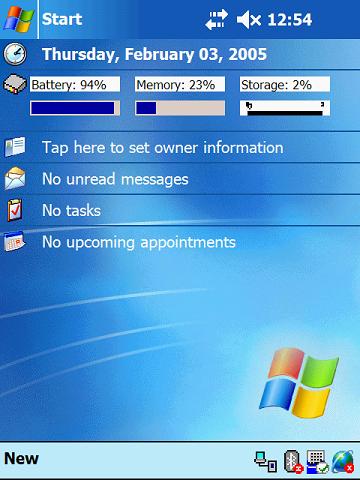
You can see similar implementation; for example, on a HP iPaq 2410. For simplicity, you won’t deal with the options dialog. So, coming back to the above snippet, InitializeCustomItem makes a ‘black job’ of component initialization. Pay attention that it doesn’t paint anything. All forthcoming messages will be handled in WndProc.